This tutorial aims to guide you through the process of creating an audio room experience reminiscent of platforms such as Twitter Spaces or Clubhouse. The outcome, as depicted in the image below, will encompass the following functionalities:
- Backstage Mode: Initiate the call with your co-hosts, allowing for pre-live discussions.
- Global Edge Network: Calls operate on Stream's worldwide edge network, ensuring low latency and scalability.
- No Listener Limit: Rooms can accommodate an unlimited number of listeners.
- Raised Hand Feature: Listeners can indicate their desire to speak by raising their hand and subsequently being invited by the host.
- Enhanced Audio Reliability: Audio tracks are transmitted multiple times to enhance overall reliability.
Step 1 - Create a new React Native app
To create a new React Native app, you'll first need to set up your environment. Once you're set up, continue with the steps below to create an application and start developing.
You can use React Native Community CLI to generate a new project. Let's create a new React Native project called "AudioRoomExample":
12npx @react-native-community/cli@latest init AudioRoomExample
cd AudioRoomExample
If you are having trouble with iOS, try to reinstall the dependencies by running:
cd iosto navigate to theiosfolderbundle installto install Bundlerbundle exec pod installto install the iOS dependencies managed by CocoaPods
Step 2 - Install the SDK and declare permissions
In order to install the Stream Video React Native SDK, run the following command in your terminal of choice:
1yarn add @stream-io/video-react-native-sdk @stream-io/react-native-webrtc
The SDK requires installing some peer dependencies. You can run the following command to install them:
1234567yarn add react-native-incall-manager
yarn add react-native-svg
yarn add @react-native-community/netinfo
yarn add @notifee/react-native

# Install pods for iOS
npx pod-install
Declare permissions
In AndroidManifest.xml add the following permissions before the application section.
1234567891011121314<manifest xmlns:android="http://schemas.android.com/apk/res/android">
  <uses-feature android:name="android.hardware.audio.output" />
  <uses-feature android:name="android.hardware.microphone" />
  <uses-permission android:name="android.permission.RECORD_AUDIO" />
  <uses-permission android:name="android.permission.ACCESS_NETWORK_STATE" />
  <uses-permission android:name="android.permission.CHANGE_NETWORK_STATE" />
  <uses-permission android:name="android.permission.MODIFY_AUDIO_SETTINGS" />
  <uses-permission android:name="android.permission.INTERNET" />
  ...
  <application
    ...
  />
  </application>
</manifest>
Add the following keys and values to Info.plist file, under dict tag.
12345678910<plist version="1.0">
<dict>
  ...
  <key>CFBundleName</key>
  <string>$(PRODUCT_NAME)</string>
  <key>NSMicrophoneUsageDescription</key>
  <string>$(PRODUCT_NAME) would like to use your microphone</string>
  ...
</dict>
</plist>
Android Specific installation
In android/build.gradle add the following inside the buildscript section:
1234567buildscript {
    ext {
        ...
        minSdkVersion = 24
    }
    ...
}
Run the app
To ensure the best possible experience, we highly recommend running the app on a physical device. This is due to the limitations in audio and video device support on emulators. You can refer to the React Native documentation for guidance on running the app on a physical device.
However, if you still prefer to use an emulator, execute the following command:
12345# run iOS app
yarn ios

# run Android app
yarn android
Step 3 - Understand the basics
Before we dive deep into writing code, there are two concepts you should be familiar with - StreamVideoClient and Call.
client, an instance of StreamVideoClient class, is the low level client used by the SDK to communicate with the Stream services.
It provides all the necessary methods to connect a user to the Stream service, query calls, create call etc.
call, an instance of the Call class,
is utilized for performing call-specific actions, such as joining a call, muting participants, leaving a call, and more.
1234567891011121314151617181920212223// create client instance
const client = new StreamVideoClient({ apiKey, user, token });

// Alternatively you can also choose to separate client creation and user connection:
// const client = new StreamVideoClient({ apiKey });
// await client.connectUser(user, token);

// create a call instance
const call = client.call('audio_room', callId);
call.join({
  create: true, // create the call if it doesn't exist
  data: {
    members: [{ user_id: 'mark' }, { user_id: 'sara', role: 'speaker' }],
    custom: {
      // custom data set on call
      title: 'React Native test',
      description: 'Conducting a test of React Native Audio Rooms',
    },
  },
});

// Host makes the call live
call.goLive();
In this example
apiKeyis the API key of your Stream Video application available on dashboarduseris the user object{ id: "john_smith", "name": "John Smith" }- and
tokenis the user token generated by your server-side API. For development purpose, you can use the token generated by the Token Generator. You can read more information about client authentication on the Client & Authentication guide.
A call of type audio_room can exist in either of two states: backstage and live.
- During the backstage mode, only the host and designated speakers have permission to join the call.
- In the live mode, anyone can join the call.
From the dashboard you can disable backstage mode or fine tune the permissions for backstage mode.
React Native SDK Components
The client instance and the call instance are made accessible to all the video components from SDK via StreamVideo component and StreamCall component respectively.
In your app you need to wrap your component tree with StreamVideo component and provide the client instance to it as a prop.
Client creation would normally take place during sign-in stage of the application.
And similarly you need to wrap your call specific UI components with StreamCall component and provide the call instance to it as a prop.
StreamVideo and StreamCall components are context providers, and they enable you to consume hooks provided by the SDK.
These hooks do all the heavy lifting around call management and provide you with the necessary state and methods to build your UI.
1234567891011import { StreamCall, StreamVideo } from '@stream-io/video-react-native-sdk';

// ...

<StreamVideo client={client}>
  <StreamCall call={call}>
    <View>
      <Text>My Video Call UI</Text>
    </View>
  </StreamCall>
</StreamVideo>
Step 4 - Setup Starter UI
Lets begin by creating a basic UI for our audio room.
Normally you would use a navigation library like React Navigation to navigate between screens.
But for this tutorial we'll keep it simple and mock the navigation using a state variable - activeScreen.
Within your tutorial app, create a folder named src and create the following files within it:
src/HomeScreen.tsxsrc/CallScreen.tsxsrc/AudioRoomUI.tsx
Now copy the following content into the respective files (as mentioned in header):
123456789101112131415161718192021222324252627282930313233import React, { useState } from 'react';
import { SafeAreaView, StyleSheet } from 'react-native';
import { HomeScreen } from './src/HomeScreen';
import { CallScreen } from './src/CallScreen';

const apiKey = 'REPLACE_WITH_API_KEY';
const token = 'REPLACE_WITH_TOKEN';
const userId = 'REPLACE_WITH_USER_ID';
const callId = 'REPLACE_WITH_CALL_ID';

export default function App() {
  const [activeScreen, setActiveScreen] = useState('home');
  const goToCallScreen = () => setActiveScreen('call-screen');
  const goToHomeScreen = () => setActiveScreen('home');

  return (
    <SafeAreaView style={styles.container}>
      {activeScreen === 'call-screen' ? (
        <CallScreen goToHomeScreen={goToHomeScreen} callId={callId} />
      ) : (
        <HomeScreen goToCallScreen={goToCallScreen} />
      )}
    </SafeAreaView>
  );
}

const styles = StyleSheet.create({
  container: {
    flex: 1,
    justifyContent: 'center',
    textAlign: 'center',
  },
});
123456789101112131415161718192021222324252627import React from 'react';
import { Button, StyleSheet, Text, View } from 'react-native';

type Props = { goToHomeScreen: () => void };

export const AudioRoomUI = ({ goToHomeScreen }: Props) => {
  return (
    <View style={styles.container}>
      <Text style={styles.text}>Here we will add Audio Room UI</Text>
      <Button title='Leave Audio Room' onPress={goToHomeScreen} />
    </View>
  );
};

const styles = StyleSheet.create({
  container: {
    flex: 1,
    padding: 4,
    justifyContent: 'center',
  },
  text: {
    fontSize: 20,
    fontWeight: 'bold',
    marginBottom: 20,
    textAlign: 'center',
  },
});
12345678import React from 'react';
import { AudioRoomUI } from './AudioRoomUI';

type Props = { goToHomeScreen: () => void; callId: string };

export const CallScreen = ({ goToHomeScreen, callId }: Props) => {
  return <AudioRoomUI goToHomeScreen={goToHomeScreen} />;
};
123456789101112131415161718192021222324import React from 'react';
import { View, Text, Button, StyleSheet } from 'react-native';

type Props = {
  goToCallScreen: () => void;
};

export const HomeScreen = ({ goToCallScreen }: Props) => {
  return (
    <View>
      <Text style={styles.text}>Welcome to Audio Room Tutorial</Text>
      <Button title='Join Audio Room 🎧' onPress={goToCallScreen} />
    </View>
  );
};

const styles = StyleSheet.create({
  text: {
    fontSize: 20,
    fontWeight: 'bold',
    marginBottom: 20,
    textAlign: 'center',
  },
});
In App.tsx we have hardcoded the placeholders of apiKey, userId, token and callId for simplicity of tutorial.
To actually run this sample we need a valid user token.
The user token is typically generated by your server side API.
When a user logs in to your app you return the user token that gives them access to the call.
In actual application you will want to store apiKey in a secure storage or in environment file.
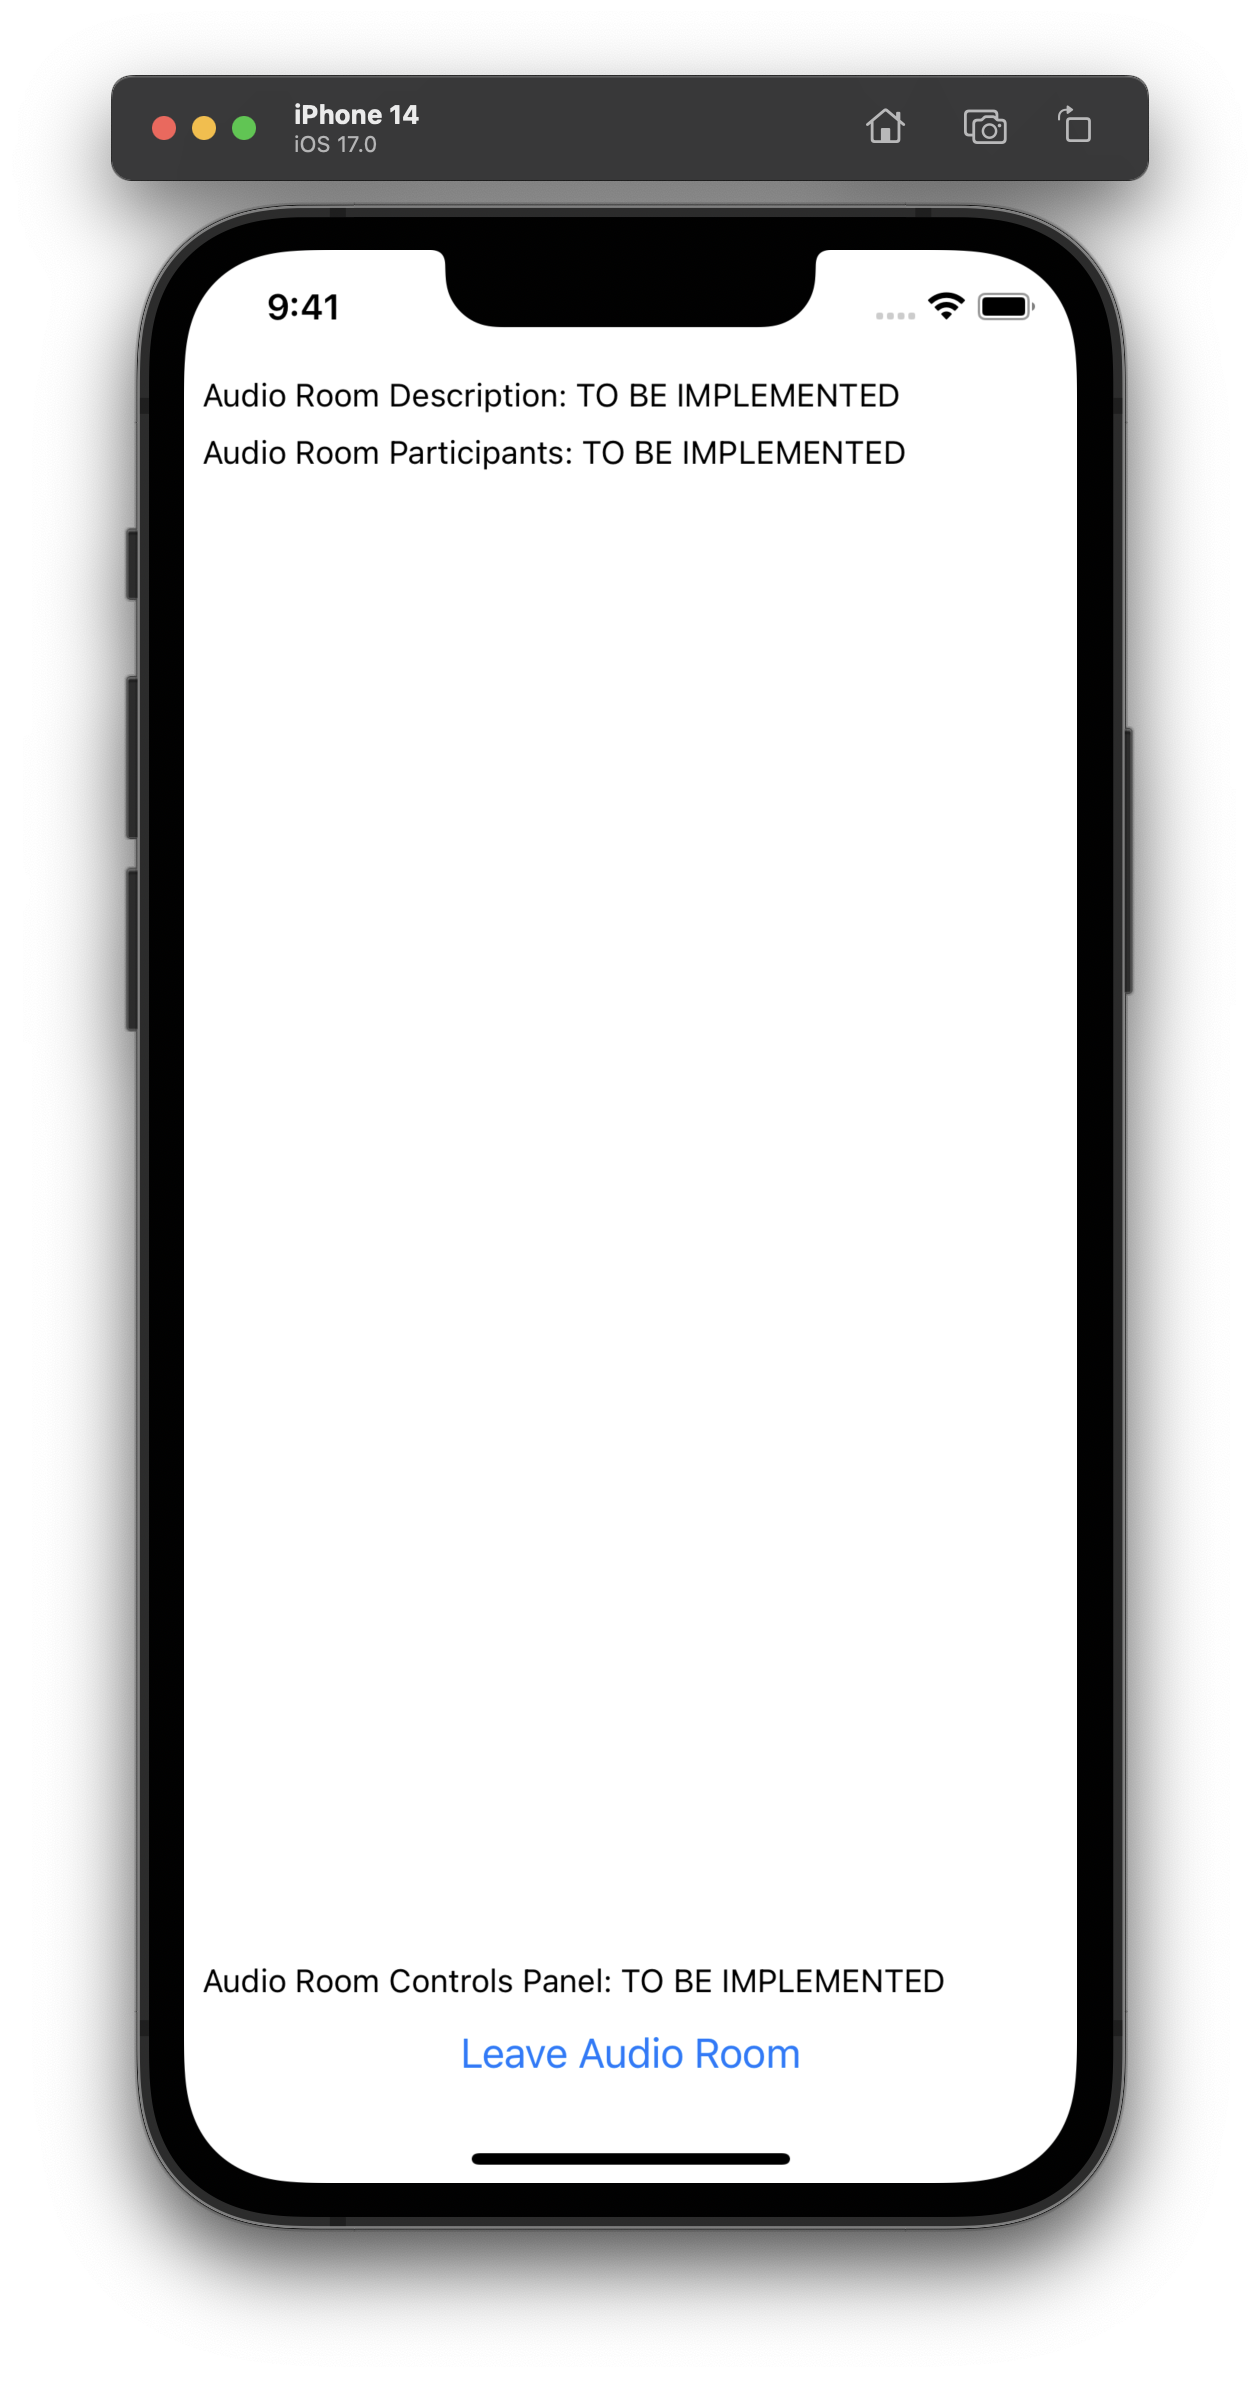
You should see on your emulator or device the following UI.
 Preview of the Home Screen
![]() Preview of empty audio room
Preview of empty audio room
Step 5 - Setup Video Client
Within this configuration, we will establish a StreamVideoClient instance and facilitate the user's connection to the Stream service.
In real application, client creation should be encapsulated within a useEffect hook and during unmount you should call client.disconnectUser()
to avoid creating multiple websockets.
The client instance needs to be passed to the StreamVideo component so it can provide it to all child components.
It usually goes at the top of the component tree.
12345678910111213141516171819202122232425// ... other imports
import {
  StreamVideo,
  StreamVideoClient,
} from '@stream-io/video-react-native-sdk';

// ... other code (api key, token, call_id, etc)

const user = {
  id: userId,
  name: 'John Malkovich',
  image: `https://getstream.io/random_png/?id=${userId}&name=John+Malkovich`,
};
const client = new StreamVideoClient({ apiKey, user, token });

export default function App() {
  // ... other code (activeScreen, goToCallScreen, goToHomeScreen)
  return (
    <StreamVideo client={client}>
      <SafeAreaView style={styles.container}>
        ...
      </SafeAreaView>
    </StreamVideo>
  );
}
You wouldn't see any change in the UI at this point, since we haven't joined the call yet.
To re-run the app, use the following command and follow the instructions:
1234yarn start

# For Android type 'a'
# For iOS type 'i'
Step 6 - Create & Join a call
In this step we will create and join a call.
The call will be stored in a state variable call and it needs to be provided to StreamCall component.
As explained earlier, StreamCall component is provided by the SDK and it provides all the necessary hooks for configuring UI around audio room.
We will explore these hooks later in the tutorial.
Open up src/CallScreen.tsx and replace it with this code:
12345678910111213141516171819202122232425262728// ... other imports
import { StyleSheet, View, Text } from 'react-native';
import { Call, StreamCall } from '@stream-io/video-react-native-sdk';

// ... props

export const CallScreen = ({goToHomeScreen, callId}: Props) => {
  const [call, setCall] = React.useState<Call>();
  if (!call) {
    return <Text>Joining call...</Text>;
  }

  return (
    <StreamCall call={call}>
      <View style={styles.container}>
        <AudioRoomUI goToHomeScreen={goToHomeScreen} />
      </View>
    </StreamCall>
  );
};

const styles = StyleSheet.create({
  container: {
    flex: 1,
    justifyContent: 'center',
   textAlign: 'center',
  },
});
Also as explained earlier in Understand the Basics section, call can be created or accessed using client.call(...) method.
Thus we need access to client inside CallScreen component. We will use the useStreamVideoContext hook to get access to the client instance.
We will put the joining logic inside useEffect hook, so we automatically join the call when user goes to CallScreen.
1234567891011121314151617181920212223242526272829import React, { useEffect } from 'react';
import { useStreamVideoClient } from '@stream-io/video-react-native-sdk';

// ... props

export const CallScreen = ({ goToHomeScreen, callId }: Props) => {
  const [call, setCall] = React.useState<Call>();
  const client = useStreamVideoClient();
  useEffect(() => {
    if (!client) return;
    const myCall = client.call('audio_room', callId);
    myCall.join({
      create: true,
        data: {
          members: [{ user_id: 'john_smith' }, { user_id: 'jane_doe' }],
          custom: {
            title: 'React Native test',
            description: 'We are doing a test of react native audio rooms',
          },
        },
      })
      .then(() => myCall.goLive())
      .then(() => setCall(myCall));
    return () => {
      myCall.leave();
    };
  }, [client, callId]);
  // ... rest of the code
};
Please note the difference between call.join() and call.goLive() methods.
When a call is created, it is in backstage mode by default, where only the host and speakers are allowed to join.
User needs to have permission to join the backstage mode, which we will explore later in the tutorial.
Normal user or audience of the audio room will be able to join the call when host calls call.goLive().
This makes it easy to try out your room and talk to your co-hosts before going live. You can enable or disable backstage mode in the dashboard.
For now we will call call.goLive() immediately after joining the call, so that we can test the audio room.
To enhance the interactivity of this tutorial moving forward, kindly follow these steps:
- Give the app a refresh, then tap the "Join Audio Room" button within your mobile tutorial app.
- Access the web version of the audio room on your browser by clicking the "Join Call" link provided below, and subsequently, hit the "Join" button.
Currently, you won't have the ability to speak, as we haven't set up the user interface for the audio room. However, you will be able to view the current user listed among the participants on the web application.
Step 7 - Configure UI for Audio Room
Up until now, we've effectively established and entered the call. Moving forward, our focus will be on setting up the audio room's user interface. This involves presenting a participant list, indicating their speaking status, offering controls to enable or disable both live mode and audio transmission, and more.
As previously mentioned, all essential call information can be accessed through the SDK's provided hooks, facilitated by the StreamCall component.
You can conveniently access a range of hooks related to the call's state by utilizing the useCallStateHooks hook as demonstrated below.
By utilizing these hooks, you can confidently depend on the most up-to-date state information.
123456const { useCallCustomData, useParticipants } = useCallStateHooks();

// Custom data is the `data.custom` property you set in `client.call()` method
const custom = useCallCustomData();
const participants = useParticipants();
// .. and many more
For a comprehensive list of all the available hooks, kindly consult the Call and Participant State guide.
Now, we'll establish a basic structure for the UI by crafting the subsequent components within the AudioRoomUI component:
AudioRoomDescription: This component will display the call's title and participant count.AudioRoomParticipants: Here, you'll showcase the list of participants along with their speaking status.AudioRoomControlsPanel: This component will house controls to activate or deactivate both live mode and audio transmission.
So please go ahead and create the following files:
12345678910111213141516import React from 'react';
import { StyleSheet, Text, View } from 'react-native';

export const AudioRoomDescription = () => {
  return (
    <View style={styles.container}>
      <Text>Audio Room Description: TO BE IMPLEMENTED</Text>
    </View>
  );
};

const styles = StyleSheet.create({
  container: {
    padding: 4,
  },
});
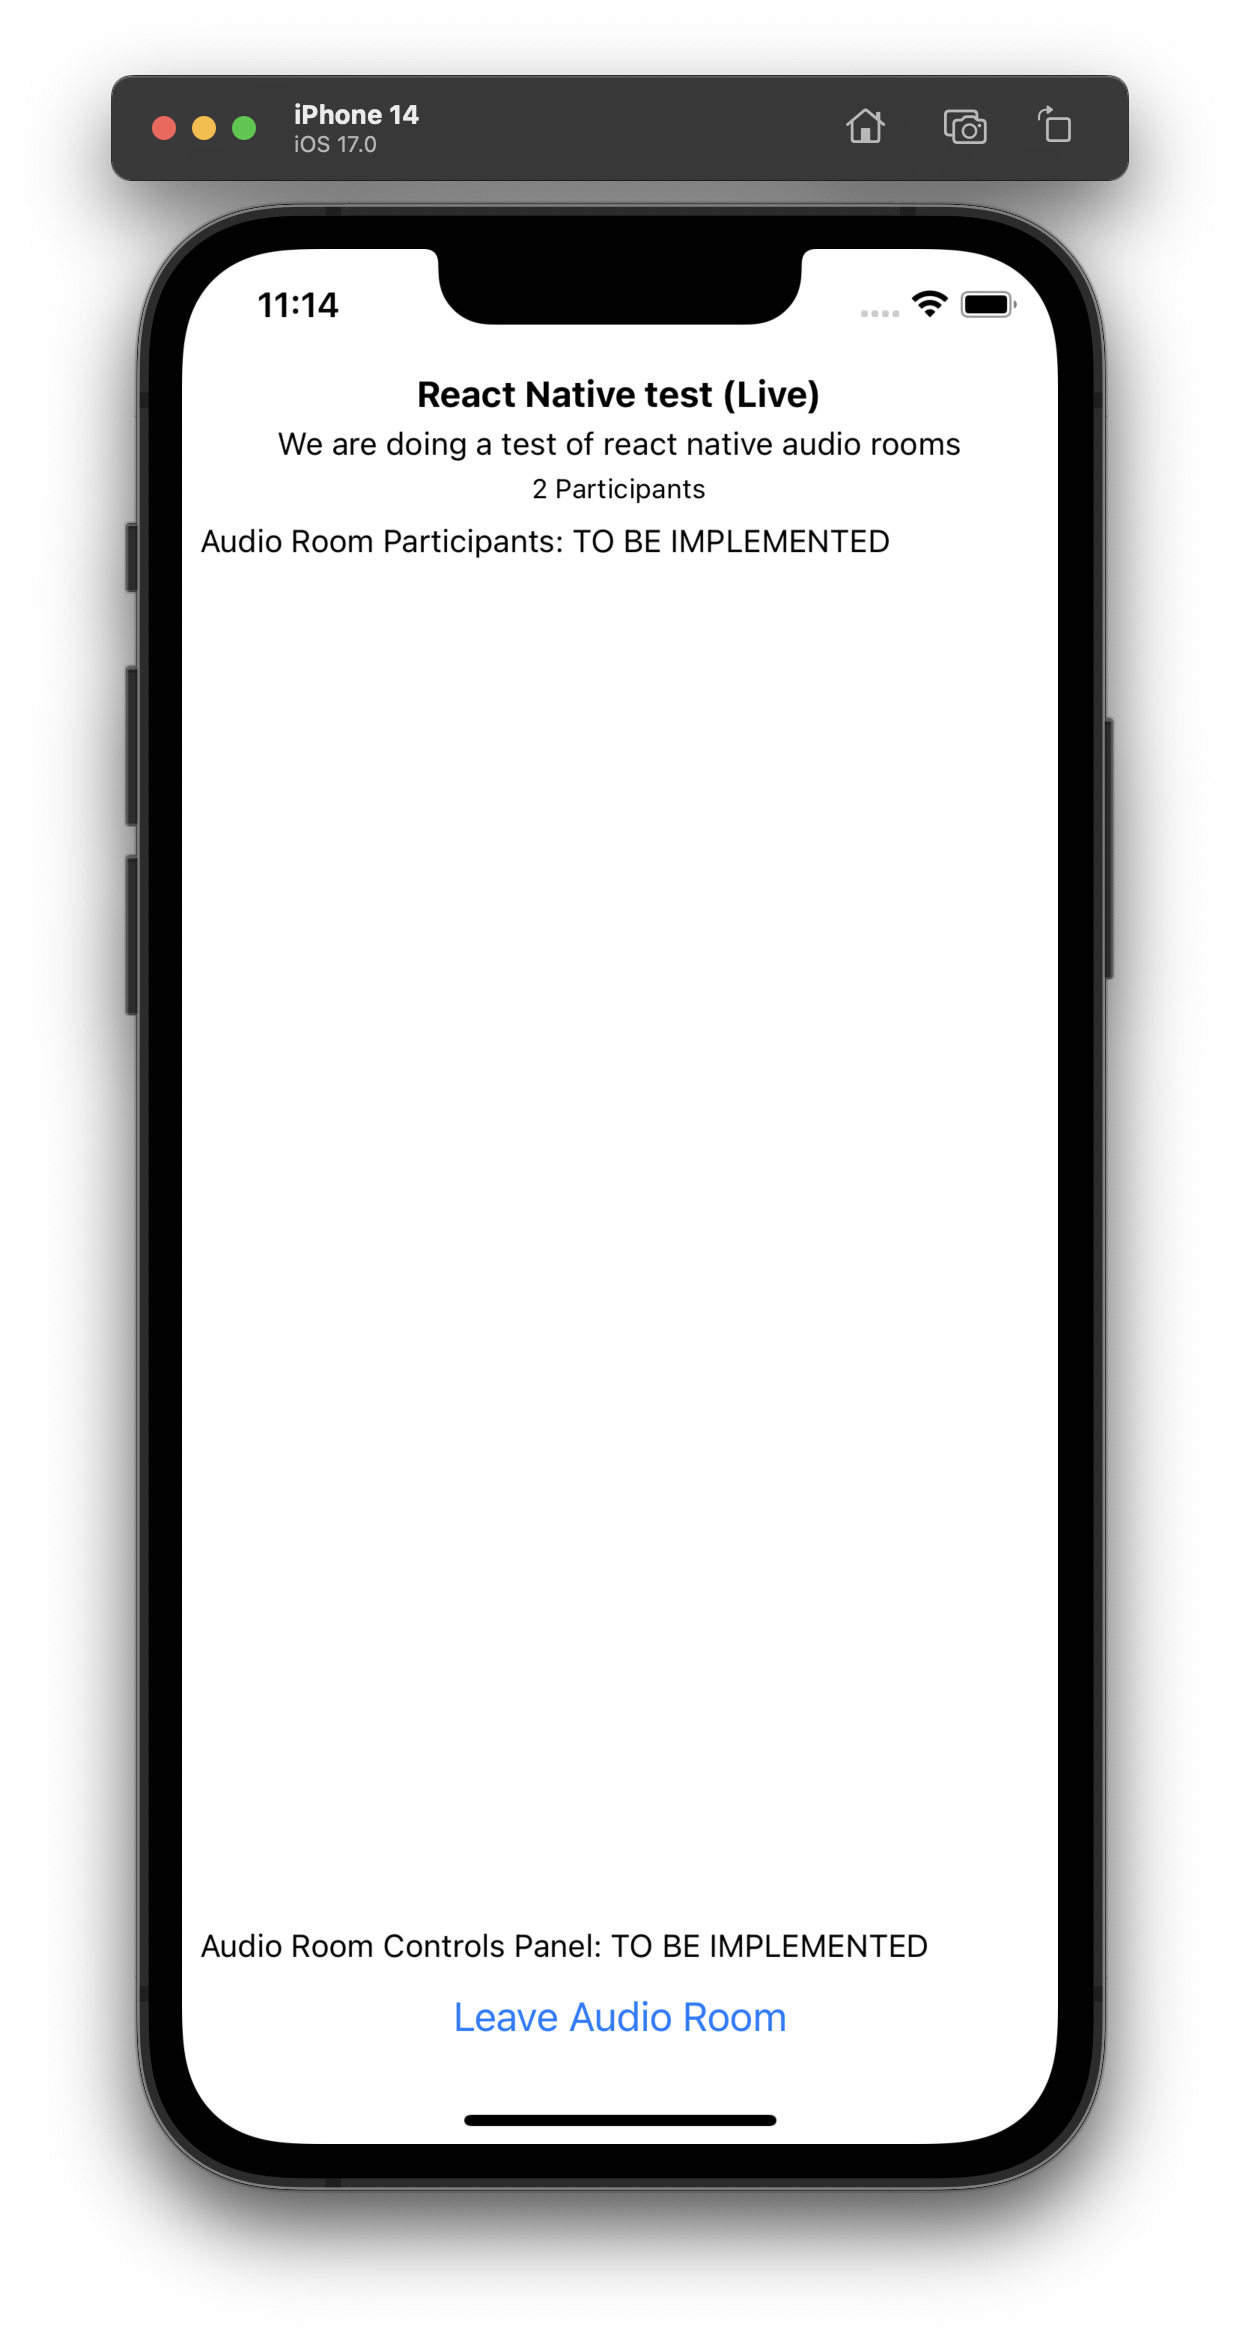
1234567891011121314151617import React from 'react';
import { StyleSheet, Text, View } from 'react-native';

export const AudioRoomParticipants = () => {
  return (
    <View style={styles.container}>
      <Text>Audio Room Participants: TO BE IMPLEMENTED</Text>
    </View>
  );
};

const styles = StyleSheet.create({
  container: {
    flex: 1,
    padding: 4,
  },
});
12345678910111213141516import React from 'react';
import { StyleSheet, Text, View } from 'react-native';

export const AudioRoomControlsPanel = () => {
  return (
    <View style={styles.container}>
      <Text>Audio Room Controls Panel: TO BE IMPLEMENTED</Text>
    </View>
  );
};

const styles = StyleSheet.create({
  container: {
    padding: 4,
  },
});
And lets add these components to AudioRoomUI:
12345678-9+10+11+12131415...
import { AudioRoomControlsPanel } from './AudioRoomControlsPanel';
import { AudioRoomDescription } from './AudioRoomDescription';
import { AudioRoomParticipants } from './AudioRoomParticipants';
...

return (
<View style={styles.container}>
    <Text style={styles.text}>Here we will add Audio Room UI</Text>
    <AudioRoomDescription />
    <AudioRoomParticipants />
    <AudioRoomControlsPanel />
    <Button title="Leave Audio Room" onPress={goToHomeScreen} />
</View>
);
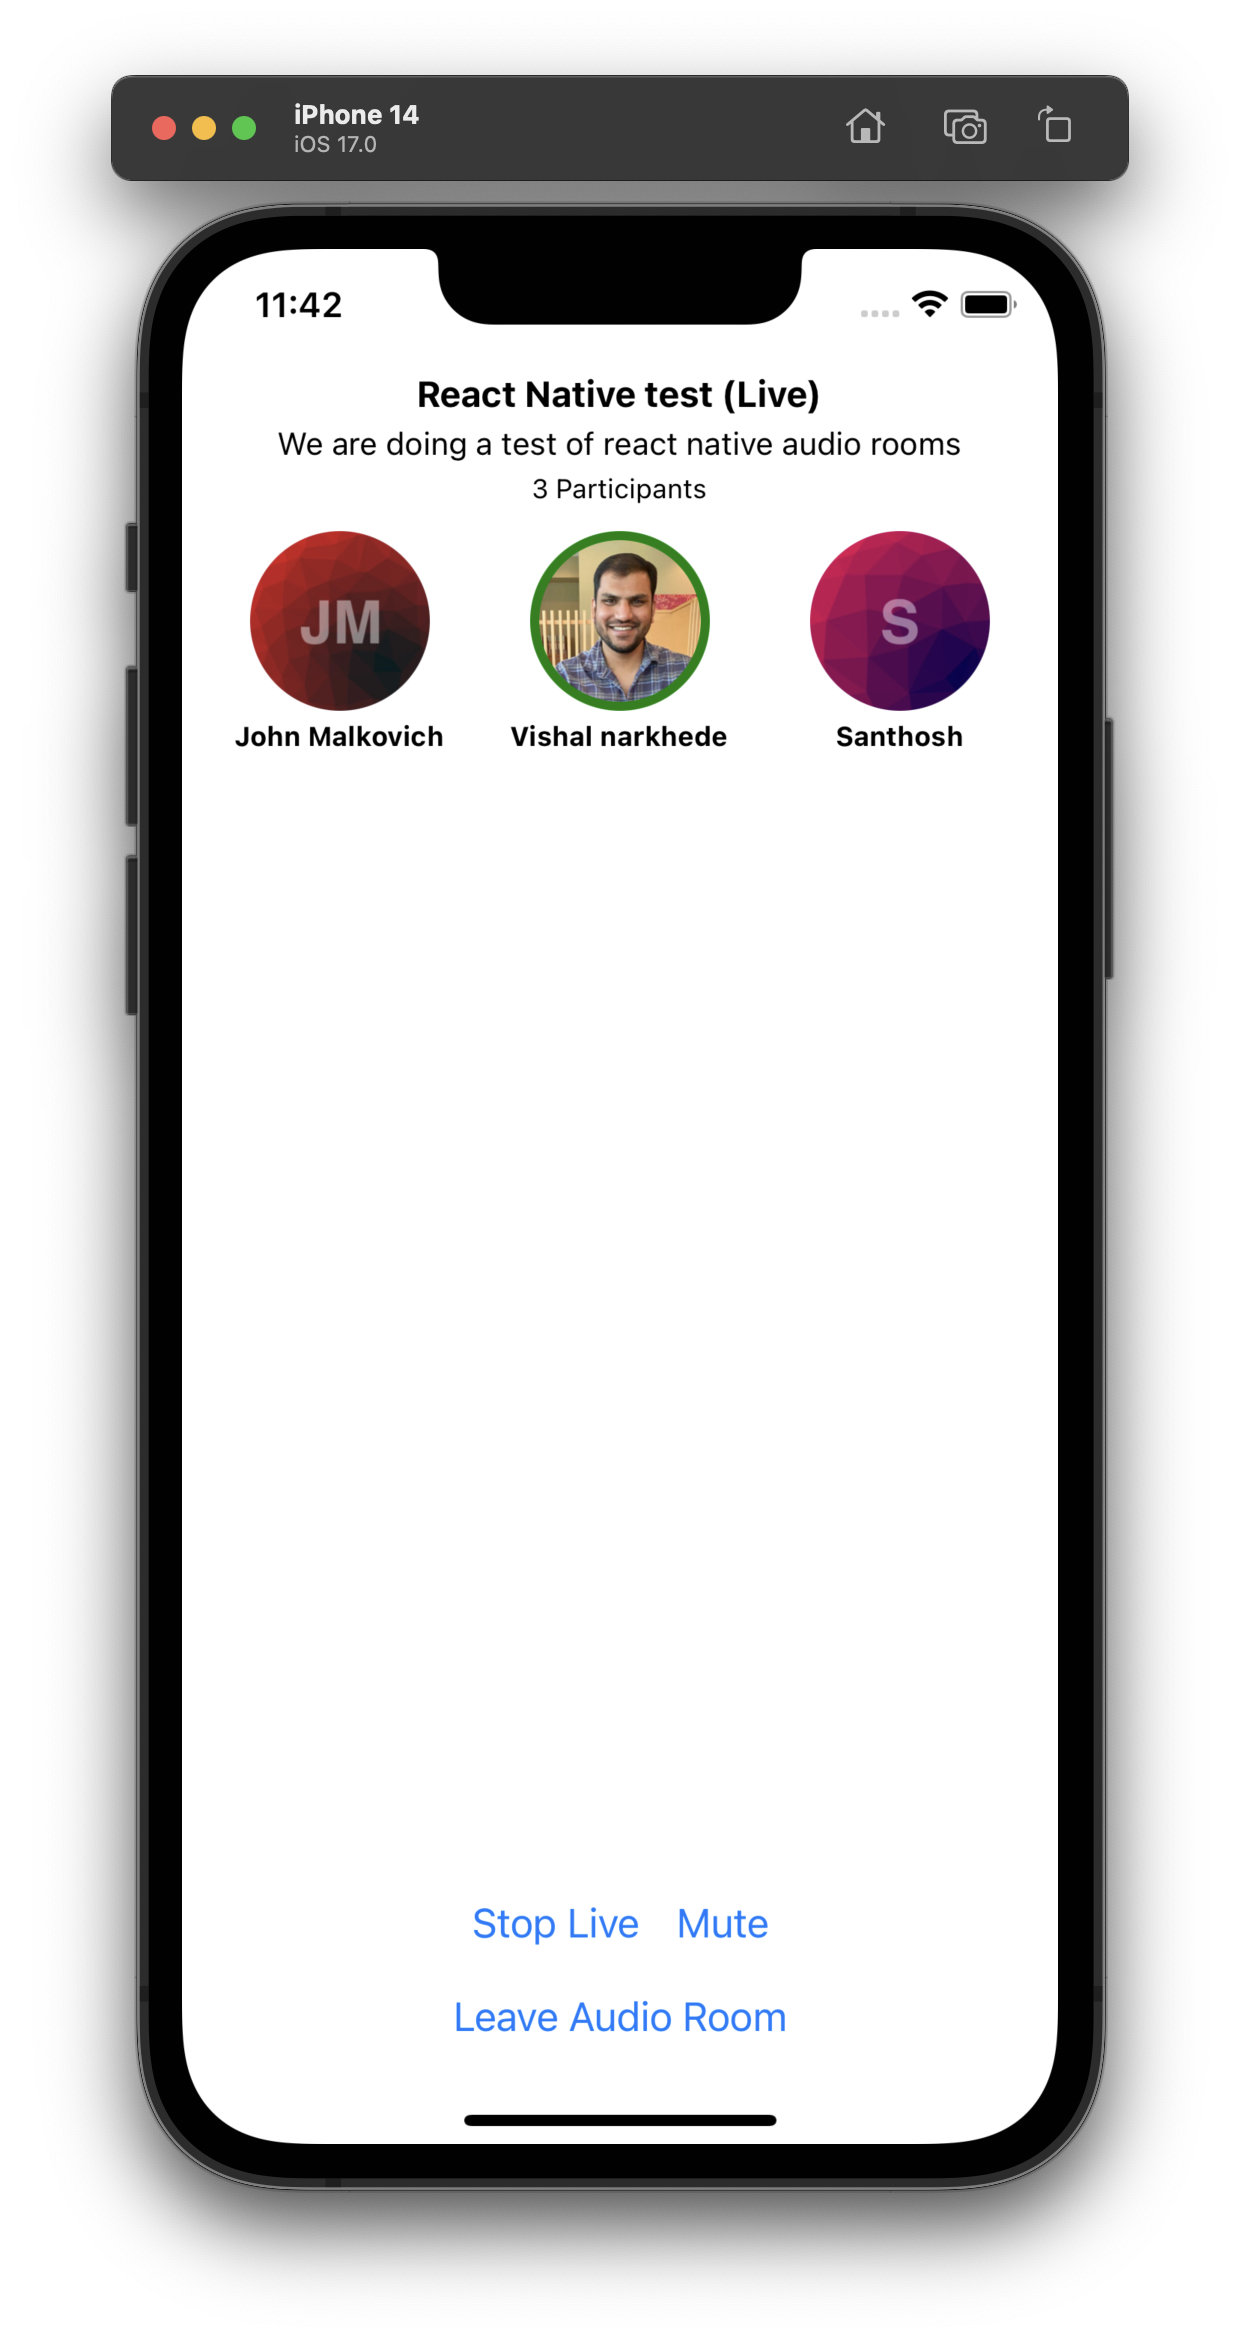
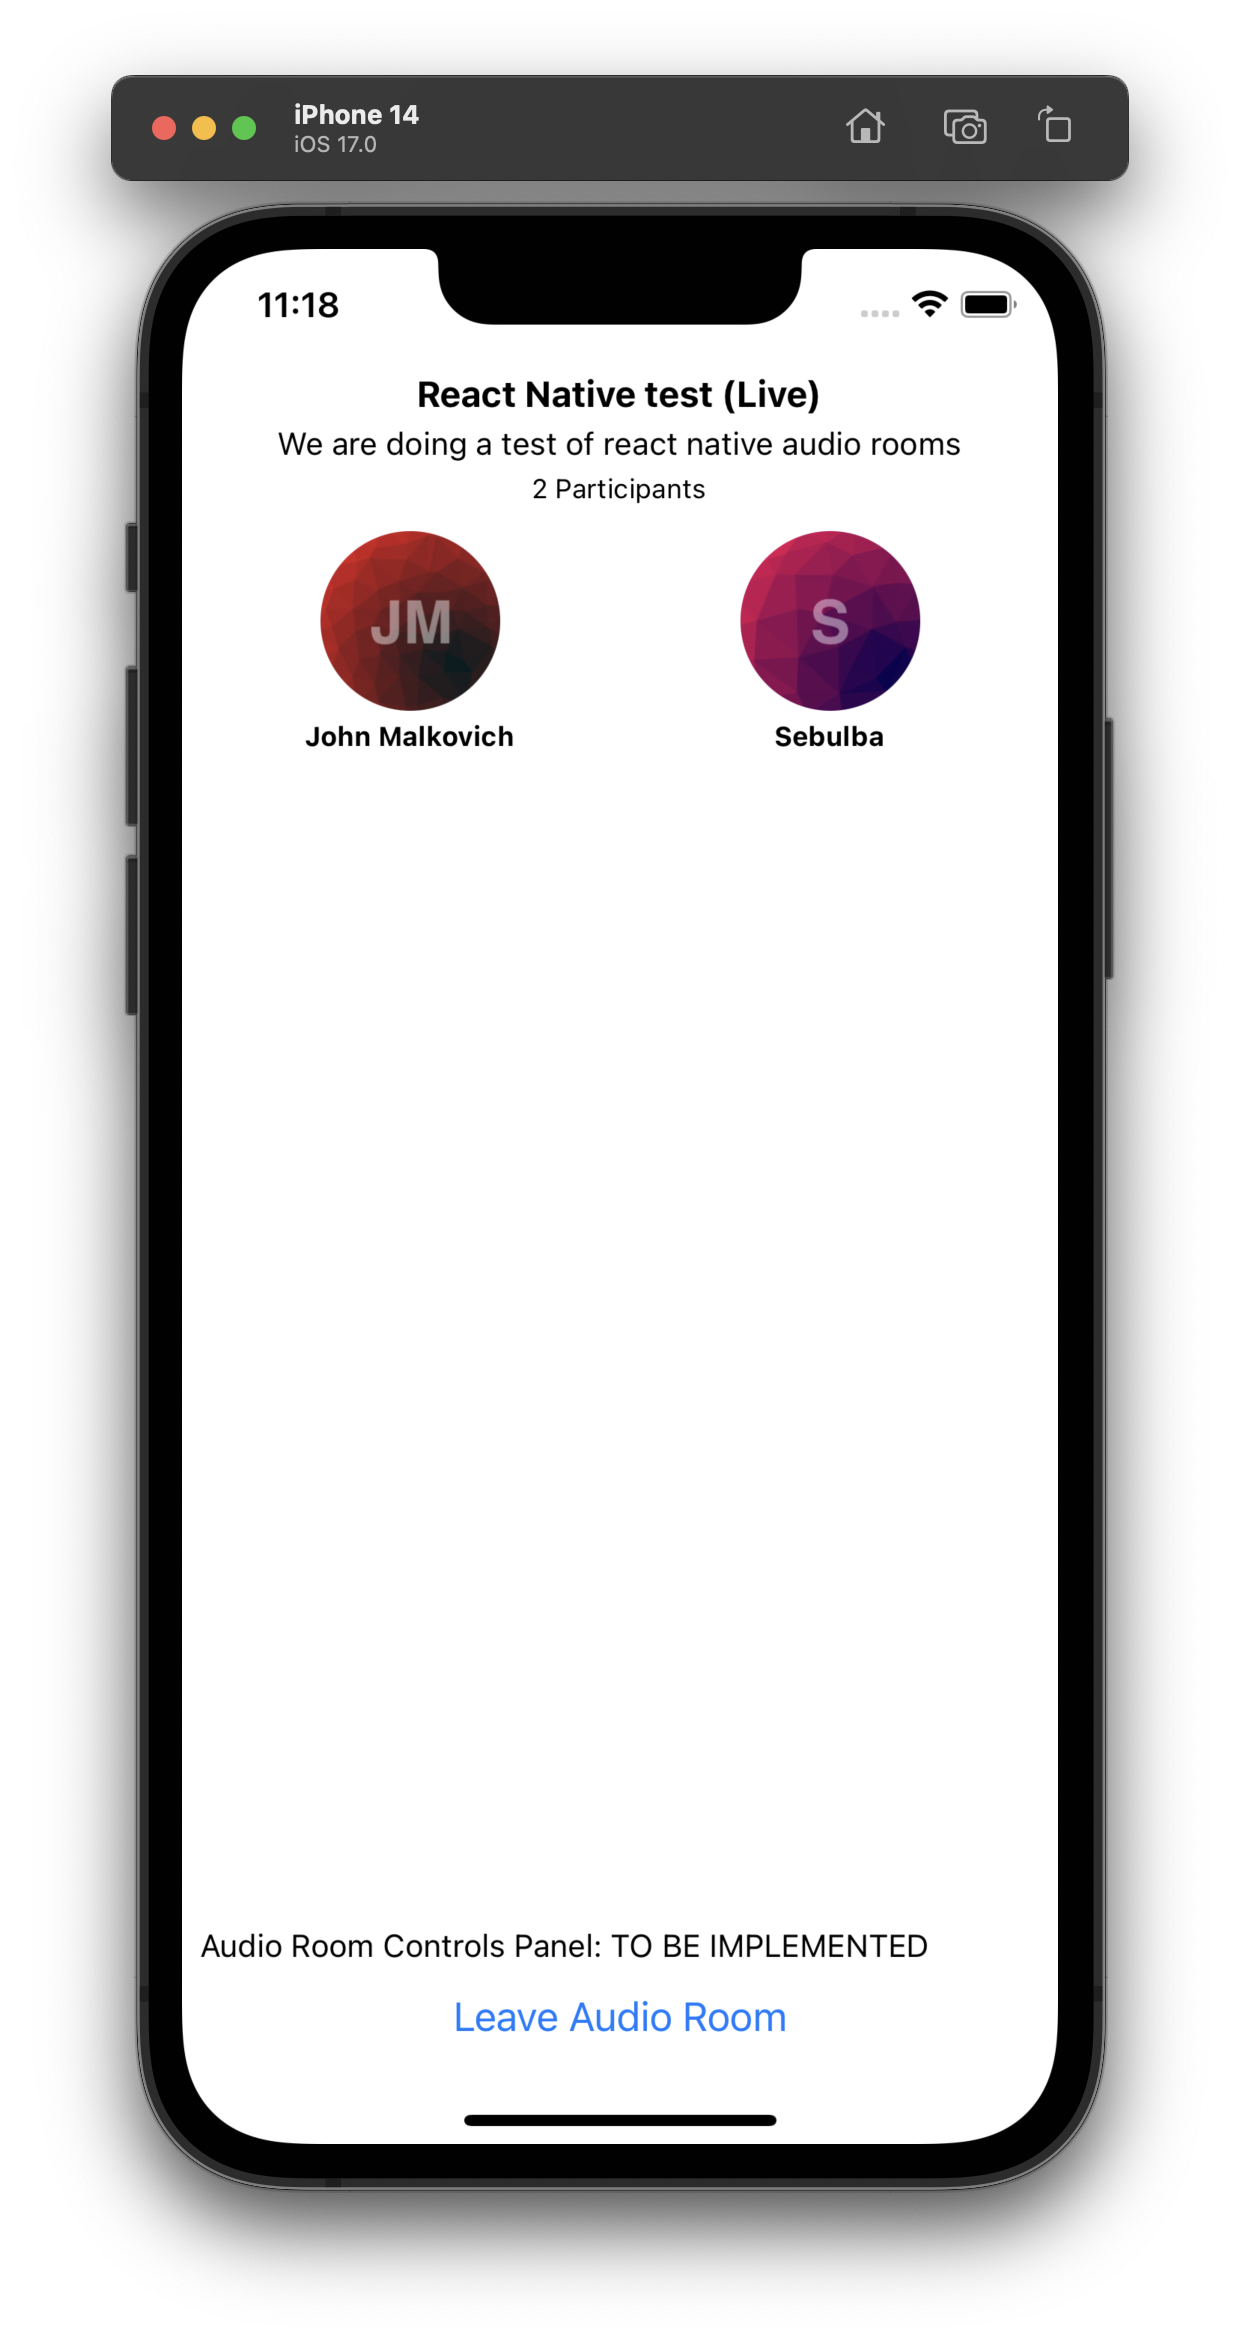
If you refresh the app, you should see following UI:
Audio Room Description
We will use the useCallCustomData to access custom data which we set as data.custom property in client.call(..) method which creating the call.
And participant count can be accessed using useParticipants hook.
123456789101112-13+14+15+16+17+1819202122232425262728293031323334353637383940import React from 'react';
import { StyleSheet, Text, View } from 'react-native';
import { useCallStateHooks } from '@stream-io/video-react-native-sdk';

export const AudioRoomDescription = () => {
  const { useCallCustomData, useParticipants, useIsCallLive } = useCallStateHooks();
  const custom = useCallCustomData();
  const participants = useParticipants();
  const isLive = useIsCallLive();

  return (
    <View style={styles.container}>
    <Text>Audio Room Description: TO BE IMPLEMENTED</Text>
    <Text style={styles.title}>
        {custom?.title} {!isLive ? '(Live)' : '(Not Live)'}
    </Text>
    <Text style={styles.subtitle}>{custom?.description}</Text>
    <Text style={styles.count}>{`${participants.length} Participants`}</Text>
</View>
  );
};

const styles = StyleSheet.create({
  container: {
    padding: 4,
    alignContent: 'center',
    alignItems: 'center',
  },
  title: {
    fontSize: 16,
    fontWeight: 'bold',
  },
  subtitle: {
    paddingVertical: 4,
    fontSize: 14,
  },
  count: {
    fontSize: 12,
  },
});
Upon refreshing the application, you will notice the title and participant count displayed in the UI. You can also experiment by joining and leaving the audio room using the web app, observing how the participant count dynamically changes on the mobile interface.
Audio Room Participants
We will use the useParticipants hook to access list of participants and their speaking status.
1234+5+6789-10+11+12+13+14+15+16+17+18+19+20+21222324252627282930+31+32+33+34+35+36+37+38+39+40+41+42+43+44+45+46+4748import { StyleSheet, Text, View, FlatList, Image } from 'react-native';
import { useCallStateHooks } from '@stream-io/video-react-native-sdk';

export const AudioRoomParticipants = () => {
  const { useParticipants } = useCallStateHooks();
  const participants = useParticipants();

  return (
    <View style={styles.container}>
      <Text>Audio Room Participants: TO BE IMPLEMENTED</Text>
      <FlatList
        numColumns={3}
        data={participants}
        renderItem={({item}) => (
          <View style={styles.avatar}>
            <Image style={[styles.image]} source={{uri: item.image}} />
            <Text style={styles.name}>{item.name}</Text>
          </View>
        )}
        keyExtractor={item => item.sessionId}
      />
    </View>
  );
};

const styles = StyleSheet.create({
  container: {
    flex: 1,
    padding: 4,
  },
  name: {
    marginTop: 4,
    color: 'black',
    fontSize: 12,
    fontWeight: 'bold',
  },
  avatar: {
    flex: 1,
    alignItems: 'center',
    borderWidth: 4,
    borderColor: 'transparent',
  },
  image: {
    width: 80,
    height: 80,
    borderRadius: 40,
  },
});
In practical applications, depending on business requirements you may want to dynamically sort the participants list based on certain criteria for example dominant speaker first or alphabetical etc.
You can pass comparator function to useParticipants hook to sort the participants list.
123import { speaking, useParticipants } from '@stream-io/video-react-native-sdk';

const participants = useParticipants({ sortBy: speaking });
Please take a look at Participants Sorting guide for the details and various sorting options.
Typically, audio room applications incorporate an indicator to denote whether a participant is currently speaking.
We can achieve this effect by utilizing the isSpeaking boolean property associated with each participant.
This property can be used to dynamically apply a border around the user avatar.
123456789+10+11+12+1314...
<Image
  style={[styles.image, item.isSpeaking && styles.activeSpeakerIndicator]}
  source={{uri: item.image}}
/>
...

const styles = StyleSheet.create({
  ...
  activeSpeakerIndicator: {
    borderWidth: 4,
    borderColor: 'green',
  },
});
If you refresh the app, you should see the participant list as following
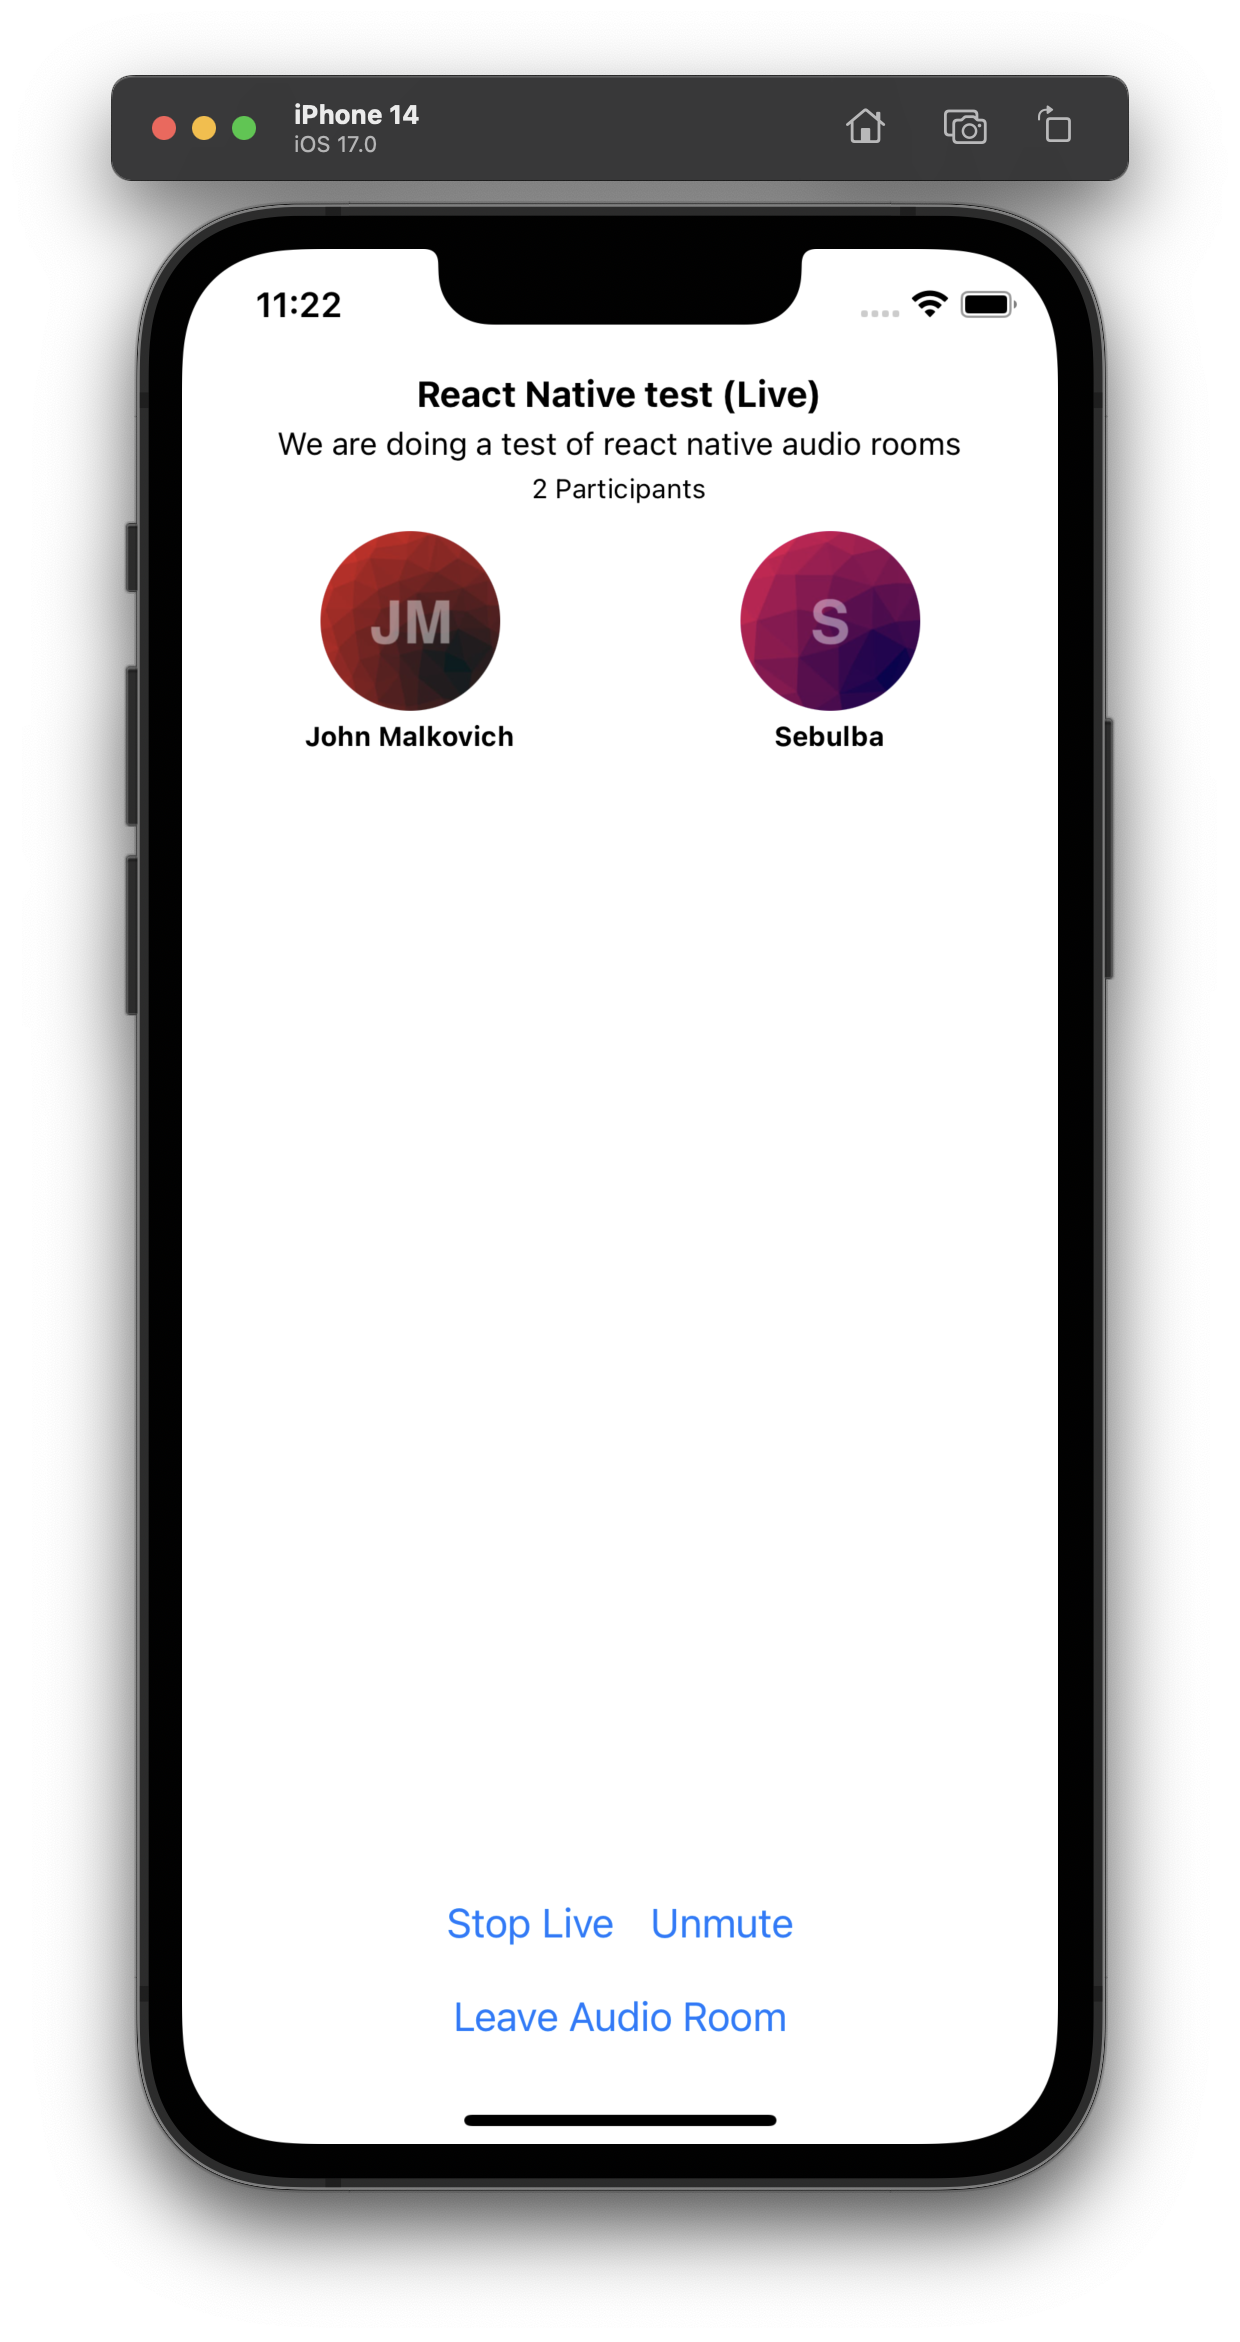
Audio Room Controls Panel
Let's expand the ControlPanel and add a button that controls the backstage of the room. In Create and Join Call step, we made the call live right after creating/joining it. We will move that logic to a toggle button where host or speakers can toggle live mode of the call.
Please create a file named ToggleLiveButton.tsx in src directory and add the following code.
Also make the following changes to src/AudioRoomControlsPanel.tsx and src/CallScreen.tsx file.
123456789101112131415161718192021222324import { useCall, useCallStateHooks } from '@stream-io/video-react-native-sdk';
import React from 'react';
import { Button } from 'react-native';

export const ToggleLiveButton = () => {
  // this utility hook returns the call object from the <StreamCall /> context
  const call = useCall();
  // will emit a new value whenever the call goes live or stops being live.
  // we can use it to update the button text or adjust any other UI elements
  const { useIsCallLive } = useCallStateHooks();
  const isLive = useIsCallLive();
  return (
    <Button
      title={`${isLive ? 'Stop' : 'Go'} Live`}
      onPress={() => {
        if (isLive) {
          call?.stopLive();
        } else {
          call?.goLive();
        }
      }}
    />
  );
};
123456-7+89101112...
import {ToggleLiveButton} from './ToggleLiveButton';

export const AudioRoomControlsPanel = () => {
  return (
    <View style={styles.container}>
      <Text>Audio Room Controls Panel: TO BE IMPLEMENTED</Text>
      <ToggleLiveButton />
    </View>
  );
};
...
123-456useEffect(() => {
    // After this step the call is live and you can start sending and receiving audio.
    call.join(...)
    .then(() => call.goLive())
    .then(() => setCall(call));
}, [client]);
Next we will add a button to mute or unmute the microphone button.
Handling audio and video devices in a your application means working with MediaStream, MediaDeviceInfo and other WebRTC API objects.
To make this simpler, we hide all the complexity inside the SDK and export utility functions and states.
You can toggle the state of microphone using call.microphone.toggle() function and you can access the state of microphone using useMicrophoneState hook.
Please check Camera and Microphone guide for more details.
Please create a file named ToggleMicButton.tsx in src directory as following and add it to AudioRoomControlsPanel component.
1234567891011121314151617import { useCall, useCallStateHooks } from '@stream-io/video-react-native-sdk';
import React from 'react';
import { Button } from 'react-native';

export const ToggleMicButton = () => {
  const call = useCall();

  const { useMicrophoneState } = useCallStateHooks();
  const { status: micStatus } = useMicrophoneState();

  return (
    <Button
      title={`${micStatus === 'enabled' ? 'Mute' : 'Unmute'}`}
      onPress={() => call?.microphone.toggle()}
    />
  );
};
12+345678+910111213141516+17+181920...
import { ToggleLiveButton } from './ToggleLiveButton';
import { ToggleMicButton } from './ToggleMicButton';

export const AudioRoomControlsPanel = () => {
  return (
    <View style={styles.container}>
      <ToggleLiveButton />
      <ToggleMicButton />
    </View>
  );
};

const styles = StyleSheet.create({
  container: {
    padding: 4,
    flexDirection: 'row',
    justifyContent: 'center',
  },
});
However, if you wish for the app to seamlessly switch between the earphone and speaker, you can use the react-native-incall-manager. Please follow the usage docs of the library for this purpose and our Speaker management docs.
By default, the audio source is set to the device's speaker if the mode is video and device's earpiece if the mode is audio.
1+234567+8+9+10+111213...
import InCallManager from 'react-native-incall-manager';

export const ToggleMicButton = () => {
  // start incall manager
  // Please read more about `media` and `auto` options in the documentation of react-native-incall-manager
  // https://github.com/react-native-webrtc/react-native-incall-manager#usage
  useEffect(() => {
    InCallManager.start({ media: 'audio' });
    return () => InCallManager.stop();
  }, []);
  ...
}
If you refresh the app, you should be able to toggle live mode and mute/unmute the microphone.
Step 8 - Requesting permission to speak
In real audio room applications, a participant may need to request permission to speak from the host or speakers.
And host or speakers can grant or deny the request using call.grantPermissions or call.revokePermissions methods.
They can subscribe to an event call.permission_requested to get notified when a participant requests permission to speak.
Let's first have a quick look at how the SDK call object exposes this:
123456789101112131415161718import { OwnCapability } from '@stream-io/video-react-native-sdk';

// On user side who is requesting permission to speak
await call.requestPermissions({
  permissions: [OwnCapability.SEND_AUDIO],
});

// Once the host grants or rejects permission, user will be notified using `call.permissions_updated` event
const unsubscribe = call.on('call.permissions_updated', (event) => {
  if (connectedUser.id !== event.user.id) return;

  // automatically publish/unpublish audio stream based on the new permissions
  if (event.own_capabilities.includes(OwnCapability.SEND_AUDIO)) {
    call.microphone.enable();
  } else {
    call.microphone.disable();
  }
});
123456789101112131415import type { PermissionRequestEvent } from '@stream-io/video-react-native-sdk';

const unsubscribe = call.on('call.permission_requested', async (request: PermissionRequestEvent) => {
  // get the permission request data
  const { user, permissions } = request;

  // reject it
  await call.revokePermissions(user.id, permissions);

  // grant it
  await call.grantPermissions(user.id, permissions);
});

// don't forget to unsubscribe during unmount
unsubscribe();
Now, let's begin by first developing the logic to initiate a permission request for speaking when the user taps on the microphone button.
123+456+7891011121314+15+16+17+18+19+20212223242526+27282930+31+32+33+34+35+36+37+38394041424344import {
  useCall,
  useCallStateHooks,
  OwnCapability,
} from '@stream-io/video-react-native-sdk';
import React, { useEffect, useState } from 'react';
import { Button } from 'react-native';

export const ToggleMicButton = () => {
  const call = useCall();

  const { useMicrophoneState, useHasPermissions } = useCallStateHooks();
  const { status: micStatus } = useMicrophoneState();

  const hasPermission = useHasPermissions(OwnCapability.SEND_AUDIO);
  const canRequestSpeakingPermissions =
    call?.permissionsContext.canRequest(OwnCapability.SEND_AUDIO);
  // State to track if the user has requested speaking permissions.
  // If they have, we'll disable the toggle microphone button.
  const [isAwaitingAudioApproval, setIsAwaitingAudioApproval] = useState(false);

  useEffect(() => {
    InCallManager.start({ media: 'audio' });
    return () => InCallManager.stop();
  }, []);

  const disabled = !hasPermission || !canRequestSpeakingPermissions || isAwaitingAudioApproval
  return (
    <Button
      title={`${micStatus === 'enabled' ? 'Mute' : 'Unmute'}`}
      disabled={disabled}
      onPress={() => {
        if (!hasPermission) {
          setIsAwaitingAudioApproval(true);
          return call?.requestPermissions({
            permissions: [OwnCapability.SEND_AUDIO],
          });
        }

        call?.microphone.toggle();
      }}
    />
  );
};
Let's proceed to add an event listener for the event call.permissions_updated.
This will keep the current user informed about any changes in permissions, whether they are granted or rejected by hosts or speakers.
It's worth noting that the current user in the app will already possess permission to speak, as the default permission configuration allows the call creator to transmit audio.
12+345678+9101112+13+14+15+16+17+18+19+20+21+22+23+24+25+262728import {
  ...
  useConnectedUser,
} from '@stream-io/video-react-native-sdk';

export const ToggleMicButton = () => {
  ...

  const connectedUser = useConnectedUser();
  // State to track if the user has requested speaking permissions.
  // If they have, we'll disable the toggle microphone button.
  const [isAwaitingAudioApproval, setIsAwaitingAudioApproval] = useState(false);
  useEffect(() => {
    if (!call || !connectedUser) return;
    const unsubscribe = call.on('call.permissions_updated', event => {
      if (connectedUser.id !== event.user.id) return;
      setIsAwaitingAudioApproval(false);
      // automatically publish/unpublish audio stream based on the new permissions
      if (event.own_capabilities.includes(OwnCapability.SEND_AUDIO)) {
        call.microphone.enable();
      } else {
        call.microphone.disable();
      }
    });
    return () => unsubscribe();
  }, [call, connectedUser]);
  ...
}
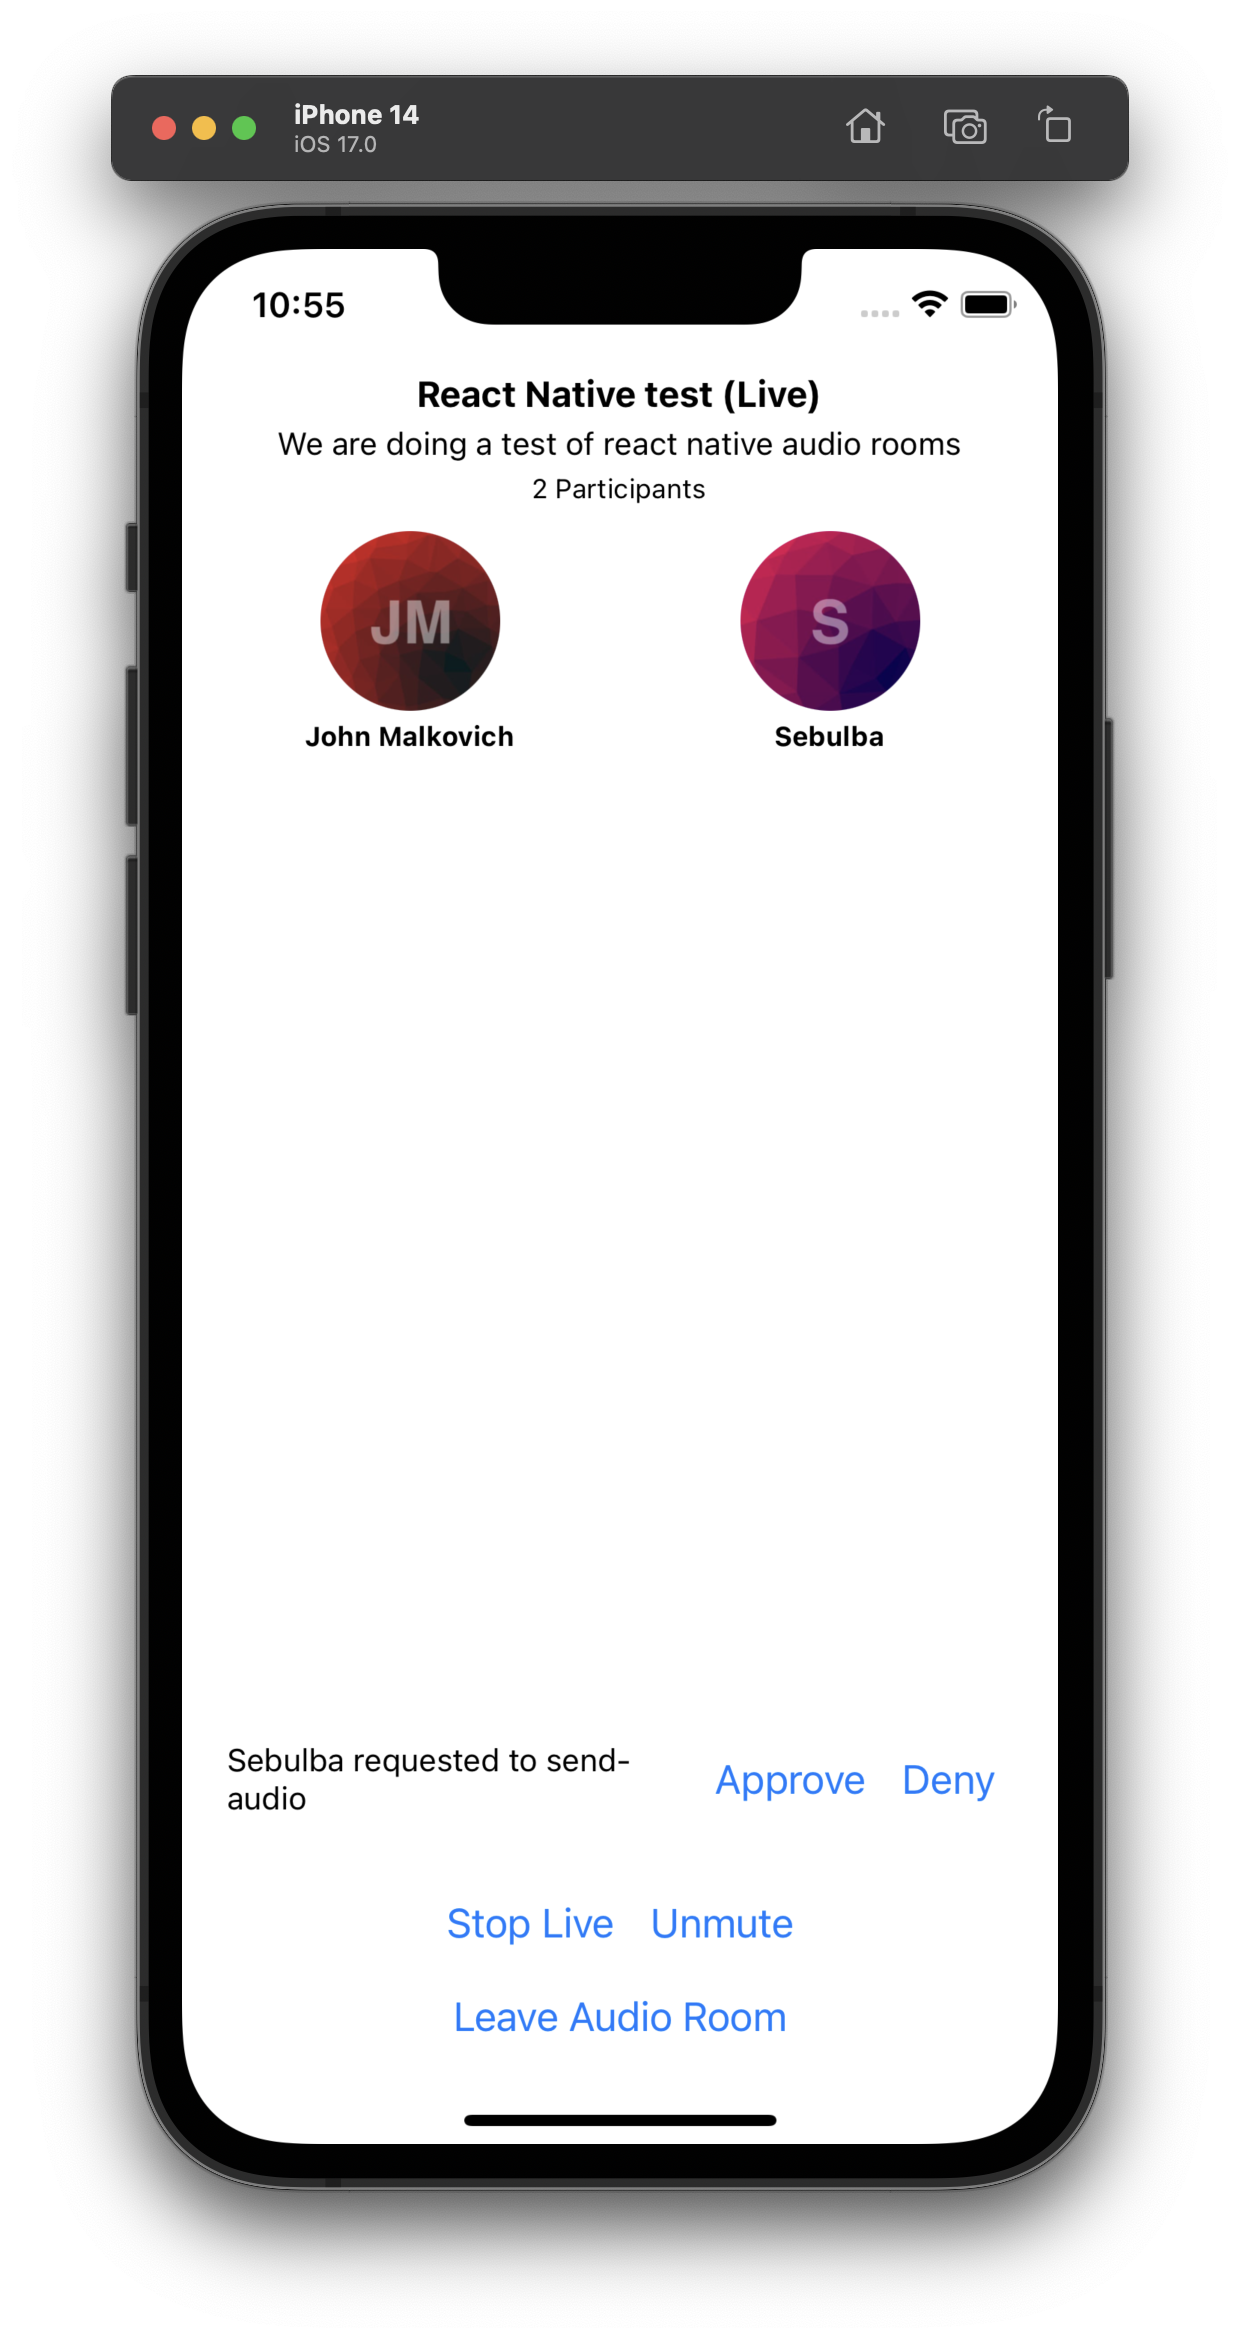
To handle the things host side, let's add another component that shows the last incoming request as well as the buttons to grant / reject it
Please create a file PermissionsRequestsPanel.tsx inside src directory and make the following changes. The code is pretty much self explanatory.
12345678910111213141516171819202122232425262728293031323334353637383940414243444546474849505152535455565758596061626364656667686970import { OwnCapability, PermissionRequestEvent, useCall, useCallStateHooks } from '@stream-io/video-react-native-sdk';
import React, { useEffect, useState } from 'react';
import { Text, Button, ScrollView, StyleSheet, View } from 'react-native';

export const PermissionRequestsPanel = () => {
  const call = useCall();
  const { useHasPermissions } = useCallStateHooks();
  const canUpdatePermissions = useHasPermissions(OwnCapability.UPDATE_CALL_PERMISSIONS);
  const [speakingRequests, setSpeakingRequests] = useState<PermissionRequestEvent[]>([]);

  const handlePermissionRequest = async (request: PermissionRequestEvent, approve: boolean) => {
    const { user, permissions } = request;
    try {
      if (approve) {
        await call?.grantPermissions(user.id, permissions);
      } else {
        await call?.revokePermissions(user.id, permissions);
      }
      setSpeakingRequests((reqs) => reqs.filter((req) => req !== request));
    } catch (err) {
      console.error('Error granting or revoking permissions', err);
    }
  };

  useEffect(() => {
    if (!call || !canUpdatePermissions) return;
    return call.on('call.permission_request', (request) => {
      setSpeakingRequests((requests) => [...requests, request]);
    });
  }, [call, canUpdatePermissions]);

  if (!canUpdatePermissions || !speakingRequests.length) return null;

  return (
    <ScrollView style={styles.scrollContainer}>
      {speakingRequests.map(request => (
        <View style={styles.itemContainer} key={request.user.id}>
          <Text style={styles.text} numberOfLines={2} ellipsizeMode="tail">
            {`${request.user.name} requested to ${request.permissions.join(',')}`}
          </Text>
          <Button
            title="Approve"
            onPress={() => handlePermissionRequest(request, true)}
          />
          <Button
            title="Deny"
            onPress={() => handlePermissionRequest(request, false)}
          />
        </View>
      ))}
    </ScrollView>
  );
};

const styles = StyleSheet.create({
  scrollContainer: {
    width: '100%',
    maxHeight: 60,
  },
  text: {
    flexShrink: 1,
  },
  itemContainer: {
    flexDirection: 'row',
    justifyContent: 'space-between',
    alignItems: 'center',
    paddingHorizontal: 16,
    width: '100%',
  },
});
And now we will add this component to AudioRoomUI component.
12+3456789+10111213141516...
import { AudioRoomParticipants } from './AudioRoomParticipants';
import { PermissionRequestsPanel } from './PermissionsRequestsPanel';

export const AudioRoom = ({goToHomeScreen}: Props) => {
  return (
    <View style={styles.container}>
      <AudioRoomDescription />
      <AudioRoomParticipants />
      <PermissionRequestsPanel />
      <AudioRoomControlsPanel />
      <Button title="Leave Audio Room" onPress={goToHomeScreen} />
    </View>
  );
};
...
Now, for the purpose of testing:
- Navigate to the web app.
- Join the audio room.
- Click on the raised hand (✋) button located in the top-right corner to request permission to speak.
- You should observe the request being displayed in the mobile app as illustrated below:
Step 9 - Leave the call
User can leave the call by calling call.leave() method.
Lets add this functionality to "Leave Audio Room" button.
12+3456+7+8+9+10+11+12131415161718+19202122...
import { AudioRoomParticipants } from './AudioRoomParticipants';
import { useCall } from '@stream-io/video-react-native-sdk';

...
export const AudioRoom = ({goToHomeScreen}: Props) => {
  const call = useCall();
  const leaveCall = async () => {
    // This will leave the call and stop sending and receiving audio.
    await call?.leave();
    goToHomeScreen();
  };

  return (
    <View style={styles.container}>
      <AudioRoomDescription />
      <AudioRoomParticipants />
      <AudioRoomControlsPanel />
      <Button title="Leave Audio Room" onPress={leaveCall} />
    </View>
  );
};
Other built-in features
There are a few more exciting features that you can use to build audio rooms
- Query Calls: You can query calls to easily show upcoming calls, calls that recently finished as well as call previews.
- Reactions & Custom events: Reactions and custom events are supported.
- Chat: Stream's chat SDKs are fully featured and you can integrate them in the call
- Moderation: Moderation capabilities are built-in to the product
- Transcriptions: You can enable transcriptions for your calls
Recap
It was fun to see just how quickly you can build an audio-room for your app. Please do let us know if you ran into any issues. Our team is also happy to review your UI designs and offer recommendations on how to achieve it with Stream.
To recap what we've learned:
- You set up a call with
const call = client.call('audio_room', '123') - The call type
audio_roomcontrols which features are enabled and how permissions are set up - The
audio_roomby default enablesbackstagemode, and only allows admins and the creator of the call to join before the call goes live - When you join a call, real-time communication is set up for audio & video calling:
await call.join() - Call state
call.stateand helper state access hooks make it easy to build your own UI - Calls run on Stream's global edge network of video servers. Being closer to your users improves the latency and reliability of calls. For audio rooms we use Opus RED and Opus DTX for optimal audio quality.
The SDKs enable you to build audio rooms, video calling and live-streaming in days.
We hope you've enjoyed this tutorial and please do feel free to reach out if you have any suggestions or questions.