In this tutorial, we'll walk through building a simple video and audio calling application with ringing functionality using the Stream Video Flutter SDK. The goal is to have an application that will:
- Allow users to make calls that ring on the recipient's device.
- Work on both Android and iOS.
- Support both audio and video calls.
- Ensure ringing works even when the app is in the background or closed.
If you prefer to skip this tutorial but still want to implement the same functionality, refer to the official Flutter Ringing Documentation.
You can find the complete code for this tutorial in the Flutter Video Tutorials Repository.
Let's get started! If you have any questions or feedback, use the feedback button — we're here to help.
Step 1 - Create a New Project and Configure Dependencies
First, create a new Flutter project using the following command:
1flutter create ringing_tutorial --empty
Next, add the Stream Video Flutter SDK to your project. Open pubspec.yaml and include the following inside the dependencies section:
1234567dependencies:
  flutter:
    sdk: flutter

  stream_video: ^latest
  stream_video_flutter: ^latest
  stream_video_push_notification: ^latest
Run the following command to install the packages:
1flutter pub get
For this tutorial, we will use the following Stream packages:
- stream_video: Core functionality for video calling.
- stream_video_flutter: Pre-built UI components for video calls.
- stream_video_push_notification: Enables push notifications and integrates with CallKit for a complete call flow.
Before proceeding, ensure your app has the necessary permissions for video calling.
Android Configuration
To ensure your app can handle video calls properly on Android, follow these steps:
Update AndroidManifest.xml
Add the following permissions to allow camera, audio, and network access:
123456789101112131415161718192021<manifest xmlns:android="http://schemas.android.com/apk/res/android">

    <uses-feature android:name="android.hardware.camera"/>
    <uses-feature android:name="android.hardware.camera.autofocus"/>

    <uses-permission android:name="android.permission.INTERNET"/>
    <uses-permission android:name="android.permission.CAMERA"/>
    <uses-permission android:name="android.permission.RECORD_AUDIO"/>
    <uses-permission android:name="android.permission.ACCESS_NETWORK_STATE"/>
    <uses-permission android:name="android.permission.CHANGE_NETWORK_STATE"/>
    <uses-permission android:name="android.permission.MODIFY_AUDIO_SETTINGS"/>

    <!-- Bluetooth permissions for audio routing -->
    <uses-permission android:name="android.permission.BLUETOOTH" android:maxSdkVersion="30"/>
    <uses-permission android:name="android.permission.BLUETOOTH_ADMIN" android:maxSdkVersion="30"/>
    <uses-permission android:name="android.permission.BLUETOOTH_CONNECT"/>

    <!-- Required for displaying call notifications -->
    <uses-permission android:name="android.permission.POST_NOTIFICATIONS"/>

</manifest>
Set android:launchMode to singleInstance
Update your MainActivity declaration in AndroidManifest.xml:
123456789<manifest...>
     ...
   <application ...>
       <activity ...
          android:name=".MainActivity"
          android:launchMode="singleInstance">
        ...
   ...
 </manifest>
This ensures that tapping the push notification does not create a new instance of your app. Instead, it brings the existing instance to the foreground, preventing multiple screens from stacking up when accepting calls.
Prevent Obfuscation in proguard-rules.pro
To avoid issues with call-related keys being obfuscated, add this rule to android/app/proguard-rules.pro:
-keep class com.hiennv.flutter_callkit_incoming.** { *; }
iOS Configuration
For iOS, open your Info.plist file and include the required permissions:
1234567891011121314151617<key>NSCameraUsageDescription</key>
<string>$(PRODUCT_NAME) needs access to your camera for video calls.</string>
<key>NSMicrophoneUsageDescription</key>
<string>$(PRODUCT_NAME) needs access to your microphone for voice and video calls.</string>
<key>UIApplicationSupportsIndirectInputEvents</key>
<true/>
<key>BGTaskSchedulerPermittedIdentifiers</key>
<array>
	 <string>$(PRODUCT_BUNDLE_IDENTIFIER)</string>
</array>
<key>UIBackgroundModes</key>
<array>
	<string>audio</string>
	<string>processing</string>
	<string>remote-notification</string>
	<string>voip</string>
</array>
Make sure your application has Push Notifications Capability enabled in Xcode:
- Open
ios/Runner.xcworkspacein Xcode. - Select your app's target.
- Navigate to the Signing & Capabilities tab.
- Click the + Capability button.
- Search for Push Notifications and add it.
Step 2 - Authentication
To run this sample, we need valid user tokens. These tokens are typically generated by your server-side API and are used to authenticate users when they log in to your app.
For ringing functionality to work, we need at least two users who can log in on separate devices.
Generating User Tokens
- First, create a new application in the Stream Dashboard.
- Then, use this token generation form to generate sample tokens.
- Provide your App Secret and User ID to create tokens for each user.
Creating Hardcoded Users
To simplify testing, we'll create a TutorialUser class in tutorial_user.dart to store hardcoded user data.
Fill in the userId, name, and token fields with the generated values for three different users.
1234567891011121314151617181920212223242526272829303132333435363738394041424344454647import 'package:stream_video_flutter/stream_video_flutter.dart';

class TutorialUser {
  const TutorialUser({
    required this.user,
    required this.token,
  });

  final User user;
  final String? token;

  factory TutorialUser.user1() => TutorialUser(
        user: User.regular(
          userId: '{REPLACE_WITH_USER_1_ID}',
          name: '{REPLACE_WITH_USER_1_NAME}',
          image:
              'https://images.pexels.com/photos/774909/pexels-photo-774909.jpeg?auto=compress&cs=tinysrgb&w=600',
        ),
        token: '{REPLACE_WITH_USER_1_TOKEN}',
      );

  factory TutorialUser.user2() => TutorialUser(
        user: User.regular(
          userId: '{REPLACE_WITH_USER_2_ID}',
          name: '{REPLACE_WITH_USER_2_NAME}',
          image:
              'https://images.pexels.com/photos/415829/pexels-photo-415829.jpeg?auto=compress&cs=tinysrgb&w=600',
        ),
        token: '{REPLACE_WITH_USER_2_TOKEN}',
      );

  factory TutorialUser.user3() => TutorialUser(
        user: User.regular(
          userId: '{REPLACE_WITH_USER_3_ID}',
          name: '{REPLACE_WITH_USER_3_NAME}',
          image:
              'https://images.pexels.com/photos/1681010/pexels-photo-1681010.jpeg?auto=compress&cs=tinysrgb&w=600',
        ),
        token: '{REPLACE_WITH_USER_3_TOKEN}',
      );

  static List<TutorialUser> get users => [
        TutorialUser.user1(),
        TutorialUser.user2(),
        TutorialUser.user3(),
      ];
}
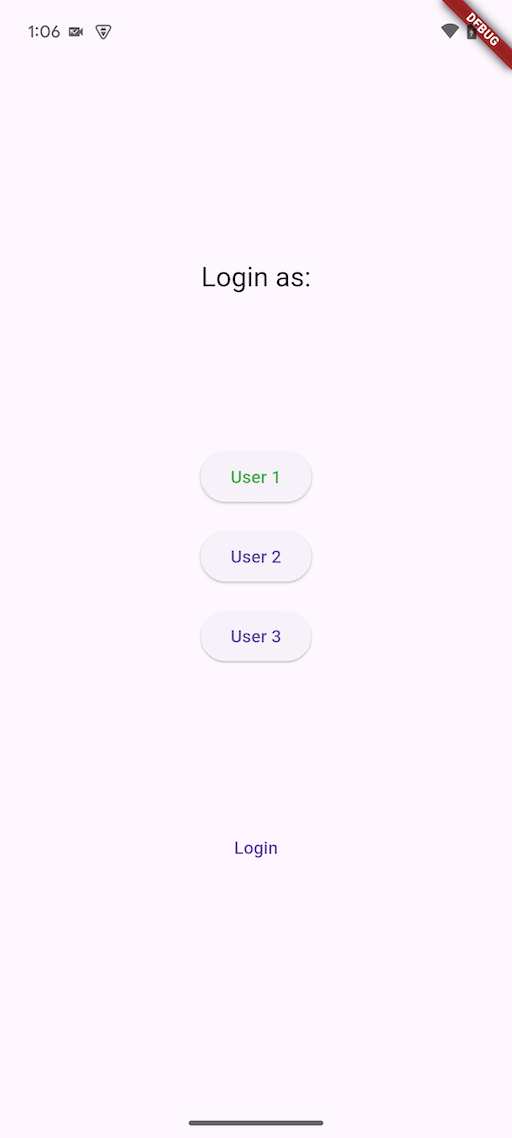
Building a Simple Login Page
Next, we'll create a basic login page where you can select a user to log in as.
12345678910111213141516171819202122232425262728293031323334353637383940414243444546474849505152535455565758596061626364656667686970717273747576import 'package:flutter/material.dart'; import 'package:ringing_tutorial/app_initializer.dart'; import 'package:ringing_tutorial/home_screen.dart'; import 'package:ringing_tutorial/tutorial_user.dart'; class LoginScreen extends StatefulWidget { const LoginScreen({super.key}); State<LoginScreen> createState() => _LoginScreenState(); } class _LoginScreenState extends State<LoginScreen> { TutorialUser? selectedUser; List<TutorialUser> users = TutorialUser.users; Widget build(BuildContext context) { return MaterialApp( home: Builder( builder: (context) { return Scaffold( body: Center( child: Column( spacing: 16, mainAxisAlignment: MainAxisAlignment.center, children: [ Text( 'Login as:', style: Theme.of(context).textTheme.titleLarge, ), const SizedBox(height: 90), ...users.map((user) { return ElevatedButton( style: ElevatedButton.styleFrom( foregroundColor: selectedUser?.user.id == user.user.id ? Colors.green : null, ), onPressed: () { setState(() { selectedUser = user; }); }, child: Text(user.user.name ?? ''), ); }), const SizedBox(height: 90), TextButton( onPressed: selectedUser != null ? () async { // We will implement this class in the next step await AppInitializer.storeUser(selectedUser!); await AppInitializer.init(selectedUser!); if (context.mounted) { Navigator.of(context).push( MaterialPageRoute( builder: (context) => HomeScreen(), ), ); } } : null, child: Text( 'Login', )), ], ), ), ); }, ), ); } }
Step 3 - Setting up the Stream Video client
To enable video calling and ringing functionality, we need to initialize the Stream Video client using your API key and the logged-in user token.
The StreamVideo instance will:
- Establish a connection with the Stream backend.
- Listen for events and enable call creation.
- Handle incoming calls via push notifications.
Handling Push Notifications
For ringing functionality, we need to set up the StreamVideoPushNotificationManager, which will:
- Register the device for push notifications.
- Handle core logic for ringing calls.
Implementing the AppInitializer Class
First, define a class to hold app keys:
12345class AppKeys {
  static const String streamApiKey = '{REPLACE_WITH_YOUR_STREAM_API_KEY}';
  static const String iosPushProviderName = '{REPLACE_WITH_YOUR_APN_PROVIDER_NAME}';
  static const String androidPushProviderName = '{REPLACE_WITH_YOUR_FIREBASE_PROVIDER_NAME}';
}
Next, define the AppInitializer class to store user data and initialize the StreamVideo client:
123456789101112131415161718192021222324252627282930313233343536373839404142434445464748495051525354555657585960616263import 'package:firebase_core/firebase_core.dart';
import 'package:ringing_tutorial/app_keys.dart';
import 'package:ringing_tutorial/firebase_options.dart';
import 'package:ringing_tutorial/tutorial_user.dart';
import 'package:flutter_secure_storage/flutter_secure_storage.dart';
import 'package:stream_video_flutter/stream_video_flutter.dart';
import 'package:stream_video_push_notification/stream_video_push_notification.dart';

class AppInitializer {
  static const storedUserKey = 'loggedInUserId';

  static Future<TutorialUser?> getStoredUser() async {
    final storage = FlutterSecureStorage();

    final userId = await storage.read(key: storedUserKey);
    if (userId == null) {
      return null;
    }

    return TutorialUser.users.firstWhere(
      (user) => user.user.id == userId,
    );
  }

  static Future<void> storeUser(TutorialUser tutorialUser) async {
    final storage = FlutterSecureStorage();
    await storage.write(key: storedUserKey, value: tutorialUser.user.id);
  }

  static Future<void> clearStoredUser() async {
    final storage = FlutterSecureStorage();
    await storage.delete(key: storedUserKey);
  }

  static Future<StreamVideo> init(TutorialUser tutorialUser) async {
    await Firebase.initializeApp(
      options: DefaultFirebaseOptions.currentPlatform,
    );

    return StreamVideo(
      AppKeys.streamApiKey,
      user: tutorialUser.user,
      userToken: tutorialUser.token,
      options: const StreamVideoOptions(
        keepConnectionsAliveWhenInBackground: true,
      ),
      pushNotificationManagerProvider:
          StreamVideoPushNotificationManager.create(
        iosPushProvider: const StreamVideoPushProvider.apn(
          name: AppKeys.iosPushProviderName,
        ),
        androidPushProvider: const StreamVideoPushProvider.firebase(
          name: AppKeys.androidPushProviderName,
        ),
        pushParams: const StreamVideoPushParams(
          appName: 'Ringing Tutorial',
          ios: IOSParams(iconName: 'IconMask'),
        ),
        registerApnDeviceToken: true,
      ),
    )..connect();
  }
}
Understanding the Code
In the code above, we:
- Store and retrieve user data to maintain login sessions, even if the app is closed.
- Initialize the Stream Video client using the user token and API key.
- Set up
StreamVideoPushNotificationManagerfor handling push notifications.
To store the user data securly we use flutter_secure_storage package. Remember to add it to your pubspec.yaml file:
1flutter_secure_storage: ^latest
This will allow us to keep the user logged in even after the app is closed and connect to ringing calls even when app is not in the foreground.
Configuring Push Notification Providers
The StreamVideoPushNotificationManager requires two push providers:
- One for iOS (APNs)
- One for Android (FCM)
At this point you will have to configure those providers in the Stream Dashboard.
- Follow the step-by-step guide in the Provider Configuration documentation.
- Use the names provided in the dashboard when initializing
StreamVideoPushProvider.
Connecting to the Stream Backend
Notice that after initializing the Stream Video client, we call the connect() method:
1streamVideo.connect();
This:
- Establishes a connection with the Stream backend for the logged-in user.
- Registers the current device for push notifications.
Step 4 - Building the home screen
Now that we have the Stream Video client set up, let's build a simple home screen where users will be able to initiate a ringing call.
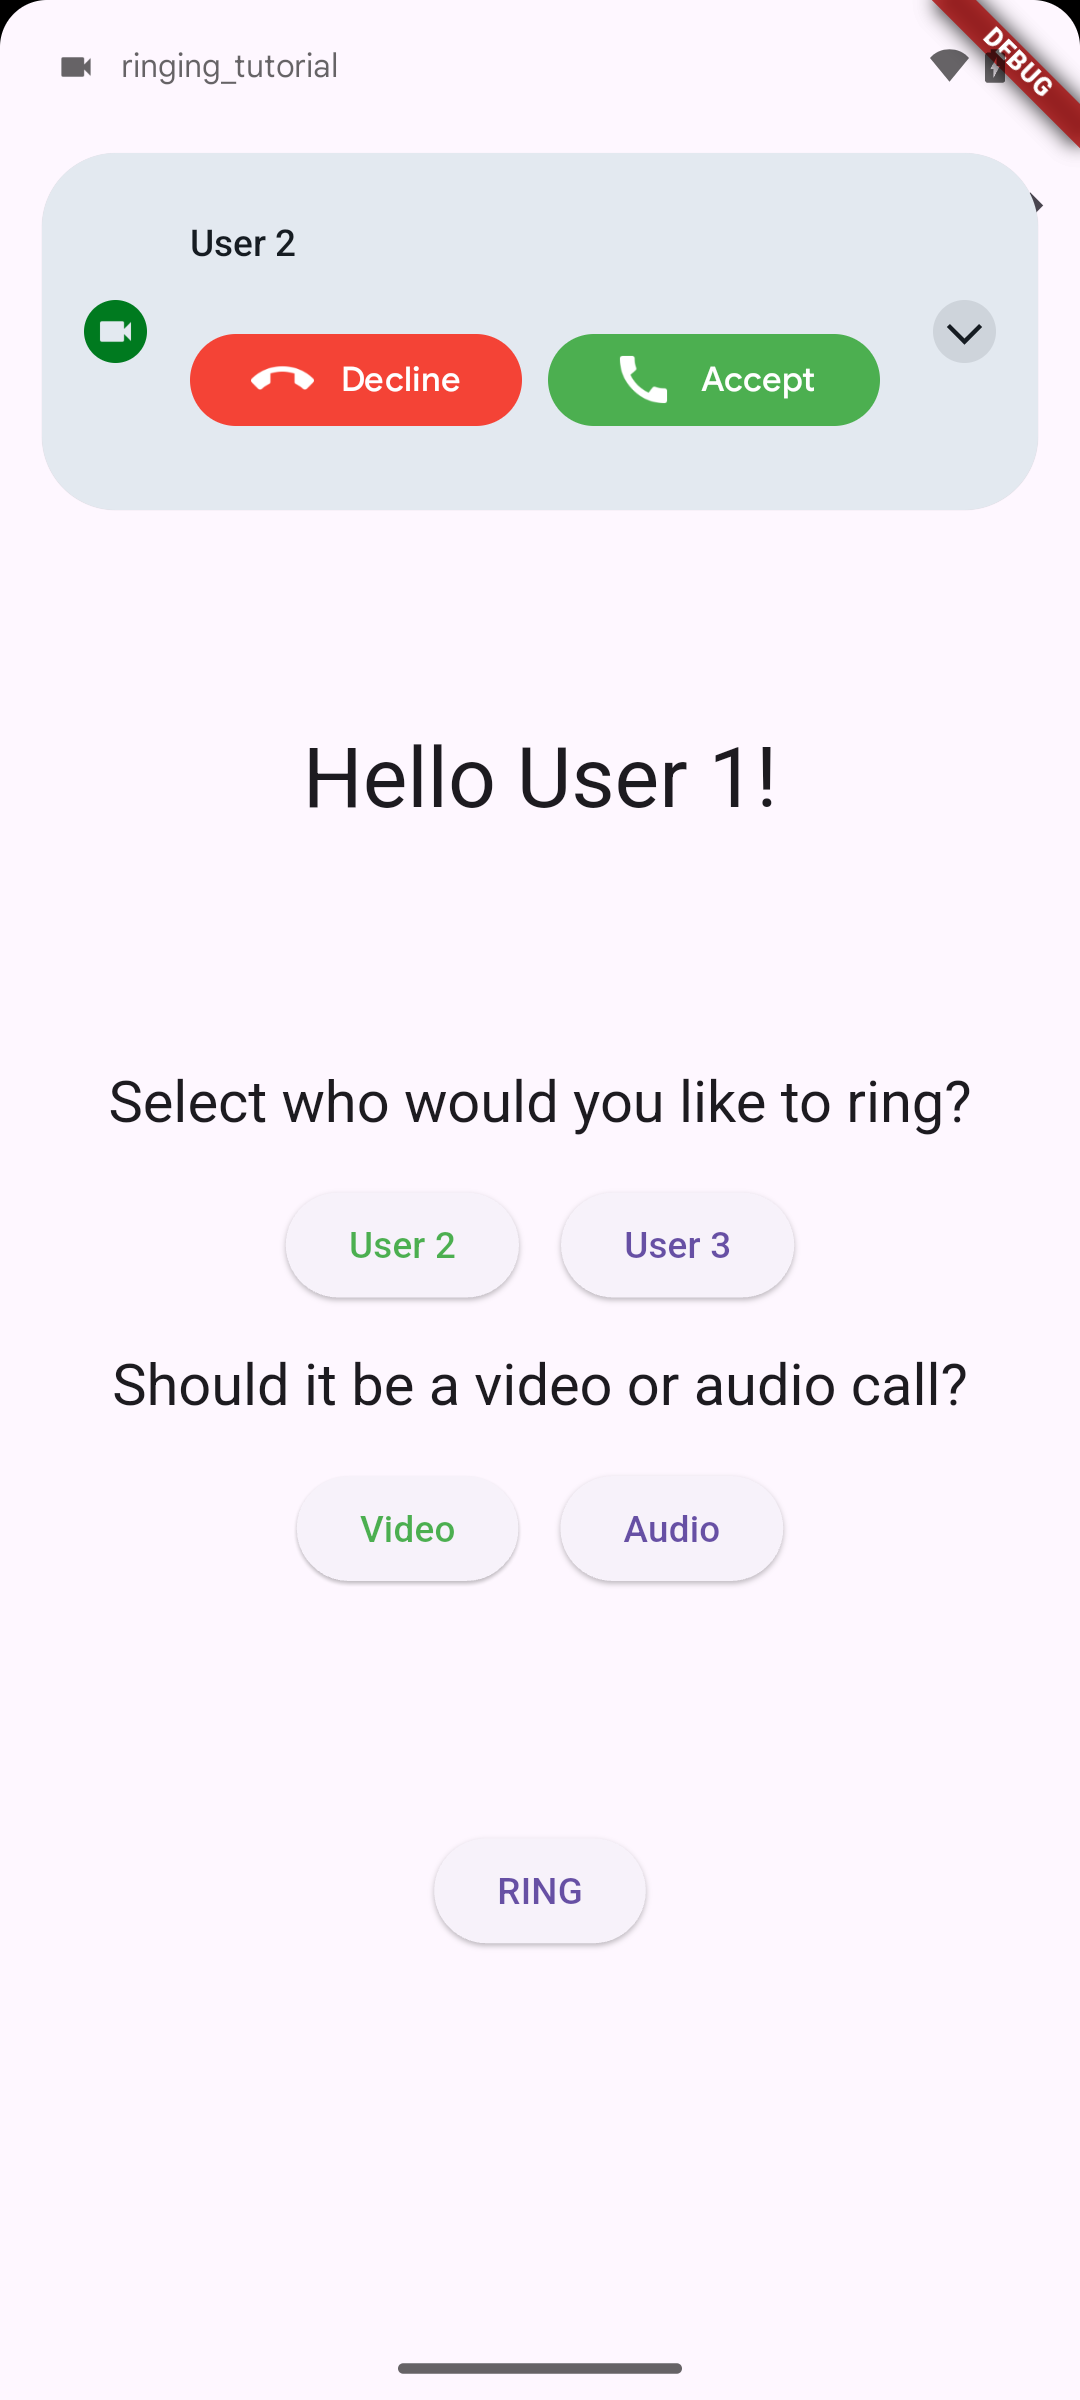
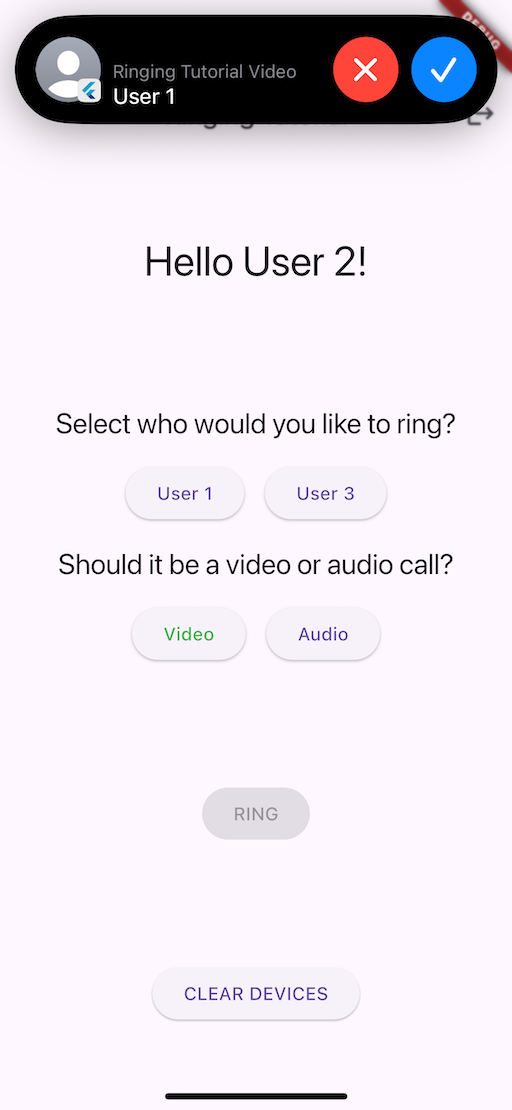
123456789101112131415161718192021222324252627282930313233343536373839404142434445464748495051525354555657585960616263646566676869707172737475767778798081828384858687888990919293949596979899100101102103104105106107108109110111112113114115116117118119120121122123124125126127128129130131132133134135136137138139140141142143144import 'dart:async'; import 'package:firebase_messaging/firebase_messaging.dart'; import 'package:flutter/material.dart'; import 'package:ringing_tutorial/app_initializer.dart'; import 'package:ringing_tutorial/login_screen.dart'; import 'package:ringing_tutorial/tutorial_user.dart'; import 'package:stream_video_flutter/stream_video_flutter.dart'; class HomeScreen extends StatefulWidget { const HomeScreen({super.key}); State<HomeScreen> createState() => _HomeScreenState(); } class _HomeScreenState extends State<HomeScreen> { final Subscriptions subscriptions = Subscriptions(); final List<String> selectedUserIds = []; bool videoCall = true; Widget build(BuildContext context) { return Scaffold( appBar: AppBar( title: const Text('Ringing Tutorial'), centerTitle: true, automaticallyImplyLeading: false, actions: [ IconButton( icon: const Icon(Icons.logout), onPressed: () async { await StreamVideo.instance.disconnect(); await StreamVideo.reset(); await AppInitializer.clearStoredUser(); subscriptions.cancelAll(); if (context.mounted) { Navigator.of(context).pushReplacement( MaterialPageRoute( builder: (context) => LoginScreen(), ), ); } }, ), ], ), body: Center( child: Column( mainAxisAlignment: MainAxisAlignment.center, children: [ Text( 'Hello ${StreamVideo.instance.currentUser.name}!', style: Theme.of(context).textTheme.headlineLarge, ), const SizedBox(height: 90), Text( 'Select who would you like to ring?', style: Theme.of(context).textTheme.titleLarge, ), const SizedBox(height: 16), Row( spacing: 16, mainAxisSize: MainAxisSize.min, children: [ ...TutorialUser.users .where( (u) => u.user.id != StreamVideo.instance.currentUser.id) .map((user) { return ElevatedButton( onPressed: () async { if (selectedUserIds.contains(user.user.id)) { selectedUserIds.remove(user.user.id); } else { selectedUserIds.add(user.user.id); } setState(() {}); }, style: ElevatedButton.styleFrom( foregroundColor: selectedUserIds.contains(user.user.id) ? Colors.green : null, ), child: Text(user.user.name ?? ''), ); }), ], ), const SizedBox(height: 16), Text( 'Should it be a video or audio call?', style: Theme.of(context).textTheme.titleLarge, ), const SizedBox(height: 16), Row( spacing: 16, mainAxisSize: MainAxisSize.min, children: [ ElevatedButton( onPressed: () async { setState(() { videoCall = true; }); }, style: ElevatedButton.styleFrom( foregroundColor: videoCall ? Colors.green : null, ), child: Text('Video'), ), ElevatedButton( onPressed: () async { setState(() { videoCall = false; }); }, style: ElevatedButton.styleFrom( foregroundColor: !videoCall ? Colors.green : null, ), child: Text('Audio'), ), ], ), const SizedBox(height: 90), ElevatedButton( onPressed: selectedUserIds.isEmpty ? null : _createRingingCall, child: const Text('RING'), ), ], ), ), ); } void dispose() { subscriptions.cancelAll(); super.dispose(); } }
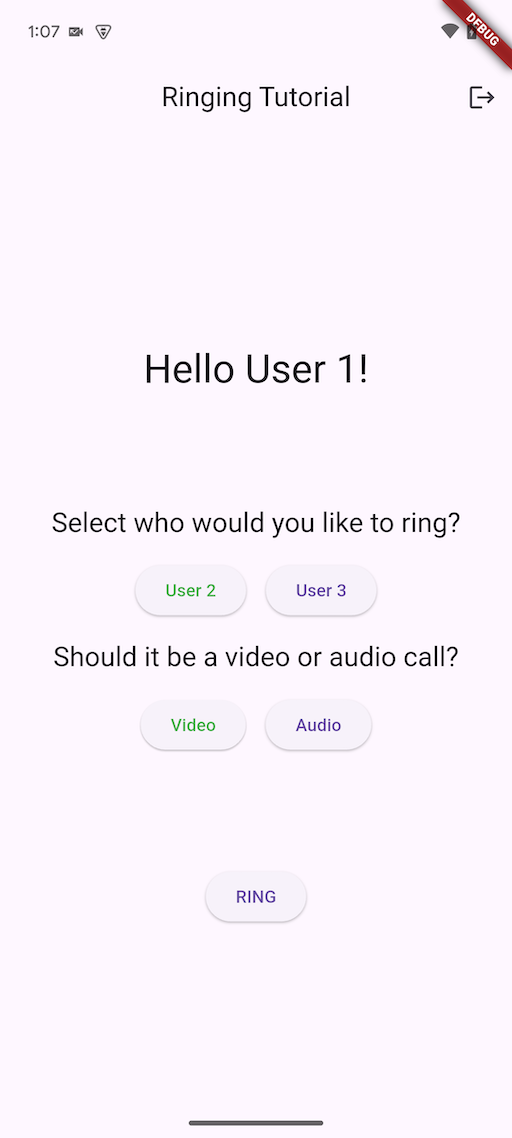
- The screen displays a list of users available to call.
- The user can select who to call and what type of call it should be.
- The "RING" button will initiate a call with ringing.
We also included the logout button that:
- Disconnects the user from the Stream backend.
- Clears the stored user data.
- Navigates back to the login screen.
- Cancels all active subscriptions. (this will be usefull in the next steps)
Wrapping Login and Home Screen in main.dart
Now, let's wrap the LoginScreen and HomeScreen in the main.dart file:
1234567891011121314151617181920212223242526272829303132333435363738import 'package:flutter/material.dart'; import 'package:ringing_tutorial/app_initializer.dart'; import 'package:ringing_tutorial/home_screen.dart'; import 'package:ringing_tutorial/login_screen.dart'; import 'package:ringing_tutorial/tutorial_user.dart'; Future<void> main() async { WidgetsFlutterBinding.ensureInitialized(); final storedUser = await AppInitializer.getStoredUser(); if (storedUser != null) { await AppInitializer.init(storedUser); } runApp(MainApp(storedUser: storedUser)); } class MainApp extends StatefulWidget { final TutorialUser? storedUser; const MainApp({ this.storedUser, super.key, }); State<MainApp> createState() => _MainAppState(); } class _MainAppState extends State<MainApp> { Widget build(BuildContext context) { return MaterialApp( home: widget.storedUser == null ? LoginScreen() : HomeScreen(), ); } }
With that implementation we have the basic structure of the app ready. Now we can focus on the call screen and call logic.
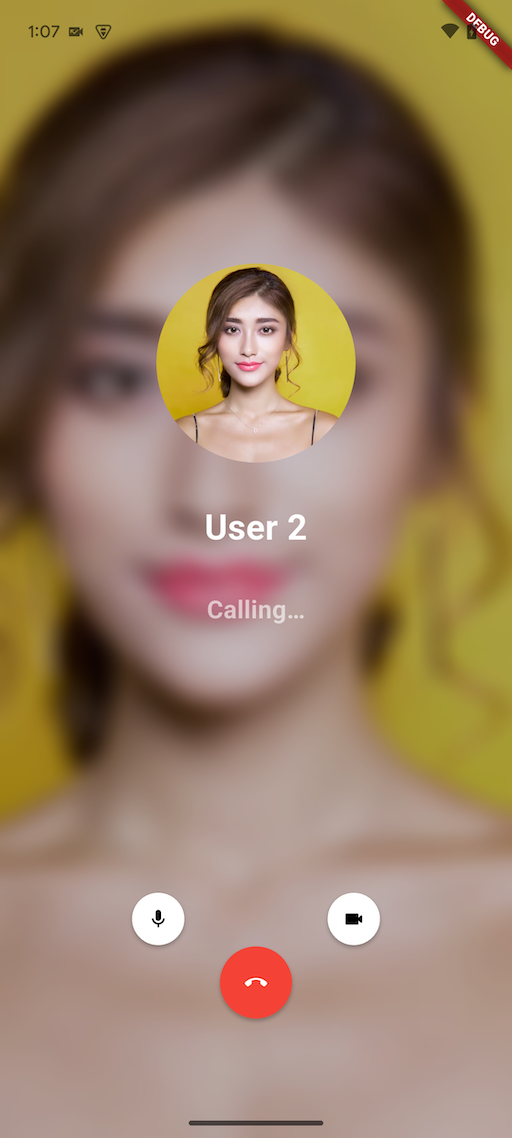
Step 6 - Building the Call Screen
Before we handle the actual call logic, let's create the final screen of the app. Call Screen where the video/audio call will take place.
The Call Screen will display the call UI using StreamCallContainer, a pre-built Stream Video UI component.
This component:
- Provides a full video/audio call experience.
- Includes built-in call controls.
- Adapts automatically for incoming, outgoing, and active calls.
12345678910111213141516171819202122232425import 'package:flutter/material.dart'; import 'package:stream_video_flutter/stream_video_flutter.dart'; class CallScreen extends StatefulWidget { final Call call; const CallScreen({ super.key, required this.call, }); State<CallScreen> createState() => _CallScreenState(); } class _CallScreenState extends State<CallScreen> { Widget build(BuildContext context) { return Scaffold( body: StreamCallContainer( call: widget.call, ), ); } }
Since all the screens are set up, let's implement the logic to start a call and handle the ringing functionality!
Step 7 - Creating the Call
Next, let's implement the _createRingingCall method in the _HomeScreenState class to initiate a ringing call.
1234567891011121314151617181920212223242526272829303132333435import 'package:uuid/uuid.dart';

Future<void> _createRingingCall() async {
    final call = StreamVideo.instance.makeCall(
      callType: StreamCallType.defaultType(),
      id: Uuid().v4(),
    );

    final result = await call.getOrCreate(
      memberIds: selectedUserIds,
      video: videoCall,
      ringing: true,
    );

    result.fold(
      success: (success) {
        if (mounted) {
          Navigator.of(context).push(
            MaterialPageRoute(
              builder: (context) => CallScreen(
                call: call,
              ),
            ),
          );
        }
      },
      failure: (failure) {
        ScaffoldMessenger.of(context).showSnackBar(
          SnackBar(
            content: Text(failure.error.message),
          ),
        );
      },
    );
  }
Understanding the Code
- Create a new call instance
- We use
StreamVideo.instance.makeCall()to create a new call object. - At this stage, the call is not yet started or connected to the Stream backend.
- We use
- Create or retrieve the call
- We call
call.getOrCreate()to either create a new call or fetch an existing one. - We pass:
memberIds: The selected user(s) to call.video: A boolean indicating if it's a video or audio call.ringing:true: Enables push notifications to notify recipients.
- We call
- Handle success or failure
- On success:
- Navigates to the
CallScreen, displaying the ongoing call UI. - Since it's a ringing call, the UI will show an outgoing call screen until the first recipient answers.
- Navigates to the
- On failure:
- Displays an error message using a SnackBar.
- On success:
At this point, we haven't yet handled push notifications for incoming calls. However, when you initiate a call, the caller's device should now display the ongoing call UI.
Next, we'll implement ringing notifications so that recipients get notified when someone calls them.
Step 8 - Handling Incoming Calls in Android
Handling Push Notifications
To show an incoming call notification on Android devices, we need to handle push notifications using the FirebaseMessaging plugin.
Add this initState() method to the HomeScreen class:
1234567891011121314151617static const int _fcmSubscription = 1; void initState() { super.initState(); FirebaseMessaging.instance.requestPermission(); _observeFcmMessages(); } void _observeFcmMessages() { subscriptions.add( _fcmSubscription, FirebaseMessaging.onMessage.listen(_handleRemoteMessage), ); }
Now, implement the _handleRemoteMessage method to process incoming calls:
123Future<bool> _handleRemoteMessage(RemoteMessage message) async {
  return StreamVideo.instance.handleRingingFlowNotifications(message.data);
}
First we request permission to receive push notifications, then we listen for incoming messages using FirebaseMessaging.onMessage.
We use the handleRingingFlowNotifications method provided in StreamVideo instance to handle the ringing flow notifications.
It automatically handles push notifications sent by Stream backend for incoming calls and also notifications about missed calls.
At this point when ringing the user that has Android device registered you should see the incoming call notification.
Reacting to CallKit events
For now tapping Accept or Decline buttons on the notification will not have any effect on the call.
To handle incoming calls on both iOS and Android we use flutter_callkit_incoming package internally.
It exposes CallKit events that we can use to handle incoming calls. We will now handle those events to react to accepting and declining the call.
Add this method to the _HomeScreenState class:
123456789101112131415161718192021static const int _callKitSubscription = 2; void _observeCallKitEvents() { final streamVideo = StreamVideo.instance; subscriptions.add( _callKitSubscription, streamVideo.observeCoreCallKitEvents( onCallAccepted: (callToJoin) { Navigator.push( context, MaterialPageRoute( builder: (context) => CallScreen( call: callToJoin, ), ), ); }, ), ); }
Now, call this method in the initState() method:
123456789void initState() { super.initState(); FirebaseMessaging.instance.requestPermission(); _observeFcmMessages(); _observeCallKitEvents(); }
It uses the observeCoreCallKitEvents method provided by the StreamVideo instance to listen for core CallKit events.
When the call is accepted, it navigates to the CallScreen to display the ongoing call UI.
Now when you accept the call on the Android device, while the app is in the foreground, you should be navigated to the call screen.
Handling ringing when Android app is in the background
To handle incoming calls when the app is in the background, we need to set up a background message handler using the FirebaseMessaging plugin.
First, let's define the handler inside home_screen.dart. This function must be:
- A top-level function (not inside any class).
- Annotated with
@pragma('vm:entry-point')to ensure it's accessible when running in a separate isolate. - Responsible for initializing the app and StreamVideo before processing the incoming call.
It might be a good idea to create a separate file for this handler, e.g., firebase_messaging_handler.dart.
1234567891011121314151617181920212223242526272829303132333435363738394041('vm:entry-point') Future<void> _firebaseMessagingBackgroundHandler(RemoteMessage message) async { await Firebase.initializeApp(options: DefaultFirebaseOptions.currentPlatform); try { final tutorialUser = await AppInitializer.getStoredUser(); if (tutorialUser == null) return; final streamVideo = StreamVideo.create( AppKeys.streamApiKey, user: tutorialUser.user, userToken: tutorialUser.token, options: const StreamVideoOptions( keepConnectionsAliveWhenInBackground: true, ), pushNotificationManagerProvider: StreamVideoPushNotificationManager.create( iosPushProvider: const StreamVideoPushProvider.apn( name: AppKeys.iosPushProviderName, ), androidPushProvider: const StreamVideoPushProvider.firebase( name: AppKeys.androidPushProviderName, ), pushParams: const StreamVideoPushParams( appName: 'Ringing Tutorial', ios: IOSParams(iconName: 'IconMask'), ), ), )..connect(); final subscription = streamVideo.observeCallDeclinedCallKitEvent(); streamVideo.disposeAfterResolvingRinging( disposingCallback: () => subscription?.cancel(), ); await streamVideo.handleRingingFlowNotifications(message.data); } catch (e, stk) { debugPrint('Error handling remote message: $e'); debugPrint(stk.toString()); } }
Key Points to Note
- The stored user data is used to initialize the
StreamVideoinstance. - We use
StreamVideo.create()factory to create a separate instance (instead of using StreamVideo default constructor that will ensure the StreamVideo.instance singleton is set). This instance is only needed during the ringing process. - The
disposeAfterResolvingRinging()method ensures the instance is disposed after the call is accepted, declined, or times out. - This prevents unnecessary resource usage and API connections since the app will take over once the call is resolved.
Next, we have to register the handler, we can do it inside the already created _observeFcmMessages() method:
12345678void _observeFcmMessages() { FirebaseMessaging.onBackgroundMessage(_firebaseMessagingBackgroundHandler); subscriptions.add( _fcmSubscription, FirebaseMessaging.onMessage.listen(_handleRemoteMessage), ); }
Now, when a call is received, the Android device will display an incoming call notification even if the app is in the background.
Handling ringing when Android app is terminated/killed
Currently, if the app is terminated or killed, an incoming call notification is displayed, but accepting the call only opens the app—it doesn't navigate to the call screen. To fix this, we need to check for any ringing calls when the app is reopened from a terminated state and automatically navigate to the call screen if a call is still ringing.
Add this code inside the _HomeScreenState class:
12345678910111213141516171819void _tryConsumingIncomingCallFromTerminatedState() { // This is only relevant for Android. if (CurrentPlatform.isIos) return; WidgetsBinding.instance.addPostFrameCallback((timeStamp) { StreamVideo.instance.consumeAndAcceptActiveCall( onCallAccepted: (callToJoin) { Navigator.push( context, MaterialPageRoute( builder: (context) => CallScreen( call: callToJoin, ), ), ); }, ); }); }
And call it in the initState() method:
1234567891011void initState() { super.initState(); FirebaseMessaging.instance.requestPermission(); _tryConsumingIncomingCallFromTerminatedState(); _observeFcmMessages(); _observeCallKitEvents(); }
💡 Important: To properly test ringing in a terminated state, run the app in Release mode to prevent the debugger from interfering. Use:
1flutter run --release
You might need to setup a proguard rules to be able to run the app in release mode.
You can use this sample proguard rules in android/app/proguard-rules.pro:
# Flutter core classes
-keep class io.flutter.plugin.**  { *; }
-keep class io.flutter.util.**  { *; }
-keep class io.flutter.view.**  { *; }
-keep class io.flutter.plugins.**  { *; }
-keep class io.flutter.embedding.** { *; }
-keep class io.flutter.app.** { *; }

# Keep third-party Flutter plugin classes
-keep class com.hiennv.flutter_callkit_incoming.** { *; }

# Suppress warnings for common missing classes
-dontwarn org.conscrypt.**
-dontwarn org.w3c.dom.bootstrap.DOMImplementationRegistry
We now have a fully functional ringing experience on Android. Next, let's ensure iOS handles incoming calls.
Step 9 - Handling Incoming Calls in iOS
If you skipped the Android push handling make sure you have _observeCallKitEvents() method called in the initState() method as mentioned in Reacting to CallKit events section above.
It is used both on Android and iOS.
To handle incoming calls on iOS, our backend sends VoIP push notifications via APNs. These need to be managed by CallKit framework on the native side.
For that go to the AppDelegate.swift class and add the following code:
12345678910111213import stream_video_push_notification

override func application(
    _ application: UIApplication,
    didFinishLaunchingWithOptions launchOptions: [UIApplication.LaunchOptionsKey: Any]?
) -> Bool {
    GeneratedPluginRegistrant.register(with: self)

    // Register for push notifications.
    StreamVideoPKDelegateManager.shared.registerForPushNotifications()

    return super.application(application, didFinishLaunchingWithOptions: launchOptions)
}
StreamVideoPKDelegateManager.shared.registerForPushNotifications() is the crucial line. It registers the app for VoIP push notifications and triggers CallKit to show an incoming call screen when a call arrives.
Testing Incoming Calls on iOS
To test properly:
- Use a real device (APNs does not work in simulators).
- Run in Release mode (flutter run --release) if you want to test ringing in terminated state.
- Ensure your APNs credentials are correctly configured in the Stream Dashboard.
And that's it! Now when you receive a call on iOS device you should see the incoming call notification.
Congratulations! 🎉 You've successfully built a fully functional ringing experience using Stream Video in a Flutter app.
What We Covered:
- Setting up Stream Video and initializing the client.
- Building UI for login, home, and call screens.
- Handled authentication and user data storage.
- Configured FCM and APNs providers in the Stream Dashboard.
- Creating and handling calls (video, and audio).
- Implementing push notifications for incoming calls.
- Handling background and terminated states on Android and iOS.
At this point, your app should be able to send and receive calls with ringing notifications across devices, even when in the background or terminated.
Next Steps
To further improve your app, check out these helpful links:
- Stream Video Docs: Deep dive into Stream Video's incoming call documentation
- Troubleshooting Common Issues: Learn how to troubleshoot common issues
- Working Ringing Sample App: Sample app build based on this tutorial
- Dogfooding App: Our internal Dogfooding with most of the SDK features implemented
We hope you've enjoyed this tutorial, and please do feel free to reach out if you have any suggestions or questions.