<key>NSCameraUsageDescription</key>
<string>$(PRODUCT_NAME) needs access to your camera for video calls.</string>
<key>NSMicrophoneUsageDescription</key>
<string>$(PRODUCT_NAME) needs access to your microphone for voice and video calls.</string>CallKit Integration
Introduction
CallKit allows us to have system-level phone integration on iOS. With that, we can use CallKit to present native incoming call screens, even when the app is closed. CallKit integration also enables the calls made through third-party apps be displayed in the phone’s recent call list in the Phone app.
The StreamVideo SDK is compatible with CallKit, enabling a complete calling experience for your users.
Make sure you created APNs provider and configured push notification manager as described in this section.
Add camera and microphone permissions
Add these permissions to Info.plist in order to support video calling:
Enable background modes capabilities
To maintain connectivity, handle incoming calls, and manage ongoing calls when the app is not in the foreground, you can enable iOS background modes. These modes ensure your app remains responsive to call events without being suspended by the system.
Enabling Background Modes in Xcode
Open your app’s project in Xcode.
Select your app’s target.
Navigate to the Signing & Capabilities tab.
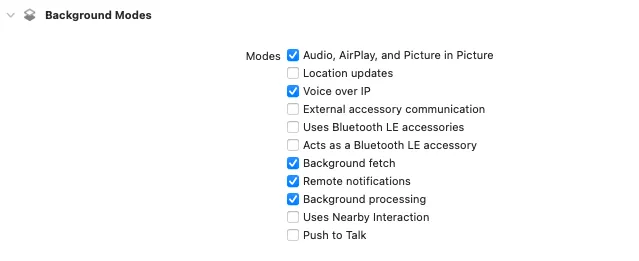
In the Background Modes section, enable the following options:
- “Voice over IP”
- “Remote notifications”
- “Background processing”
Adding Background Modes to Info.plist
Alternatively, you can directly configure the necessary background modes in your app’s Info.plist file by adding the following keys:
<key>BGTaskSchedulerPermittedIdentifiers</key>
<array>
	 <string>$(PRODUCT_BUNDLE_IDENTIFIER)</string>
</array>
<key>UIBackgroundModes</key>
<array>
	<string>audio</string>
	<string>processing</string>
	<string>remote-notification</string>
	<string>voip</string>
</array>
Ensure Push Notification Capabilities
To properly receive VoIP and remote push notifications, you need to enable the Push Notifications capability in Xcode:
- Open your app’s project in Xcode.
- Select your app’s target.
- Navigate to the Signing & Capabilities tab.
- Click the + Capability button.
- Search for Push Notifications and add it.
Make sure your app has Push Notification Capabilities set in Signing & Capabilieties.
Handling CallKit events (common for iOS and Android)
CallKit events are exposed by the flutter_callkit_incoming package that we utilize to handle incoming calls on both iOS and Android. It is important to handle these events to ensure a seamless calling experience regardless of which provider is used for push.
In a high-level widget in your app, add this code to listen to CallKit events:
import 'package:rxdart/rxdart.dart';

final _compositeSubscription = CompositeSubscription();

@override
void initState() {
  ...
  _observeCallKitEvents()
}

void _observeCallKitEvents() {
  final streamVideo = StreamVideo.instance;

  // You can use our helper method to observe core CallKit events
  // It will handled call accepted, declined and ended events
  _compositeSubscription.add(
      streamVideo.observeCoreCallKitEvents(
        onCallAccepted: (callToJoin) {
            // Replace with navigation flow of your choice
            Navigator.push(
              context,
              MaterialPageRoute(builder: (context) => CallScreen()),
            );
        },
      ),
    );

  // Or you can handle them by yourself, and/or add additional events such as handling mute events from CallKit
  // _compositeSubscription.add(streamVideo.onCallKitEvent<ActionCallToggleMute>(_onCallToggleMute));
}

@override
void dispose() {
  // ...
  _compositeSubscription.cancelAll();
}
If you need to manage the ringing flow call, you can use the StreamVideo.pushNotificationManager. As an example, let’s
say you want to end all calls, you can end them this way:
StreamVideo.instance.pushNotificationManager?.endAllCalls();Add native code to the iOS project
In your iOS project, add the following imports to your AppDelegate.swift:
import UIKit
import Flutter
import stream_video_push_notification
In the same file, add an extra line to your AppDelegate class which registers the app for push notifications:
override func application(
    _ application: UIApplication,
    didFinishLaunchingWithOptions launchOptions: [UIApplication.LaunchOptionsKey: Any]?
) -> Bool {
    GeneratedPluginRegistrant.register(with: self)

    // Register for push notifications.
    StreamVideoPKDelegateManager.shared.registerForPushNotifications()

    return super.application(application, didFinishLaunchingWithOptions: launchOptions)
}
You should now be able to receive a ringing call on iOS.
To test this:
- Create a ringing call on another device (as describe in previous section).
- Add the ID of a user logged into the iOS device to the
memberIdsarray in thecall.getOrCreate(ringing: true, memberIds: [{ID}])method. - You should see the CallKit ringing notification on the iOS device.
If you encounter any issues, refer to the Troubleshooting section for solutions to common mistakes.