// MyHud.h

UCLASS()
class AStreamChatSampleHud final : public AHUD
{
  GENERATED_BODY()

public:
  AStreamChatSampleHud();
  virtual void BeginPlay() override;

  UPROPERTY(VisibleAnywhere, BlueprintReadOnly)
  UStreamChatClientComponent* Client;
};
Unreal Introduction
The Unreal SDK enables you to build any type of chat or messaging experience for Android, iOS, Windows, macOS or Linux. Support for more platforms is coming soon!
The SDK is implemented as an Unreal Engine Plugin, which includes low-level client access to the Stream Chat service as well as an early preview of some UI widgets which are ready to be dropped into your project.
Before reading the docs, consider trying our online API tour, it is a nice way to learn how the API works. It’s in-browser so Javascript-based but the ideas are pretty much the same as Unreal.
Getting started
This guide will quickly help you get up to speed on Stream’s Chat API. The API is flexible and allows you to build any type of chat or messaging application.
First, you want to make sure you’ve downloaded the latest release of the Stream Chat plugin from the Releases page of the GitHub repository and copied it to the Plugins directory of your project.
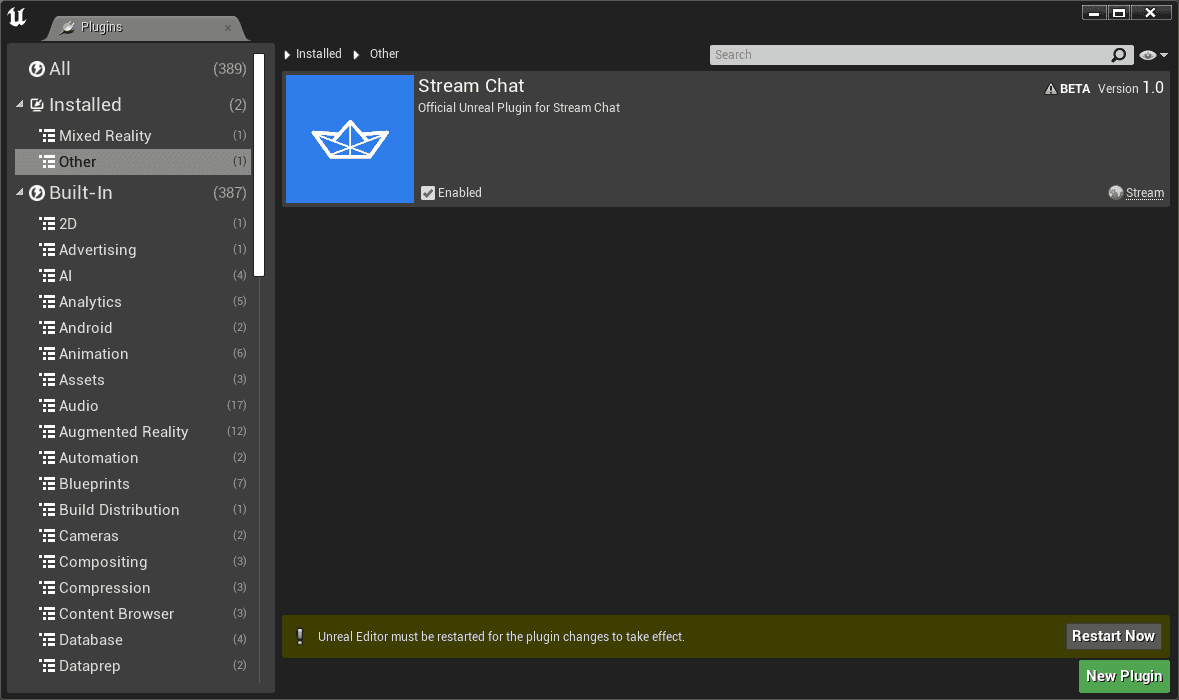
Next, make sure you have the Stream Chat plugin enabled in the Plugins panel of your project.

Chat client
You’ll need to place the StreamChatClientComponent ActorComponent on one of the Actors of your project. Recommended places include your HUD or GameState actors.
// MyHud.cpp

AStreamChatSampleHud::AStreamChatSampleHud()
{
  // Create a new instance of [UStreamChatClientComponent] passing the api_key obtained
  //from your project dashboard.
  Client = CreateDefaultSubobject<UStreamChatClientComponent>(TEXT("Client"));
  Client->ApiKey = TEXT({{ api_key }}");
}

void AStreamChatSampleHud::BeginPlay()
{
  Super::BeginPlay();

  /// Set the current user and connect the websocket.
  /// In a production scenario, this should be done using a backend to generate
  /// a user token using our server SDK.
  /// Please see the following for more information:
  /// https://getstream.io/chat/docs/ios_user_setup_and_tokens/
  const FUser User{TEXT("super-band-9")};
  const FString Token{TEXT("{{ chat_user_token }}")};
  Client->ConnectUser(
    User,
    Token,
    [](const FUserRef& UserRef)
    {
      // Successfully connected
    });
}
The user token is typically provided by your backend when you login or register in the app. If authentication is disabled for your app you can also use a Client->DevToken(UserId) to generate an insecure token for development. You should never launch into production with authentication disabled.
For more complex token generation and expiration examples have a look at the token provider documentation.
Channels
Let’s continue by watching your first channel. A channel contains messages and a list of members who are permanently associated with the channel and a list of watchers currently watching the channel. The example below shows how to set up a channel:
FChannelProperties Props = FChannelProperties::WithType(TEXT("messaging"));
Props.SetId(TEXT("unrealdevs"));
Props.ExtraData.SetString(TEXT("name"), TEXT("Unreal devs"));

Props.ExtraData.SetNumber(TEXT("my_custom_number"), 123);
Client->WatchChannel(
  Props,
  [](UChatChannel* Channel)
  {
    // Started watching channel
  });
We construct a FChannelProperties struct with a Channel Type and a Channel ID ( messaging and unrealdevs in this case). The Channel ID is optional; if you leave it out, the ID is determined based on the list of members, which can be set instead using SetMembers().
The Channel Type controls the settings we’re using for this channel.
There are 5 default types of channels:
livestream
messaging
team
gaming
commerce
These five options above provide you with the most suitable defaults for their use cases. You can also define custom channel types if one of the defaults don’t work for your use case.
The channel properties struct also contains a member ExtraData which contains the extra channel data. You can add as many custom fields as you would like as long as the total size of the resulting JSON object is less than 5 KB. Here we set the name field which is used by convention for the human-readable name of the channel.
Messages
Now that we have the channel set up, let’s send our first chat message:
FMessage Message{TEXT("I told them I was pesca-pescatarian. Which is one who eats solely fish who eat other fish.")};
Message.ExtraData.SetNumber(TEXT("custom_field"), 123);
Channel->SendMessage(Message);
Similar to users and channels, the SendMessage method allows you to add custom fields. When you send a message to a channel, Stream Chat automatically broadcasts to all the people that are watching this channel and updates in real-time.
Querying channels
The Client->QueryChannels method enables you to retrieve a list of channels. You can specify a filter and sort order. The client keeps the channels list updates as new messages, reactions and new channels arrive.
const FFilter Filter = FFilter::And({
  FFilter::In(TEXT("members"), {TEXT("thierry")}),
  FFilter::Equal(TEXT("type"), TEXT("messaging")),
});
const TArray<FChannelSortOption> SortOptions{{EChannelSortField::LastMessageAt, ESortDirection::Descending}};
Client->QueryChannels(
  [](const TArray<UChatChannel*> ReceivedChannels)
  {
    // Started watching channels
  },
  Filter,
  SortOptions);
To learn more about which fields you can query and sort on have a look at the query channels documentation.
Conclusion
Now that you understand the building blocks of a fully-functional chat integration, you can take a tour of the Unreal In-Game Chat tutorial to understand how to add the UI/UX directly into your app.
We also recommend to take a look at some of the samples, which include a number of examples of integration into different types of games and applications.
In the next sections of the documentation, we dive deeper into details on each API endpoint.