dependencies {
    implementation files('libs/MiPush_SDK_Client_5_0_6-G_3rd.aar')
}Xiaomi Mi Push
Follow this guide to get push notifications from Stream Chat using Xiaomi Mi Push.
Setting up Notifications on the Stream Dashboard
First, to get notifications from Stream, you’ll need to provide your Xiaomi app details on the Stream dashboard.
Go to the Xiaomi Console, and select the project your app belongs to.
Create a new Xiaomi project here if you don’t have one yet.
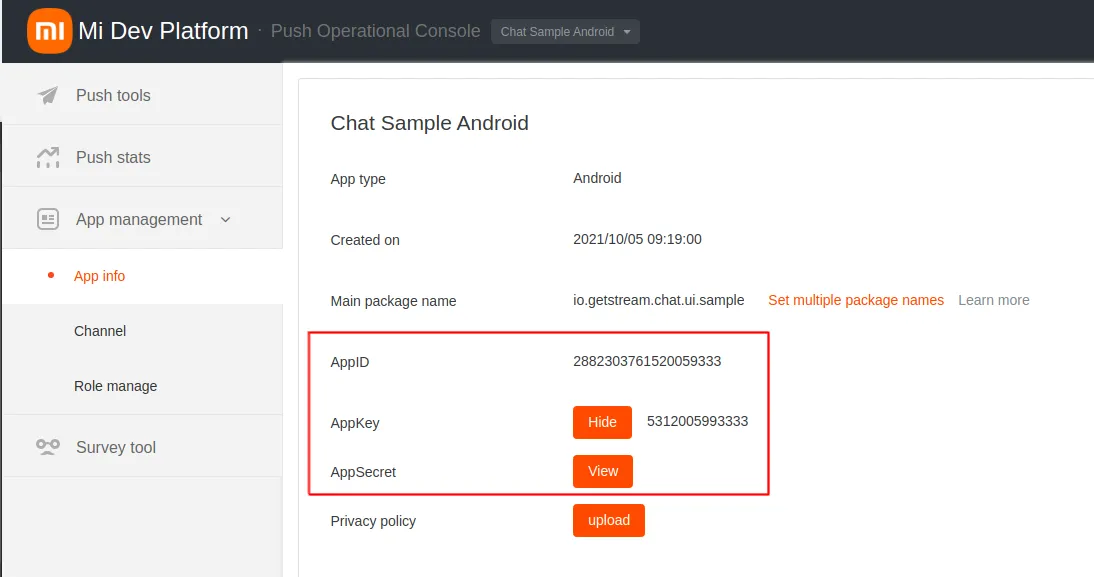
Click on App Info and locate the App ID and App secret, and copy them (if values are not shown, you need to click View button):


Open the Stream Dashboard, and go to the Chat Overview page.

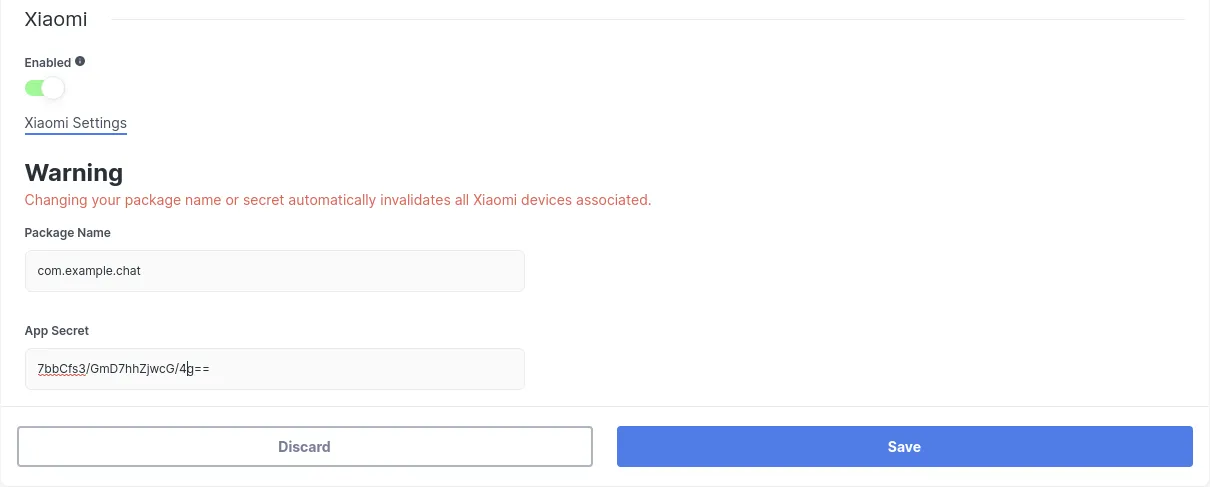
Find and select the Xiaomi switch. Paste your App ID and App secret, and click Save to confirm your changes.

That’s all you need to configure on the dashboard. You can now set up the client-side integration.
Receiving Notifications in the Client
First, add Xiaomi to your Android project. You need to download Xiaomi Mi Push SDK and add it to your project. At the time of writing this documentation, they don’t provide any Maven repository that you can use, so you need to download the.aar file manually and add it to the libs folder of your app, following their instructions.
Stream Chat for Android offers an artifact that allows easy setup of Xiaomi Mi Push. Add this dependency to your app’s build.gradle file:
dependencies {
    implementation "io.getstream:stream-android-push-xiaomi:$stream_version"
}
Then, create a XiaomiPushDeviceGenerator and add it to the list of generators in NotificationConfig, which you should pass into ChatClient.Builder when you initialize the SDK:
val notificationConfig = NotificationConfig(
    pushDeviceGenerators = listOf(
        XiaomiPushDeviceGenerator(
            context = context,
            appId = "YOUR XIAOMI APP ID",
            appKey = "YOUR XIAOMI APP KEY",
            providerName = "providerName",
        )
    )
)
ChatClient.Builder("apiKey", context)
    .notifications(notificationConfig)
    .build()
boolean pushNotificationEnabled = true;
List<PushDeviceGenerator> pushDeviceGeneratorList = Collections.singletonList(new XiaomiPushDeviceGenerator(context, "YOUR HUAWEI APP ID", "YOUR XIAOMI APP KEY", "providerName", Region.Global));
NotificationConfig notificationConfig = new NotificationConfig(true, pushDeviceGeneratorList);
new ChatClient.Builder("apiKey", context)
.notifications(notificationConfig)
.build();You must initialize ChatClient before you can process push notifications. A good way to achieve this is by creating it within the Application class.
Your client is now set up to receive notifications from Stream using Xiaomi Mi Push.
Using a Custom PushMessageReceiver
The Stream Xiaomi push provider artifact contains a ChatXiaomiMessagingReceiver implementation that sends new Xiaomi tokens to Stream and forwards incoming push messages to ChatClient to handle.
If you’re using Xiaomi notifications for other purposes inside your app as well, you will need your own custom receiver to replace this. Here, you have to call XiaomiMessagingDelegate’s registerXiaomiToken and handleMiPushMessage methods, like so:
class CustomPushMessageReceiver : PushMessageReceiver() {

    override fun onReceiveRegisterResult(context: Context, miPushCommandMessage: MiPushCommandMessage) {
        // Update device's token on Stream backend
        try {
            XiaomiMessagingDelegate.registerXiaomiToken(miPushCommandMessage, "providerName")
        } catch (exception: IllegalStateException) {
            // ChatClient was not initialized
        }
    }

    override fun onReceivePassThroughMessage(context: Context, miPushMessage: MiPushMessage) {
        try {
            if (XiaomiMessagingDelegate.handleMiPushMessage(miPushMessage)) {
                // MiPushMessage was from Stream and it is already processed
            } else {
                // MiPushMessage wasn't sent from Stream and it needs to be handled by you
            }
        } catch (exception: IllegalStateException) {
            // ChatClient was not initialized
        }
    }
}
public final class CustomPushMessageReceiver extends PushMessageReceiver {
@Override
public void onReceiveRegisterResult(Context context, MiPushCommandMessage miPushCommandMessage) {
// Update device's token on Stream backend
try {
XiaomiMessagingDelegate.registerXiaomiToken(miPushCommandMessage, "providerName");
} catch (IllegalStateException exception) {
// ChatClient was not initialized
}
}
@Override
public void onReceivePassThroughMessage(Context context, MiPushMessage miPushMessage) {
try {
if (XiaomiMessagingDelegate.handleMiPushMessage(miPushMessage)) {
// MiPushMessage was from Stream and it is already processed
} else {
// MiPushMessage wasn't sent from Stream and it needs to be handled by you
}
} catch (IllegalStateException exception) {
// ChatClient was not initialized
}
}
}Your custom receiver needs to have an <intent-filter> priority higher than -1 to replace our SDKs service. (By default, this priority is 0.)
Push Notification Payload
Push notifications are delivered as data payloads that the SDK can use to convert into the same data types that are received when working with the APIs.
When a message received by the Chat API, according to the delivery rules, it kicks a job that sends a regular data message (as below) to configured push providers on your app. According to the battery and the online status of the device, push providers deliver this payload to the actual devices. When a device receives the payload, it’s passed to the SDK which connects to Chat API to receive regular message and channel records and unmarshals them into in-memory objects and gives control to you by passing these objects. At this point, your application can use these objects to generate any push notification to be shown to the user.
This is the main payload which will be sent to each configured provider:
{
  "sender": "stream.chat",
  "type": "message.new",
  "version": "v2",
  "message_id": "d152f6c1-8c8c-476d-bfd6-59c15c20548a",
  "id": "d152f6c1-8c8c-476d-bfd6-59c15c20548a",
  "channel_type": "messaging",
  "channel_id": "company-chat",
  "cid": "messaging:company-chat",
  "receiver_id": "company-chat-user1"
}