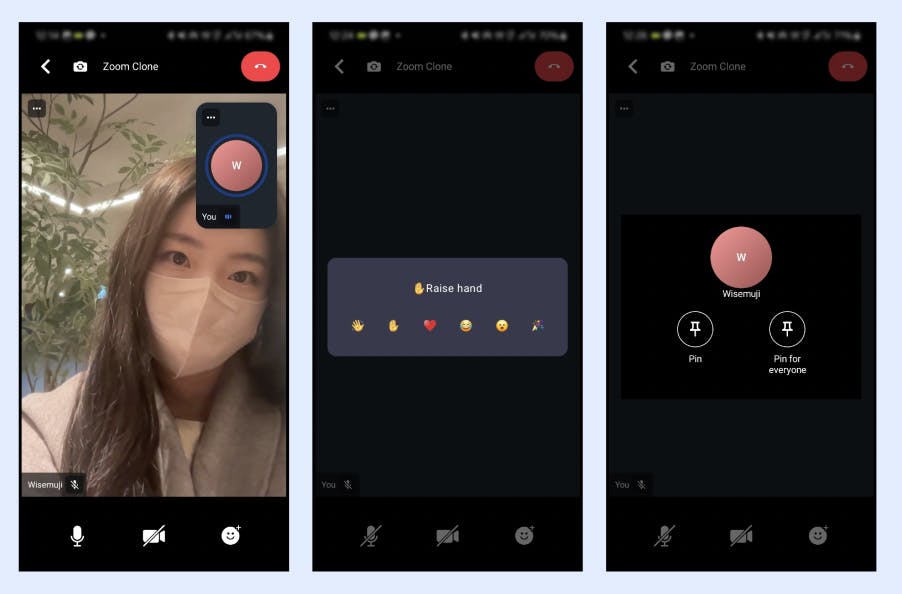
Suhyeon Kim is an Android Developer and Educator working for Woowa Bros. After regularly using and enjoying video conferencing solutions at work she felt inspired to create a Zoom clone app using Jetpack Compose, which is considered one of the most popular toolkits in modern Android development.
However, there are some challenges in implementing real-time video calling features. Many resources are required to implement features for handling video and audio streams, ensuring synchronization among participants, handling errors, and maintaining connection stability in different network environments.
The Stream Video SDK is a comprehensive solution that makes it easier to develop real-time video calls. It helps developers concentrate on creating unique and engaging user experiences without understanding the complex development behind providing users with a smooth video calling experience.
This post shows how to build a real-time Zoom clone app using the Stream Video SDK for Compose. Following this guide will teach you the steps to effectively implement real-time video calls.
Get the Complete Code
All necessary code and setup instructions in this article are available on GitHub. In order to build the app, you need to input a secret key to authenticate your application with the Stream Video SDK.
Follow the steps outlined below:
- Go to the Stream login page.
- If you have your GitHub account, click the SIGN UP WITH GITHUB button and you can sign up within a couple of seconds.

- Go to the Dashboard and click the Create App button like the below.

- Fill in the blanks like the below and click the Create App button.

- You will see the Key like the figure below and then copy it.

- Create a
secrets.propertiesfile on the root project directory with the text below using your API key:
1STREAM_API_KEY=REPLACE WITH YOUR API KEY
Build and run the project, and you're all set.
Features to Implement

These are four main screens from the Zoom Android app to clone to our app:
- Lobby: A screen where users decide to start or join a meeting.
- Start a Meeting: A screen where users can create a new meeting.
- Join a Meeting: Participate in a pre-existing meeting by entering a meeting ID.
- Meeting Room: The main interface for video calls, using the Stream Video SDK for real-time communication.
In the Meeting Room, these essential video call features are implemented:
- Toggling Microphone/Camera
- Flipping Camera
- Emoji Reactions
- Leaving a Call
Design Style
I used Figma to closely replicate the design of the Zoom Android app. By cloning the Zoom App UI project from the Figma Community, I was able to access a variety of SVG files that include important icons and components used in the app.
With the help of Figma, I replicated the design of key screens for the Zoom app. This included detailing the color palette, margins (measured in dp), and font sizes, preparing for direct code implementation.

The color scheme was organized following Material3 Color Roles, ensuring that the colors match Material Components when using Compose's Material UI Components. The preparation resulted in developing a light color scheme, with plans to also create a version for dark mode later.
Configure the Video SDK
Let’s start by setting up the Stream Video SDK. We need to add the dependencies of the SDK in the build.gradle (app).
12345dependencies {
   implementation("io.getstream:stream-video-android-ui-compose:0.5.1")
   implementation("io.getstream:stream-video-android-previewdata:0.5.1")
   // ...
}
stream-video-android-ui-compose includes the video core SDK + compose UI components. (If you only need the core parts, use stream-video-android-core).
stream-video-android-previewdata allows you to get mock instances of them and write your preview or test codes for Stream Video UI components easily.
Implement Start/Join a Meeting

First, you need to initialize the SDK in the Application class(or any initializing tools to configure through application lifecycle). You can see that the STREAM_API_KEY we provided earlier is initialized with the BuildConfig class.
12345678910111213141516171819202122class ZoomCloneComposeApplication : Application() {
   override fun onCreate() {
       super.onCreate()

       initStreamVideo()
   }

   private fun initStreamVideo() {
       val userId = "wisemuji"
       StreamVideoBuilder(
           context = applicationContext,
           apiKey = BuildConfig.STREAM_API_KEY,
           token = StreamVideo.devToken(userId),
           user = User(
               id = userId,
               name = "Wisemuji",
               image = "http://placekitten.com/200/300",
               role = "admin"
           )
       ).build()
   }
}
Next, we need to work with the Call object. Fetch the StreamVideo instance and use it to create the Call object.
123val streamVideo = StreamVideo.instance()
val call = streamVideo.call(type = type, id = id)
val result = call.join(create = true)
It's recommended to use a unique ID for creating this object. If no unique ID is provided, the SDK generates one automatically. This behavior is specified in the Stream Video documentation, but my curiosity led to an investigation to see if this was actually how it works. So I personally investigated the implementation of the StreamVideo interface made by Stream developers to see how it works inside.
123456// https://github.com/GetStream/stream-video-android/.../StreamVideo.kt
public fun call(type: String, id: String = ""): Call

// https://github.com/GetStream/stream-video-android/.../StreamVideoImpl.kt
override fun call(type: String, id: String): Call {
   val idOrRandom = id.ifEmpty { UUID.randomUUID().toString() }
By default, the StreamVideo interface will accept an empty string as the ID for a call. Inside StreamVideoImpl(which is the implementation of the interface), verifies whether the ID is empty and provides a random UUID if needed.
As you can see, the Stream Video SDK is an open-source project, allowing developers to view the entire source code on Github and access the implementation of these logics directly. This shows the advantage of using open-source libraries, enabling direct verification and understanding of the implemented logic.
The logic to create and manage a meeting call is implemented in the MeetingRoomViewModel. This ViewModel handles both scenarios: joining an existing meeting with a provided call ID or starting a new meeting, which triggers the generation of a unique ID.
Here is the complete code snippet of the MeetingRoomViewModel:
12345678910111213141516171819202122232425262728@HiltViewModel
class MeetingRoomViewModel @Inject constructor(
   savedStateHandle: SavedStateHandle,
) : ViewModel() {
   private val meetingArgs: MeetingRoomArgs = MeetingRoomArgs(savedStateHandle)
   private val callId = meetingArgs.callId

   private val _uiState =
       MutableStateFlow<MeetingUiState>(MeetingUiState.Loading)
   val uiState: StateFlow<MeetingUiState> = _uiState

   fun loadMeeting(type: String = DEFAULT_TYPE, id: String = callId) {
       viewModelScope.launch {
           val streamVideo = StreamVideo.instance()
           val call = streamVideo.call(type = type, id = id)
           val result = call.join(create = true)
           result.onSuccess {
               _uiState.value = MeetingUiState.Success(call)
           }.onError {
               _uiState.value = MeetingUiState.Error
           }
       }
   }

   companion object {
       private const val DEFAULT_TYPE = "default"
   }
}
So the meeting call loads when accessing the meeting room screen.
1234567@Composable
fun MeetingRoomScreen(
   viewModel: MeetingRoomViewModel = hiltViewModel(),
) {
   LaunchedEffect(key1 = Unit) {
       viewModel.loadMeeting()
   }
Implement Meeting room

I designed the meeting room with the following structure. Useful APIs are provided by the SDK to create the video screen and implement various control panels and features.
12345678VideoTheme {
   Scaffold(
       topBar = { CallAppBar(...) },
       bottomBar = { ControlActions(...) },
   ) {
       ParticipantsLayout(...)
   }
}
The VideoTheme component serves as a base wrapper for all compose components, defining default properties to style the app. Since VideoTheme is customizable, I configured it as follows to resemble a Zoom meeting room.
1234567891011121314151617VideoTheme(
   colors = StreamColors
       .defaultColors()
       .copy(
           appBackground = Black,
           barsBackground = Black,
           inputBackground = Black,
           textHighEmphasis = White,
       ),
   shapes = StreamShapes
       .defaultShapes()
       .copy(
           participantContainerShape = RectangleShape,
           callControls = RectangleShape
       ),
   content = content,
)
Implementing Video Call Features
Stream Video SDK provides easy integration of video call features into components such as CallAppBar or ControlActions. Below is an example of how the Flipping Camera and Leaving a Call features are implemented in the top bar:
123456789101112131415161718192021@Composable
private fun MeetingRoomTopAppBar(
   call: Call,
   onLeaveCall: () -> Unit,
) {
   CallAppBar(
       call = call,
       leadingContent = {
           // ...
           FlipCameraAction(
               onCallAction = { call.camera.flip() }
           )
       },
       title = stringResource(R.string.meeting_room_title),
       trailingContent = {
           LeaveCallAction(
               onCallAction = { onLeaveCall.invoke() }
           )
       }
   )
}
To change the icons for the specified actions or create custom actions, you can directly manipulate the call object as shown below:
12345678910@Composable
fun ToggleCameraButton(call: Call) {
   val isCameraEnabled by call.camera.isEnabled.collectAsStateWithLifecycle()
   ToggleButton(
       onClick = { call.camera.setEnabled(!isCameraEnabled) },
       enabled = isCameraEnabled,
       enabledIcon = R.drawable.ic_zoom_video_on,
       disabledIcon = R.drawable.ic_zoom_video_off,
   )
}
And last but not least, to send the Emoji reaction in the meeting, you need to send the reaction data to the Call object. Below is the simplified version of sending reaction data:
123456789101112data class ReactionItemData(val emojiDescription: String, val emojiCode: String)

object DefaultReactionsMenuData {
   val mainReaction = ReactionItemData("Raise hand", ":raise-hand:")
   val defaultReactions = listOf(
       ReactionItemData("Wave", ":hello:"),
       // ...
   )
}

// send reaction to the call
call.sendReaction("default", emojiCode)
Previewing Your Screen
Once you have successfully included the stream-video-android-previewdata dependency before, you can preview your meeting room screen in the following way:
123456789@Preview
@Composable
private fun MeetingRoomContentPreview() {
   StreamPreviewDataUtils.initializeStreamVideo(LocalContext.current)
   MeetingRoomContent(
       call = previewCall,
       onLeaveCall = { }
   )
}
Testing Your Meeting Screen
Best way to test the joining of multiple participants in a video call is to use the Stream Dashboard. You can test your meeting screen to join multiple participants by going to the Video & Audio tab, creating a call, and then joining the call with the provided call ID from your app.

And voilà! That's all we need to implement the features we planned. 🧙

Conclusion
As you can see, the Stream Video SDK for Compose allows easy customization and implementation of desired features. Despite being an SDK, it is open-source, offering several advantages for your business:
- Stay updated with ease as changes and updates to the API are transparently documented with in-depth tutorials.
- Engage directly with the SDK's engineers on GitHub for clear and immediate communication.
- Gain insights into the SDK's internal components and implementation details, providing the flexibility to adapt its usage to suit your specific needs.
Those unfamiliar with the SDK will appreciate the user-friendly video API and easily understandable source code for their requirements.

