"Social logins" are a very popular alternative to creating a login and password for a website or application that is new to a user. With "social login", a user makes use of an existing account, like Google or Facebook, to sign up for or log in to another application. This means users don't have to remember yet another username and password, and can easily utilize data from the platform that they used to sign in within the new app; for example, many "new apps" can search the user's contact list in the social app to suggest new connections within the "new app".
At Apple's last World Wide Developer Conference (WWDC), they announced their own social login option called "Sign in with Apple". It might seem like they were just following a trend to offer more of the same (and that they were late to the game); however, Apple took the opportunity to take existing tech and improve upon it. Companies like Facebook, Microsoft, and Google have all been involved in data privacy concerns; Apple surpassed the social login capabilities of these other companies not just in the realm of privacy, but also in usability. A few of the advantages to Apple’s social login are:
- Bombproof User Privacy - Only limited data is provided to the app: email and name. And, if the user wishes, they can request for Apple to mask their email address. When this extra layer of security is enabled, Apple generates a random email address specifically for the app the user is logging in to; the generated email address they generate then gets routed back to your original email. The advantage here is that applications never get the email associated with your Apple ID.
- Ability to Integrate with iOS - Sign in once, and your login is available on all your devices.
- Lightning-Fast Connections - Apple's social login process is the fastest social login out there, as all that is needed from the user is their Face ID or Touch ID.
- Elimination of Spam Users - App developers have the luxury of knowing users registering on their platform are actually legitimate users.
In this post, we'll create a simple chat application to show you how to implement "Sign In with Apple" in your application by taking advantage of Stream Chat features. As always, you can find the full code repo on GitHub.
Prerequisites
To complete this tutorial, you'll need the following logins, programs, and devices:
- An Apple Developer Account
- Xcode
- NodeJS
- Ngrok
- A Stream Accont (Don't worry, we'll show you how to set this up)
- An iPhone running iOS 13 or above (Sign in with Apple may not work in a simulator)
Creating a Stream Account
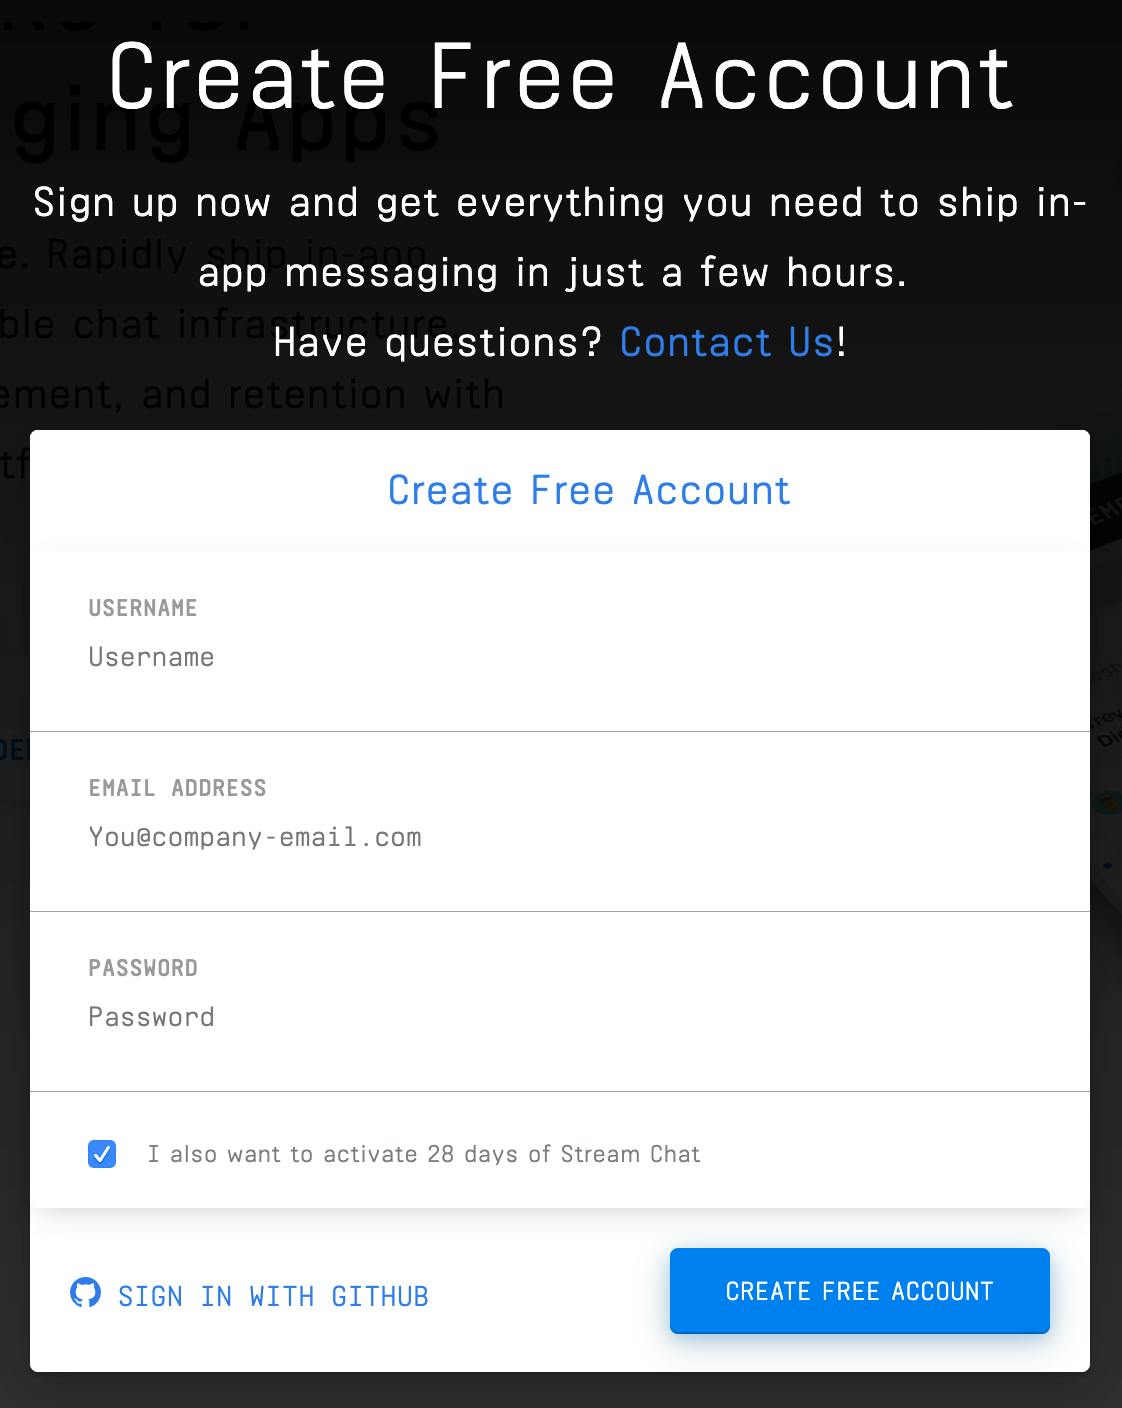
We'll be using Stream to create our application, so you'll need to create a free Stream account. To do this, head to the Stream Chat Homepage and click SIGNUP (or, if you're already a Stream user, go ahead and log in). When you click to sign up for Stream, you'll get a pop up where you can either enter your email and desired username and password OR use GitHub's social login option:

Once you've created or signed in to your account, you'll be taken to your dashboard, where you can find your API Keys:

Tuck your Key and Secret away somewhere safe; we'll be using them in a bit to authenticate our app's connection to Stream!
Now, let's get to coding!
Setting Up the Project
The first step we'll take is to set up the skeleton for our application by creating directories to house both the server and client, and then populating those with the general structure of a React Native application. We can create our directories using the following commands:
12$ mkdir applesignin
$ mkdir applesignin/server
Then, we can use the commands below to jump into our newly-created applesignin directory and create a React Native application:
12$ cd applesignin
$ npx create-react-app client
Building the Server
While Apple will handle the user authentication for us, we'll still need to communicate with Stream in order to get a user token to send/receive messages. The first step we need to take is to sort out dependencies needed. That can be done by running:
123$ cd server
$ mkdir config
$ yarn add cors dotenv express stream-chat jsonwebtoken stream-chat
The next step is to create a index.js file, where we will connect these dependencies, and a .env file, where we will keep all of the values we don't want publicly available:
1$ touch index.js .env config/config.json
Theconfig.json file will contain some credentials used to communicate with Apple. They are required as we will validate the authorization code the client app sends to the backend before connecting to StreamChat. In the config/config.json file. Paste the following:
{
    "client_id": "lanre.wtf.streamchatapplesignin",
    "team_id": "TEAM_ID",
    "redirect_uri": "",
    "key_id": "KEY_ID",
    "scope": "email"
}
Please note a few things.
key_idis your application APP ID. It can be found in the image below:

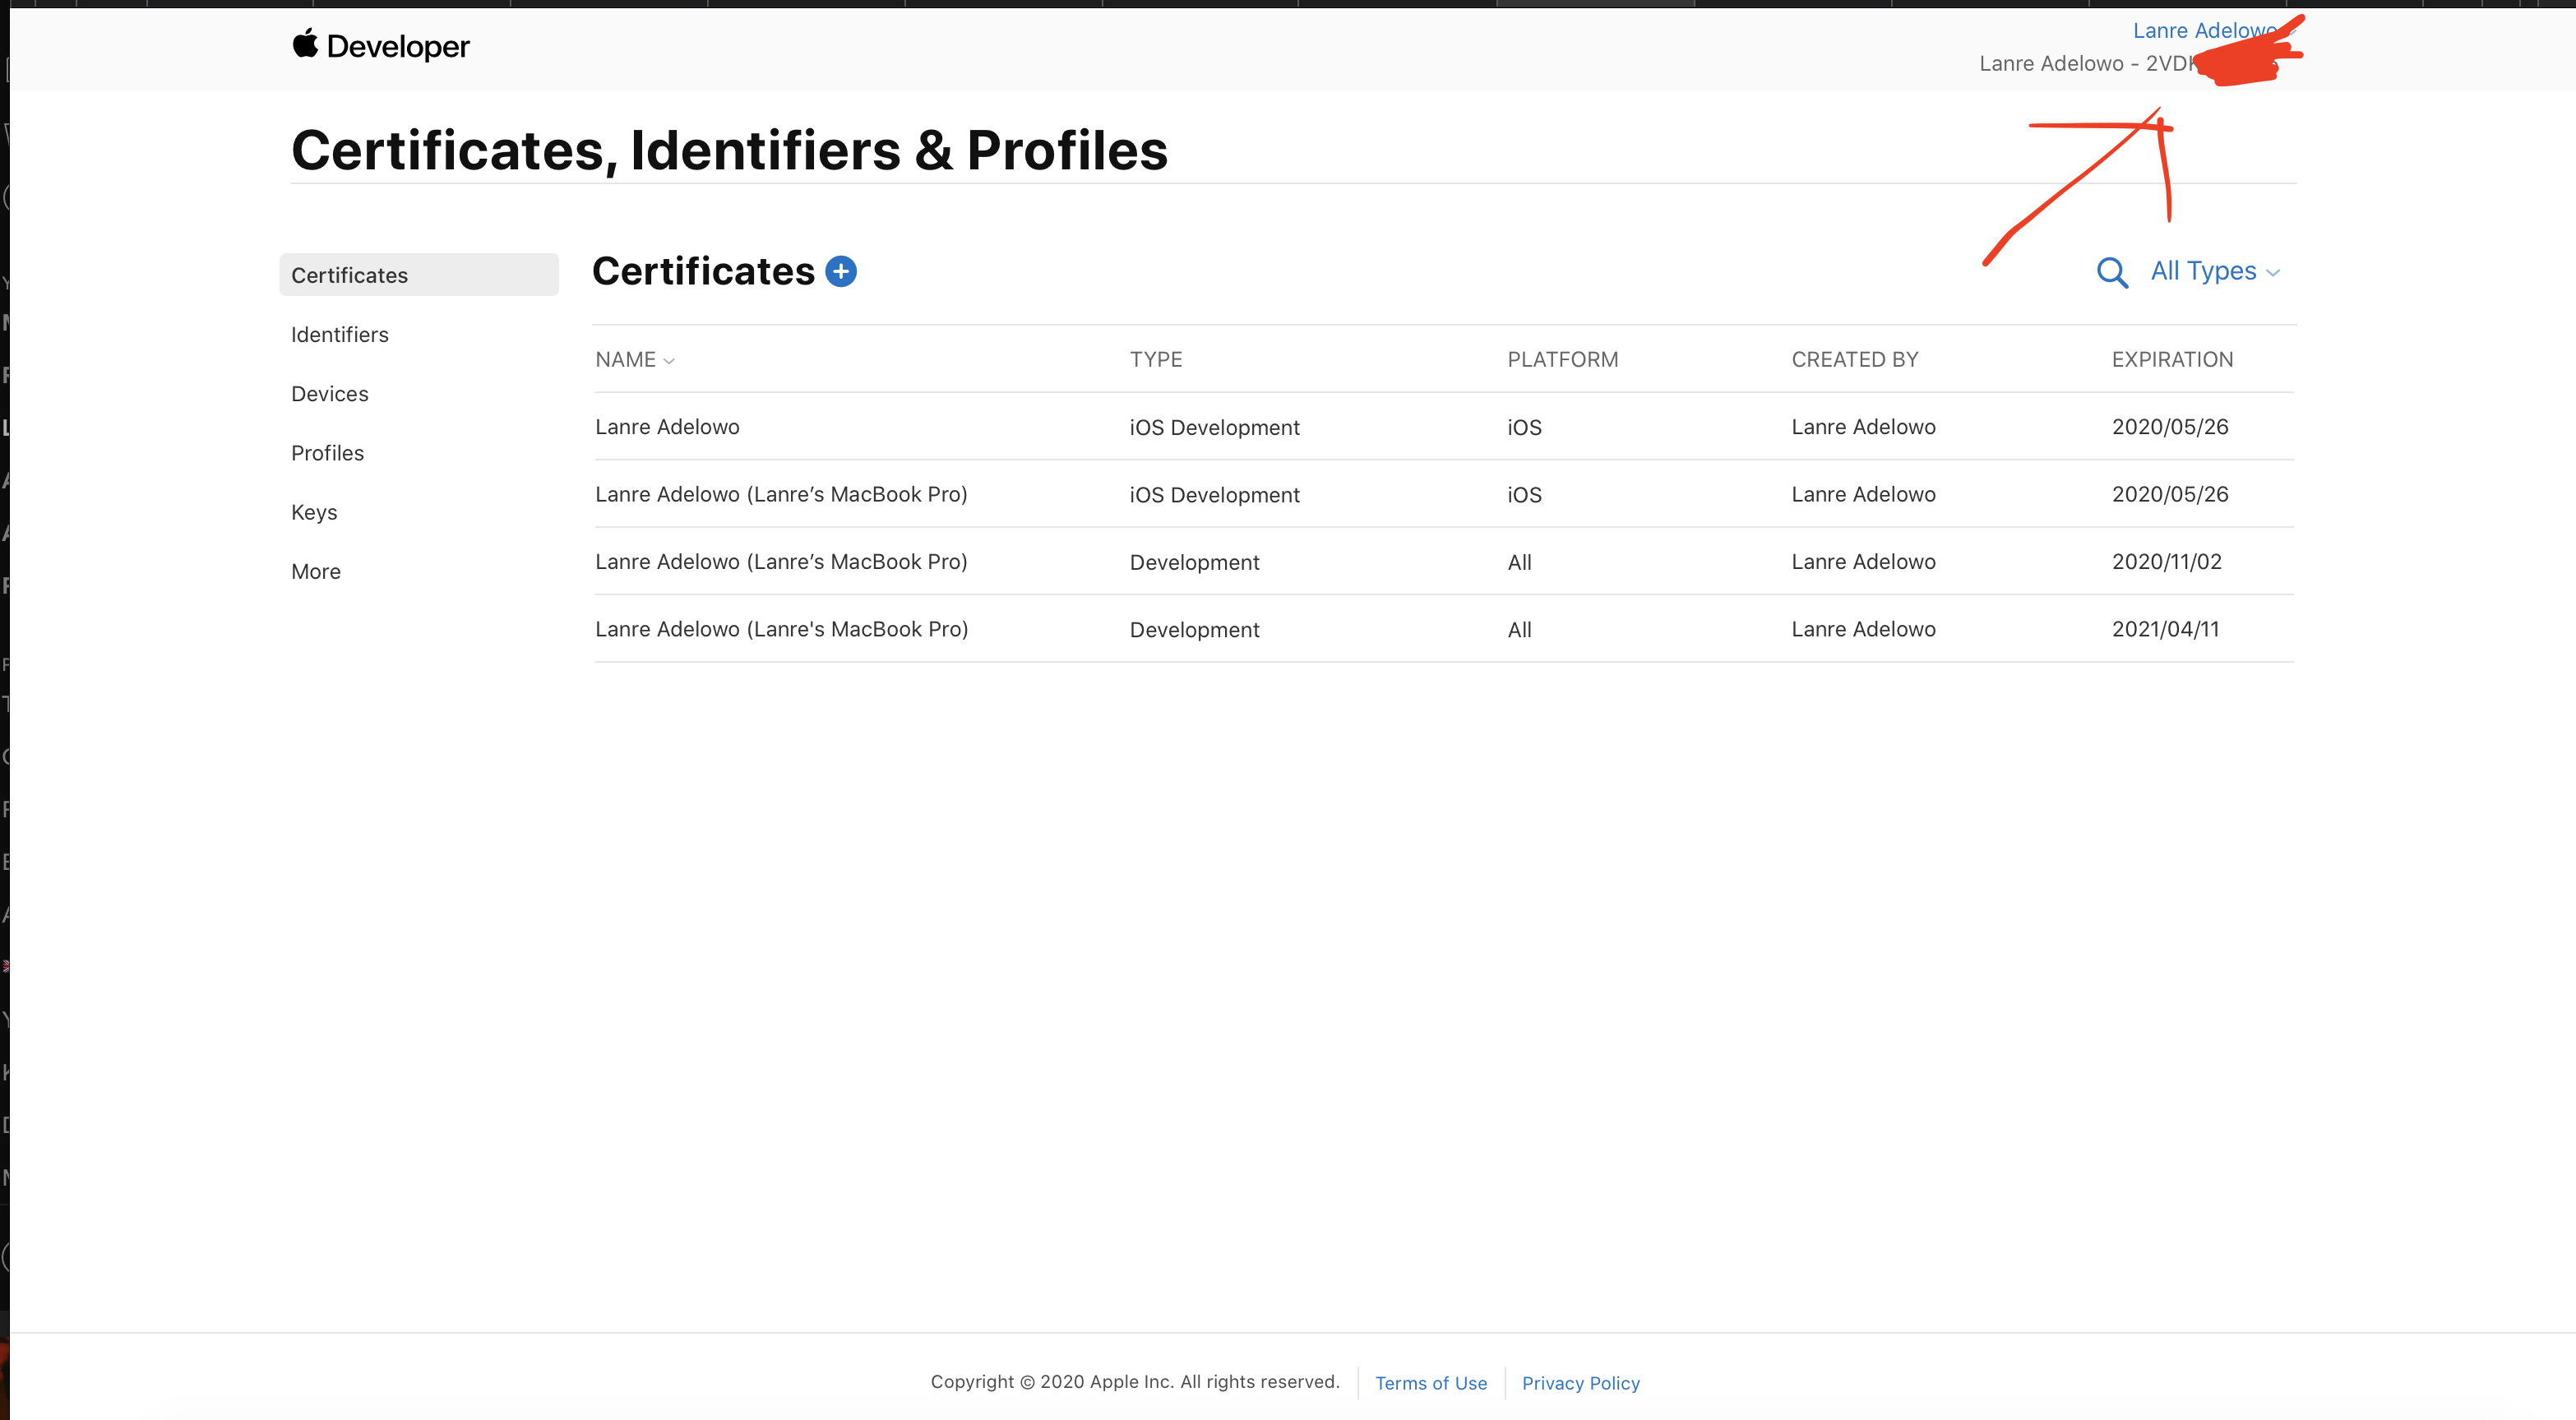
team_idis the 10 character code on the top left of the developer page next to your name. Refer to the screenshot below:

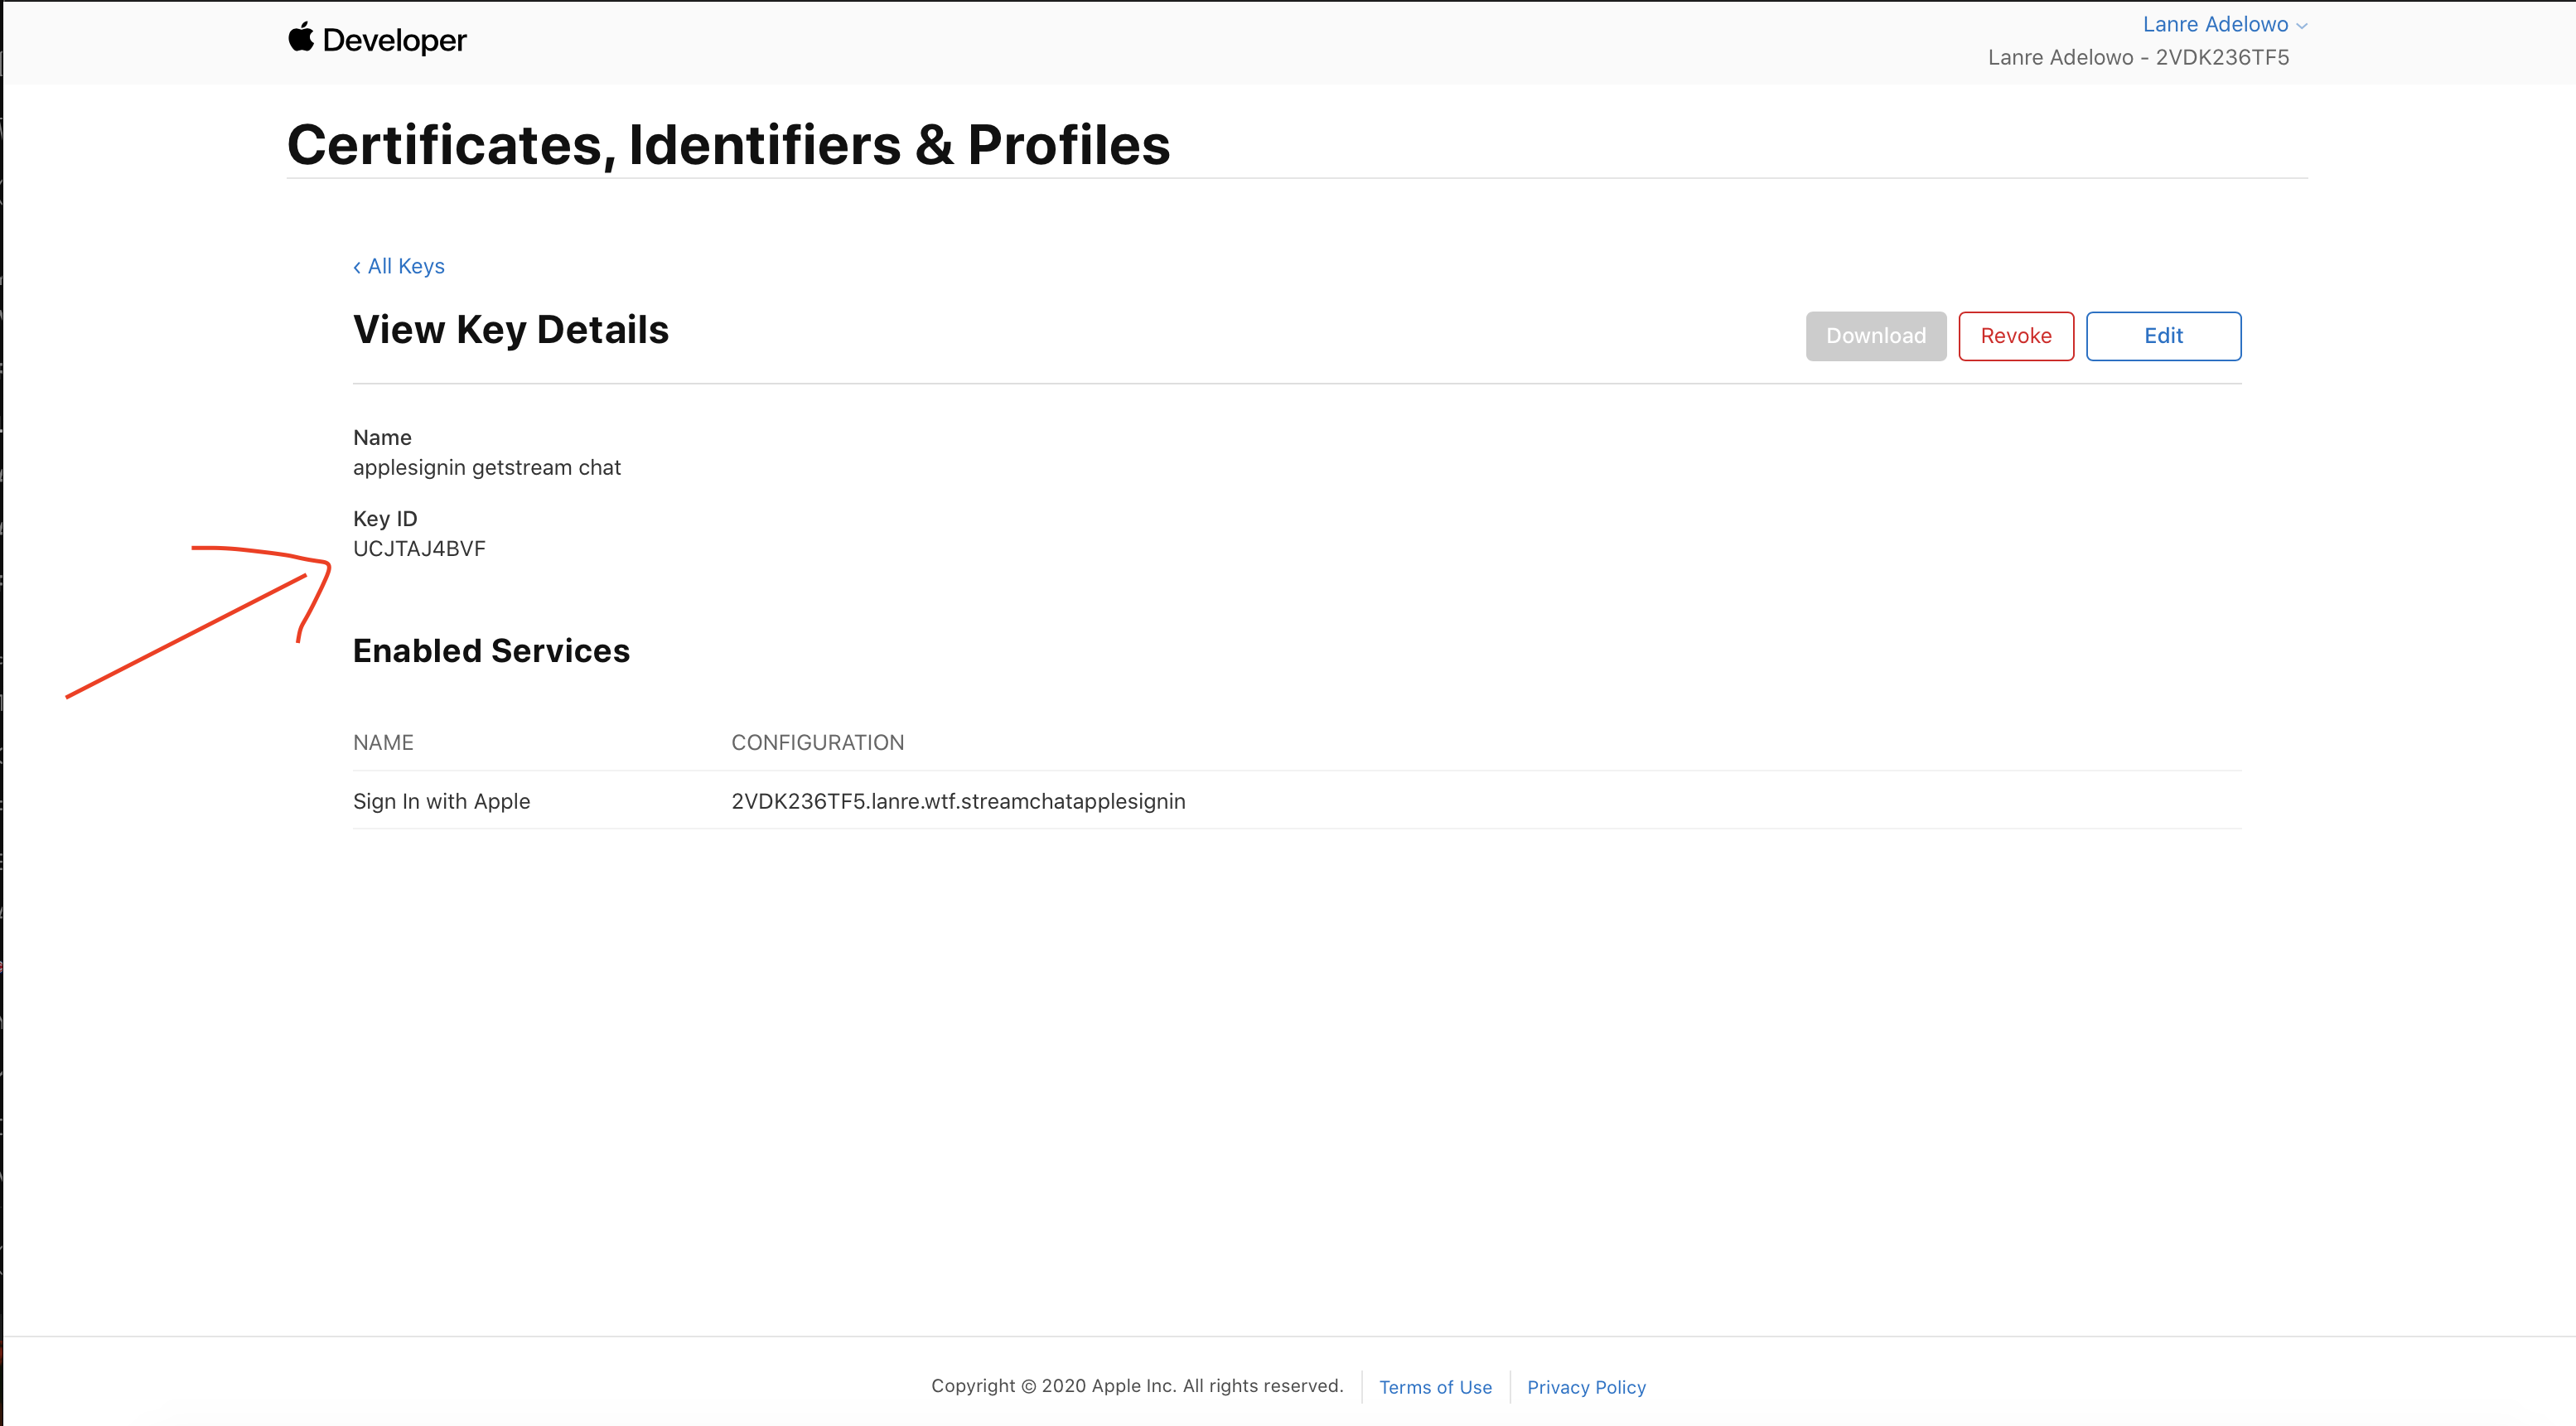
key_id: This is the ID of the key you are going to download later on in this tutorial. When downloaded, you can find the ID as shown below:

redirect_urishould be left empty as this is an iOS application not the web.
The .env file is where the API key and secret that you grabbed from the Stream Chat dashboard will be stored. The index.js file will then read the values from the .env file and act accordingly. In the .env file, paste the following:
API_KEY=your_API_KEY
API_SECRET=your_API_SECRET
Remember to replace "your_API_KEY" and "your_API_SECRET" with the values you retrieved from your Stream Chat dashboard.
The next step is to paste the following code into the index.js file:
const express = require("express");
const fs = require("fs");
const StreamChat = require("stream-chat").StreamChat;
const cors = require("cors");
const dotenv = require("dotenv");
const jwt = require("jsonwebtoken");
const AppleAuth = require("apple-auth");
const config = fs.readFileSync("./config/config.json");

const auth = new AppleAuth(
  config,
  fs.readFileSync("./config/AuthKey.p8").toString(),
  "text"
);

const port = process.env.PORT || 5200;

dotenv.config();

const app = express();
app.use(express.json());
app.use(cors());

const client = new StreamChat(process.env.API_KEY, process.env.API_SECRET);

const channel = client.channel("messaging", "applesignin", {
  name: "Apple Signin chat",
  created_by: { id: "admin" },
});

app.post("/auth", async (req, res) => {
  const authCode = req.body.code;

  try {
    const response = await auth.accessToken(authCode);
    const data = jwt.decode(response.id_token);
    const appleId = data.sub;

    const username = appleId.split(".")[1];

    const token = client.createToken(username);

    await client.updateUser({ id: username, name: username }, token);

    await channel.create();

    await channel.addMembers([username, "admin"]);

    res.json({
      status: true,
      token,
      username,
    });
  } catch (e) {
    console.log(e);
    res.json({
      status: false,
    });
  }
});

app.listen(port, () => console.log(`App listening on port ${port}!`));
In the above code, we created a single authentication endpoint for the server. The endpoint, called /auth, takes a username and then adds the user to Stream Chat and creates a token, which is then sent back to the mobile app.
Once you've set all of this up, you can start the server by running:
1$ node index.js
Building the Client
The first step to setting up the mobile client is to update the required dependencies:
$ cd ../client # If you are still in the server directory
$ yarn add @invertase/react-native-apple-authentication @react-native-community/netinfo axios react-native-document-picker
$ yarn add react-native-image-picker stream-chat stream-chat-react-native
$ touch Chat.js Login.js
$ cd ios && pod install
$ cd ../
$ yarn global add ios-deploy
Configuring Xcode and the Apple Developer Portal
Before proceeding, you will need to update some details about the app in Xcode and your Apple Developer Portal, to configure the app for "Sign in with Apple".
Xcode
Open your project in Xcode by clicking Open another project..., and navigating to the client/ios/client.xcodeproj file:

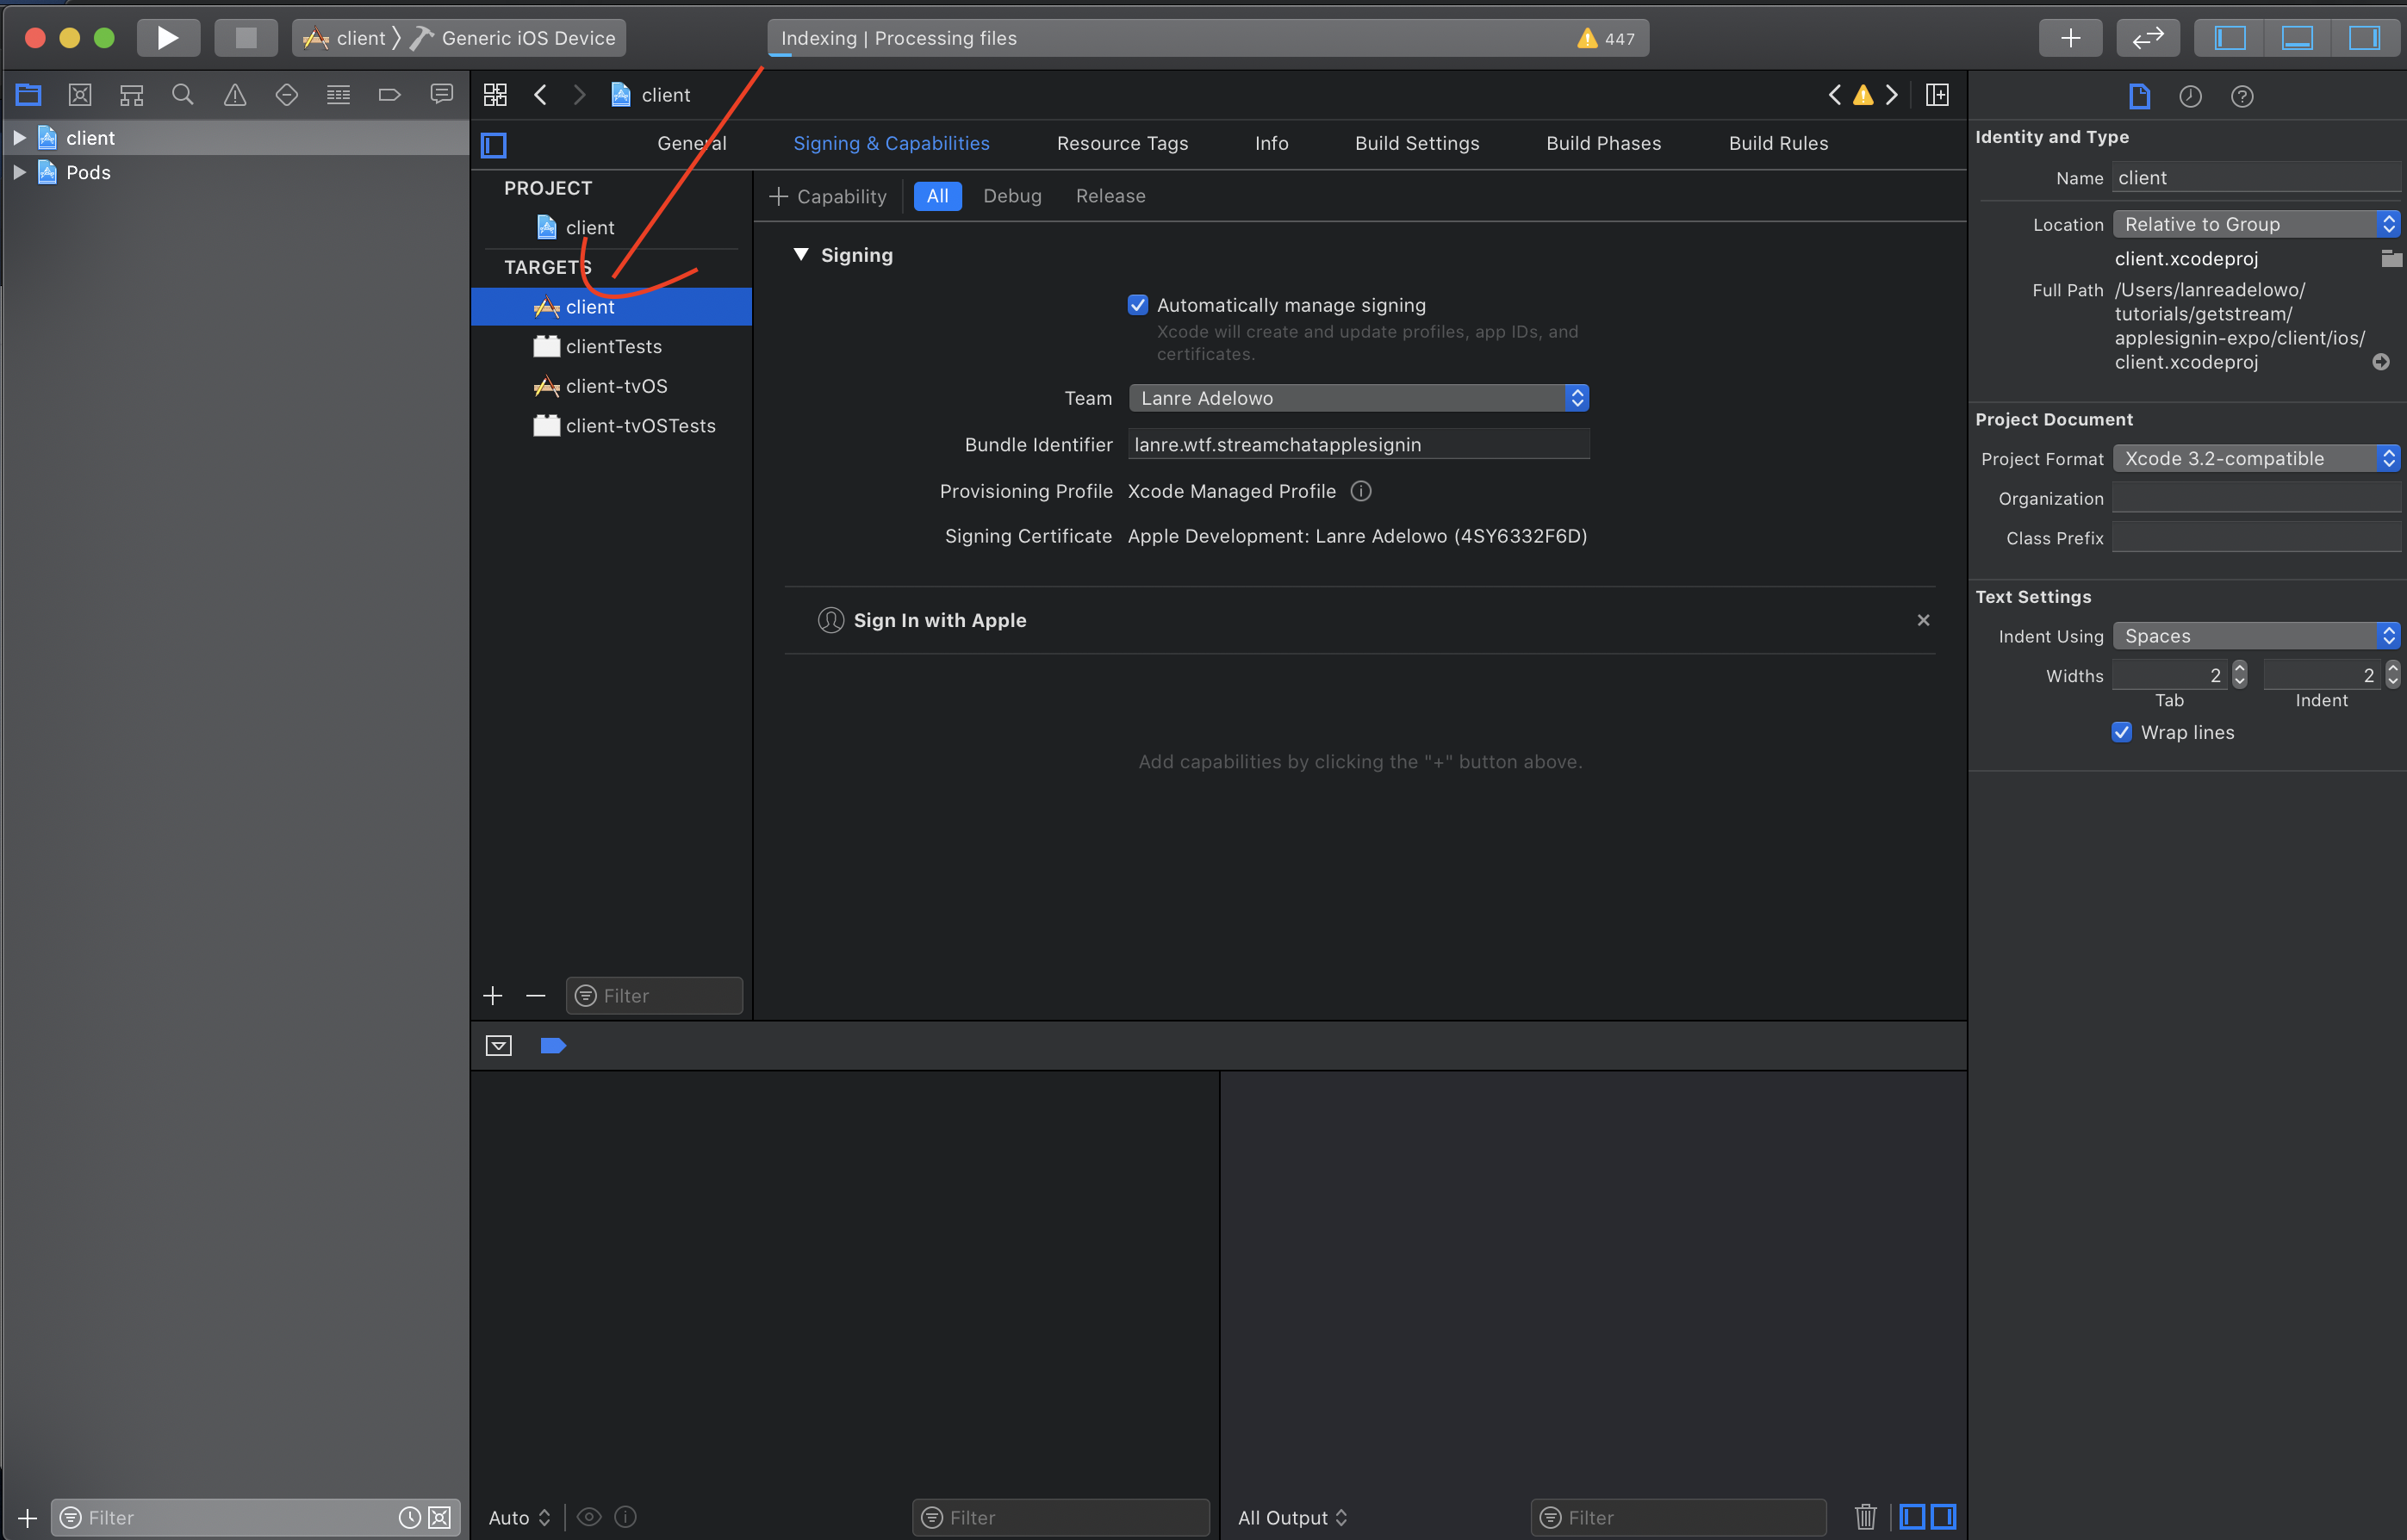
Click "client" under the TARGETS header:

Click Signing & Capabilities to show the below noted view. Click + Capability and from the menu select Sign in with Apple which will appear at the bottom as highlighted:

Failure:
You will need to sign in as a team if you have this error message.

Success:
If successful, your status should show no error message like below.

Apple Developer Console
Head over to Apple's Developer Console. Click Account in the nav bar at the top. You will either have to sign in, or create an account. Your account dashboard will look much like the below. If you do not see Certificates, Identifiers & Profiles as an option in the left-hand sidebar, it means you have not yet enrolled in the Apple Developer Program, which is a prerequisite for Apple product development:

Click on Identifiers in the left-hand sidebar, then click on the project in the list:

Tick the checkbox for Sign in with Apple and click the Edit button to the right of it. Select Enable as a primary App ID and click Save button:

Now, to solidify these changes, click the Save button at the top of the screen:

To be able to connect these changes to our app, we'll need a key. Click on Keys in the left-hand sidebar and create a new key:

Give your new key a name, tick the checkbox next to Sign In with Apple, and click Configure:

From the Configure Key page, select our new key as our Primary App ID:

Then, register your key, download it, and keep it secure:

Once the key has been downloaded, you will need to move it to the config folder. That can be done with:
$ mv /path/to/downloaded/file applesignin/server/config/AuthKey.p8
path/to/downloaded/filecould be~/Downloads/key.p8for example.
Initial setup is now complete!
Back to Coding!
In your newly created Login.js file, paste the following code:
import React, {Component} from 'react';
import {View, StyleSheet, Alert, ActivityIndicator} from 'react-native';
import appleAuth, {
  AppleButton,
  AppleAuthRequestScope,
  AppleAuthRequestOperation,
  AppleAuthError,
  AppleAuthCredentialState,
} from '@invertase/react-native-apple-authentication';
import axios from 'axios';
import {StreamChat} from 'stream-chat';

export default class Login extends Component {
  constructor(props) {
    super(props);
    this.chatClient = new StreamChat('API_KEY');
    this.state = {
      hideSigninButton: false,
    };
  }

  onAppleButtonPress = async () => {
    this.setState({
      hideSigninButton: true,
    });

    try {
      const appleAuthRequestResponse = await appleAuth.performRequest({
        requestedOperation: AppleAuthRequestOperation.LOGIN,
        requestedScopes: [
          AppleAuthRequestScope.EMAIL,
          AppleAuthRequestScope.FULL_NAME,
        ],
      });

      // get current authentication state for user
      const credentialState = await appleAuth.getCredentialStateForUser(
        appleAuthRequestResponse.user
      );

      if (credentialState === AppleAuthCredentialState.AUTHORIZED) {
        console.log('User apple sign in auth authorized');
        axios
          .post('https://NGROK_URL/auth', {
            username: appleAuthRequestResponse.user,
            code: appleAuthRequestResponse.authorizationCode,
          })
          .then(res => {
            console.log(res.data);
            if (res.data.status) {
              this.chatClient.setUser(
                {
                  id: res.data.username,
                  username: res.data.username,
                  image:
                    'https://stepupandlive.files.wordpress.com/2014/09/3d-animated-frog-image.jpg',
                },
                res.data.token
              );
              this.props.cb(this.chatClient);
            }
          })
          .catch(err => {
            this.setState({
              hideSigninButton: false,
            });

            Alert.alert('Auth', 'could not set up Stream chat');
            console.log('Could not authenticate user.. ', err);
          });

        return;
      }

      Alert.alert('Auth', 'Could not authenticate you');
    } catch (err) {
      if (err === AppleAuthError.CANCELED) {
        this.setState({
          hideSigninButton: false,
        });
        Alert.alert(
          'Authentication',
          'You canceled the authentication process'
        );
      }

      console.log(err);
    }
  };

  componentDidMount() {
    return appleAuth.onCredentialRevoked(() => {
      console.log('User auth has been revoked');
    });
  }

  render() {
    return (
      <View style={styles.container}>
        {this.state.hideSigninButton ? (
          <ActivityIndicator size="large" />
        ) : (
          <AppleButton
            buttonStyle={AppleButton.Style.WHITE}
            buttonType={AppleButton.Type.SIGN_IN}
            style={{
              width: 160,
              height: 45,
            }}
            onPress={() => this.onAppleButtonPress()}
          />
        )}
      </View>
    );
  }
}

const styles = StyleSheet.create({
  container: {
    justifyContent: 'center',
    alignItems: 'center',
    flex: 1,
  },
});
Remember to update the values of "NGROK_URL" and "API_KEY". You can get a Ngrok url by running "ngrok http 5200"
Next, in the Chat.js file, paste the following:
import React, {Component} from 'react';
import {View} from 'react-native';
import {
  Chat as StreamChat,
  Channel,
  MessageList,
  MessageInput,
} from 'stream-chat-react-native';

export default class Chat extends Component {
  render() {
    const channel = this.props.chatClient.channel('livestream', 'General');
    channel.watch();

    return (
      <StreamChat client={this.props.chatClient}>
        <Channel channel={channel}>
          <View style={{display: 'flex', height: '100%'}}>
            <MessageList />
            <MessageInput />
          </View>
        </Channel>
      </StreamChat>
    );
  }
}
As a final step, these newly created components need to be wired up in App.js; in App.js paste the following:
import React, {Component} from 'react';
import {View, SafeAreaView} from 'react-native';
import Login from './Login';
import Chat from './Chat';

class App extends Component {
  constructor(props) {
    super(props);

    this.state = {
      isAuthenticated: false,
    };
    this.chatClient = null;
  }

  onLoginSuccessCallback = chatClient => {
    this.chatClient = chatClient;
    this.setState({
      isAuthenticated: true,
    });
  };

  render() {
    return (
      <SafeAreaView style={{flex: 1}}>
        <View style={{flex: 1}}>
          {this.state.isAuthenticated && this.chatClient !== null ? (
            <Chat chatClient={this.chatClient} />
          ) : (
            <Login cb={this.onLoginSuccessCallback} />
          )}
        </View>
      </SafeAreaView>
    );
  }
}

export default App;
To run the app, connect your iPhone to your Mac and run:
$ instruments -s devices # List all connected devices. copy the name of your device
$ npx react-native run-ios --device="Lanre’s iPhone 11 Pro Max"` # Replace with the name of your device.
You'll likely need to connect your iPhone to your Mac for the above to work, as "Sign in with Apple" might not work on a simulator.
Wrapping Up
Nice work! In this tutorial, you implemented the new "Sign in with Apple" feature to authenticate users in a Stream Chat application. This should have given you some insight as to how to implement this feature in your own production application. If you run into any questions or want to add more features to your app, Stream has some awesome docs to help you out!
Thanks for reading, and Happy Coding!
