
When sending messages across a chat app, one way to ensure the data and conversations are not intercepted is to build proper security to shield people who use the app. This article dives into how to implement strong end-to-end (E2EE) encryption in your app to protect users. We will integrate Seald’s E2EE into Stream’s Chat to provide a secure chat messaging environment for all participants.
Refer to this introductory tutorial to learn more about general concepts of E2EE.
Project Goal
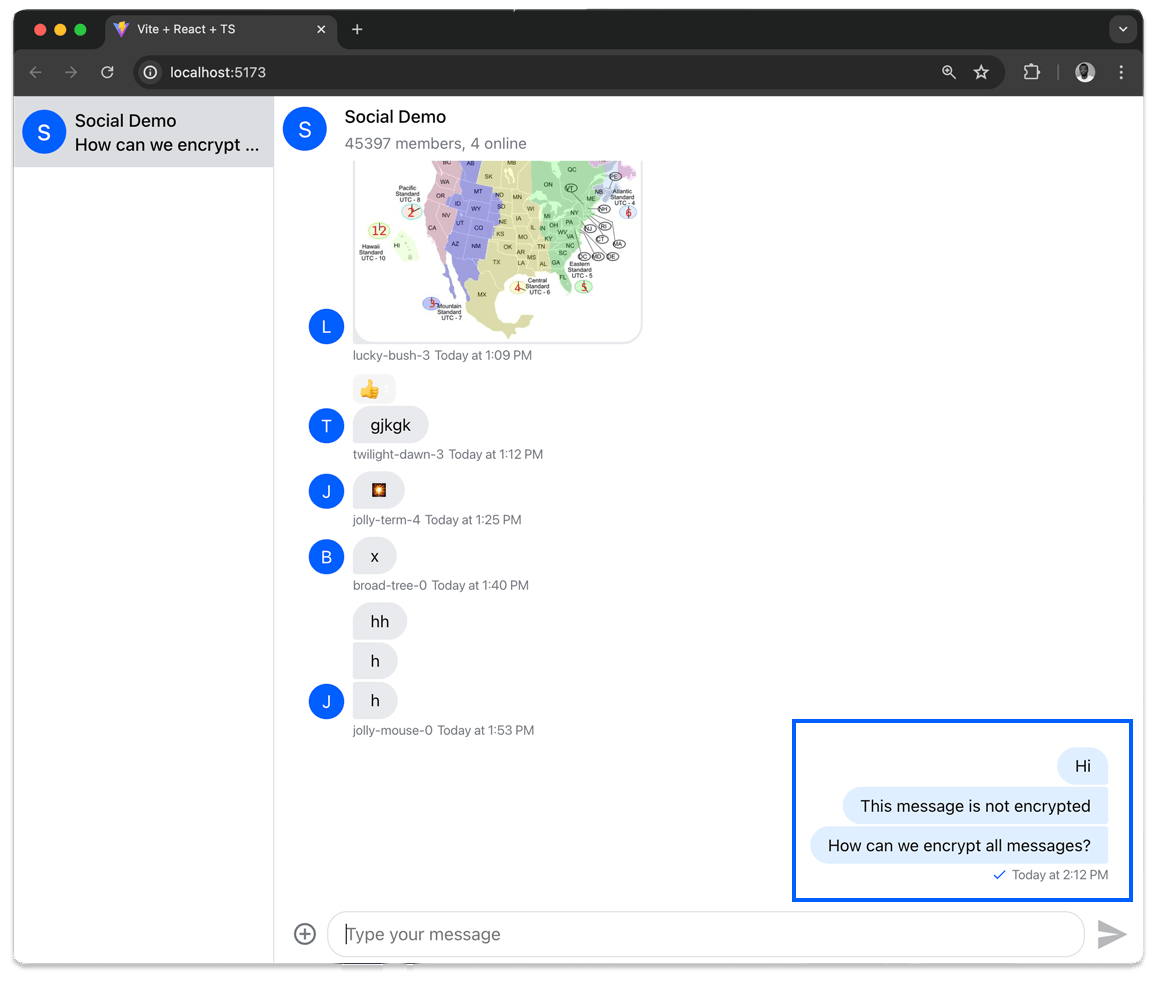
The objective of the demo project involved in this tutorial is to ensure that chat conversations are only visible to channel members using the Stream Chat React SDK and the Seald end-to-end encryption SDK. That means these messages are not sent in plain text and can not be read server-side, as this might be an attack vector for a malign party. The example above demonstrates an encrypted chat using the Seald SDK. You have observed that sending a plain text message or an attachment converts to a cipher text. That is our main task for this tutorial.
The final end-to-end encrypted project is on GitHub. You can follow the steps in this tutorial and set up your own Next.js application. Or you can also create a new GitHub Code Space to run the app. The .env file in the GitHub project requires your Seald credentials. For a sample of how the .env file should look, you can check the .env.sample file in the project. In the following sections, we’ll dive into creating Seald and Stream accounts.
Setting Up A Stream Account
This section focuses on signing up for a Stream Chat account to get user credentials for the app.
In the chat messaging part of the app, we should create a new app on Stream Dashboard. Then, create a new user and a chat channel. We can now generate a token using the account’s API Secret. Head to the Stream website, click Start Coding Free, and fill out your information to get an account.
After logging in to the account, you should do the following.
- Create a new app by clicking the button Create App on the top right of the page.
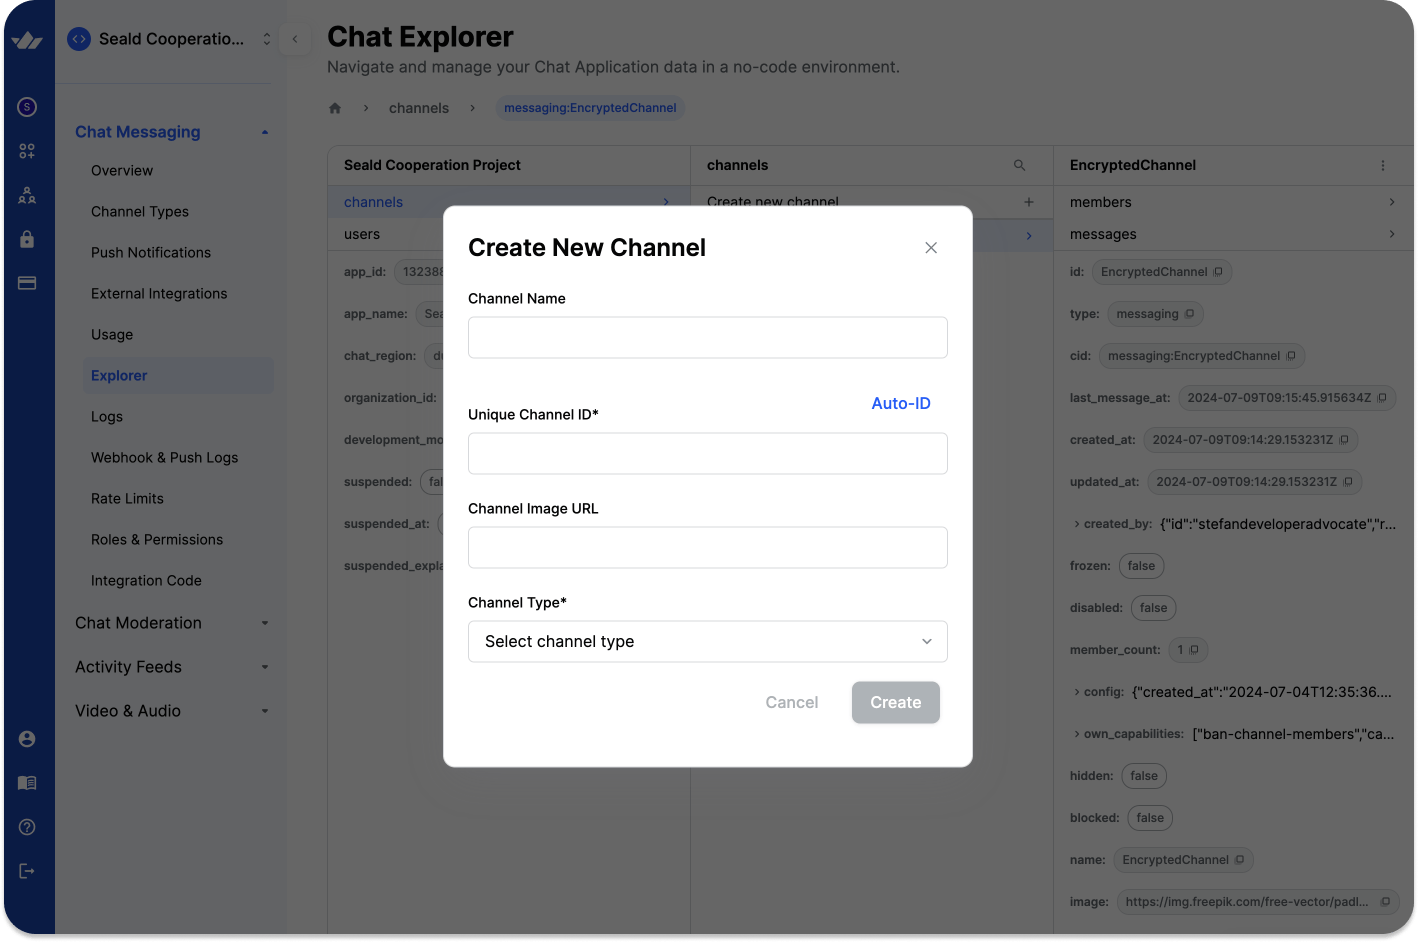
- To add a new channel, navigate to Chat Messaging -> Explorer -> Channels -> Create new channel. For this demo, let's use
EncryptedChannel.
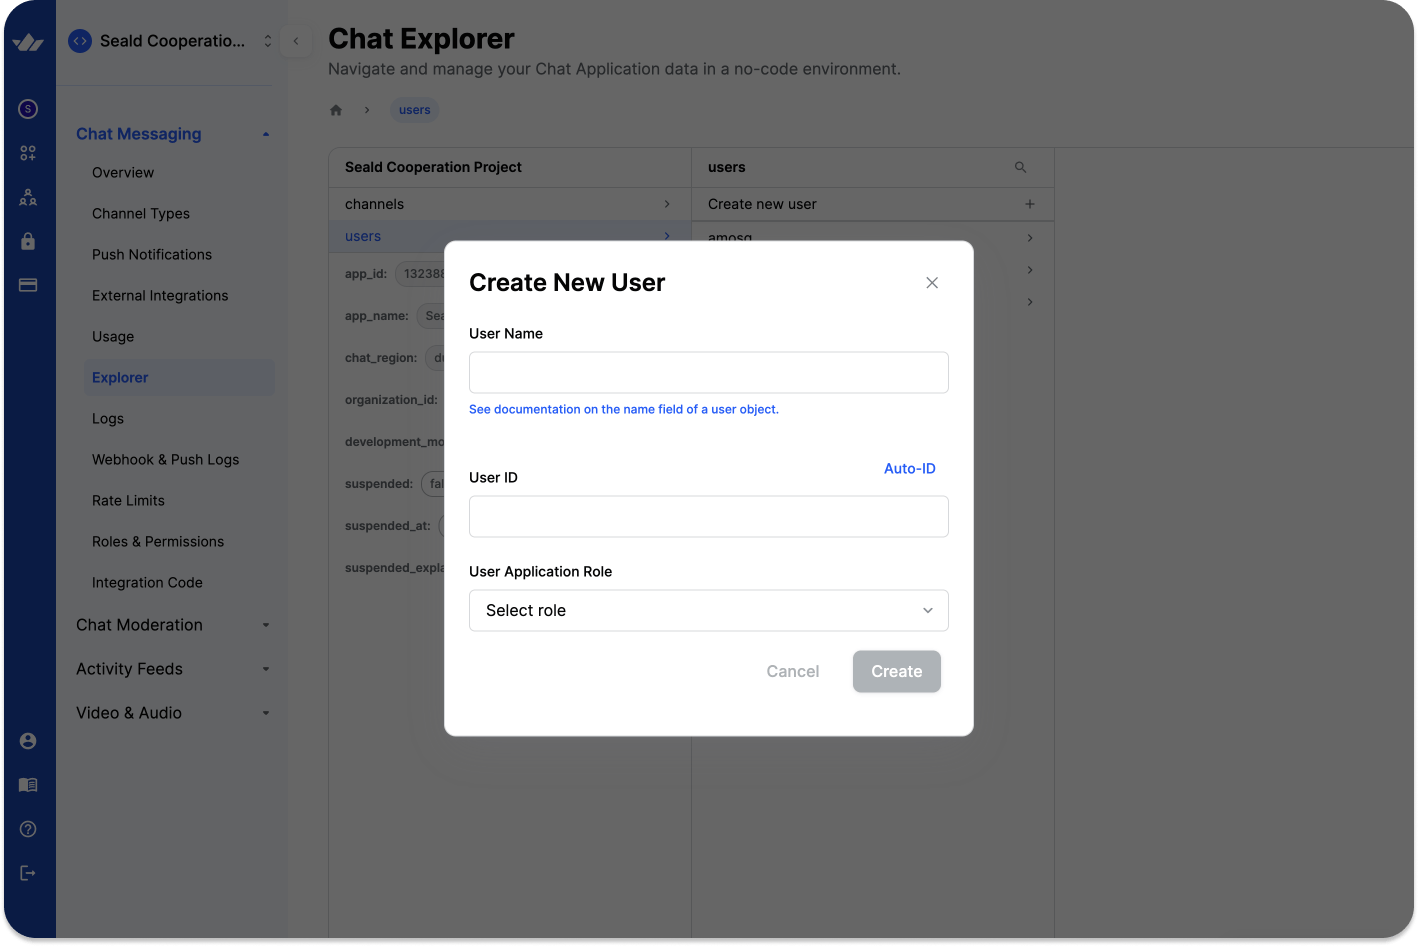
- Select Chat Messaging -> Explorer -> Users -> Create new user to add a new one. Let's call our new user
TestUser.
We will shortly use the EncryptedChannel, and the TestUser to connect to the chat SDK's backend infrastructure.
Initiate a Next.js App
In this section, we create a new Next.js project and install all the necessary chat dependencies. We will add the end-to-end encryption dependencies when the unencrypted chat messaging functionality works successfully. Ensure you have npm or yarn installed, and create a new Next.js project with the following command:
1npx create-next-app@latest
We follow the setup process to make sure the project is correctly configured:
123456789What is your project named? end-to-end-encrypted-chat
Would you like to use TypeScript? Yes
Would you like to use ESLint? Yes
Would you like to use Tailwind CSS? Yes
Would you like your code inside a `src/` directory? No
Would you like to use App Router? (recommended) Yes
Would you like to use Turbopack for `next dev`?  Yes
Would you like to customize the import alias (`@/*` by default)? No
What import alias would you like configured? @/*
We have end-to-end-encrypted-chat as the project name and use TypeScript, ESLint, and TailwindCSS. The rest of the setup follows the recommended steps.
Next, launch the project in VS Code or your favorite IDE, cd into the end-to-end-encrypted-chat directory and use yarn or npm i stream-chat stream-chat-react to fetch and install:
- Stream Chat
stream-chat: The core chat SDK without UI components. - Stream Chat React
stream-chat-react: React chat SDK consisting of reusable UI components.
Note: In VS Code, you can press the keyboard shortcut ⌃` to bring the integrated Terminal and run the above command.
Configure the Chat SDK
In this section, we set up the chat SDK to provide basic chat messaging functionality. All the files can also be found in the GitHub repository.
Go to the app's app directory, open page.tsx, and start by defining a type for the HomeState at the top of the file:
12345type HomeState = {
  apiKey: string;
  user: User;
  token: string;
};
We use this type to ensure that we initialize the chat only when we have received an authentication token (we will create the logic for this in the next step). The token is received using an API call to the route api/token.
We create a getUserToken function (wrapped in a useCallback hook) that we call in a useEffect hook. Here is the code for the page.tsx file:
1234567891011121314151617181920212223242526272829303132333435363738export default function Home() {
  const [homeState, setHomeState] = useState<HomeState | undefined>();

  const userId = 'TestUser';
  const userName = 'TestUser';

  const getUserToken = useCallback(async (userId: string, userName: string) => {
    const response = await fetch('/api/token', {
      method: 'POST',
      headers: { 'Content-Type': 'application/json' },
      body: JSON.stringify({ userId: userId }),
    });

    const responseBody = await response.json();
    const token = responseBody.token;

    const user: User = {
      id: userId,
      name: userName,
      image: `https://getstream.io/random_png/?id=${userId}&name=${userName}`,
    };

    const apiKey = process.env.NEXT_PUBLIC_STREAM_API_KEY;
    if (apiKey) {
      setHomeState({ apiKey: apiKey, user: user, token: token });
    }
  }, []);

  useEffect(() => {
    getUserToken(userId, userName);
  }, [userId, userName, getUserToken]);

  if (homeState) {
    return <MyChat {...homeState} />
  } else {
    return <LoadingIndicator />
  }
}
We need to add two things. The first is to create a Route Handler that is executed server-side and generates a token for the current user (which is what we call inside the getUserToken function).
We create a new folder api, then inside a new folder called token and inside a file called route.ts. The code inside uses the Stream secret to issue a token for a user:
12345678910111213141516171819import { StreamChat } from 'stream-chat';

export async function POST(request: Request) {
  const apiKey = process.env.NEXT_PUBLIC_STREAM_API_KEY;
  const streamSecret = process.env.STREAM_SECRET;

  const serverClient = StreamChat.getInstance(apiKey, streamSecret);

  const body = await request.json();
  const userId = body?.userId;

  const token = serverClient.createToken(userId);
  const response = {
    userId: userId,
    token: token,
  };

  return Response.json(response);
}
In the Route Handler we are using two environment variables. For that we create a new .env file in the route of our project and fill that with the values we get from the Stream Dashboard (see earlier section):
NEXT_PUBLIC_STREAM_API_KEY=<your-api-key>
STREAM_SECRET=<your-stream-secret>
Notably, the API key secret is prefixed with NEXT_PUBLIC_ because it will be available on the client side, which is safe from a security standpoint. However, the secret should never be exposed to the client and only be available on the server, so we omit the prefix here.
Now that the setup is done, we can focus on showing the UI. Inside page.tsx we used a component called MyChat, that we haven’t yet created. We create a new folder called components and inside create a file named MyChat.tsx.
We will need to add additional code later, but for now, we want to initialize a chat experience, and for that, we use the pre-built components that come with Stream’s React SDK.
Before we can use those, we need to initialize the SDK using the three properties we’ve defined in our HomeState earlier: an apiKey, an authentication token, and a user object. We hand those in as parameters to the component and then call the built-in useCreateChatClient hook.
The code for the entire MyChat.tsx file looks like this:
123456789101112131415161718192021222324252627282930313233343536373839404142export default function MyChat({
  apiKey,
  user,
  token,
}: {
  apiKey: string;
  user: User;
  token: string;
}) {
  const chatClient = useCreateChatClient({
    apiKey: apiKey,
    tokenOrProvider: token,
    userData: user,
  });
  if (!chatClient) {
    return <LoadingIndicator />;
  }

  // Chat sorting options
  const sort: ChannelSort = { last_message_at: -1 };
  const filters: ChannelFilters = {
    type: 'messaging',
    members: { $in: [user.id] },
  };
  const options: ChannelOptions = {
    limit: 10,
  };

  return (
    <Chat client={chatClient}>
      <ChannelList filters={filters} sort={sort} options={options} />
      <Channel Message={EncryptedMessage}>
        <Window>
          <ChannelHeader />
          <MessageList />
          <MessageInput />
        </Window>
        <Thread />
      </Channel>
    </Chat>
  );
}
In summary, we import the required chat components such as Chat, Channel, ChannelList, and others. We also add options for the channel list, such as sort, filters, and options. Then, we check if the chatClient has already been initialized. If not, we show a loading indicator; if yes, we show the whole chat experience.
Add Styling To The Chat Layout
We can run the app but we will see that the styling is off. We need to follow two more steps to fix this. The first is to import the CSS code that ships with the Stream SDK. This is a one-liner that we add to the top of the MyChat.tsx file:
1import 'stream-chat-react/dist/css/v2/index.css';
What it does is make sure the necessary CSS classes and code are loaded that are used inside the custom components that we added to the MyChat.tsx file. There are many options to customize this; you can learn more in the Theming section of our docs.
The second step is to add the following CSS code to the globals.css file in our app folder. Add the following code below the existing code in globals.css:
123456789101112131415body {
  display: flex;
}

.str-chat__channel-list {
  width: 30%;
}

.str-chat__channel {
  width: 100%;
}

.str-chat__thread {
  width: 45%;
}
Press control and backtick, ⌃ to launch the Terminal in VS Code and run npm run dev to start the development server. We will see Local: http://localhost:3000/` to preview the app. The output of the unencrypted chat interface is similar to the video preview below.
We can now see that sending and reading messages works for all members of a channel. However, these chats are not encrypted, meaning they are stored in plain text on the backend, which offers a vulnerability if a malign party achieves access to our servers. Let's fix that by securing messages to make them non-human readable with end-to-end encryption in the following sections.
Setup The Seald SDK For E2E-Encryption
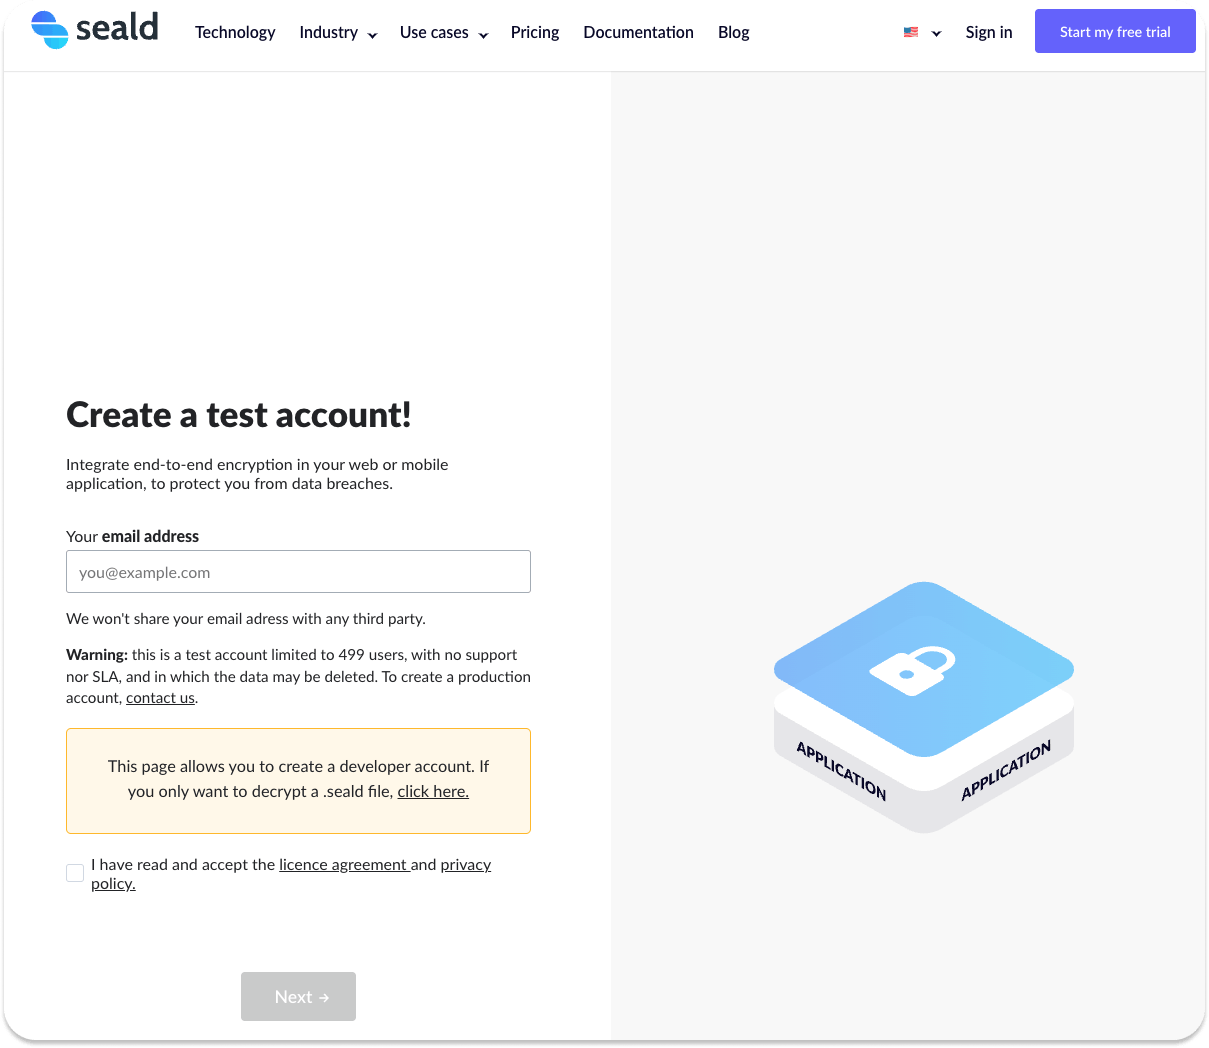
To use the Seald client-side encryption SDK for the first time, we need to create a staging environment account on their website. Once our account is ready, we can sign in to the dashboard to get started with our generated JSON Web Token secret or create a new JWT secret in the administration panel.
First, copy all the user credentials from your Seald administration dashboard. Open the .env file in the project's root folder and add the following code below the previous credentials (replace with the your own dashboard data):
VITE_SEALD_APP_ID="YOUR_SEALD_APP_ID"
VITE_API_URL="https://api.staging-0.seald.io/"
KEY_STORAGE_URL="https://ssks.staging-0.seald.io/"
VITE_JWT_SECRET="YOUR_JWT_SECRET"
VITE_JWT_SECRET_ID="YOUR_JWT_SECRET_ID"
To integrate the Seald encryption service directly into our app, we must install the NPM package @seald-io/sdk which is compatible with both mobile and web apps. In our project, we will navigate to the root directory and run one of the following command to install the SDK.
123npm i -S @seald-io/sdk
#or
yarn add @seald-io/sdk
Inside the SDK we need to create identities to manage the encryption and who has permission the decrypt certain messages. For this we can use passwort protection of the identities (there is also the alternative to use a 2-man-rule).
We can install the relevant password protection package like this:
123npm i -S @seald-io/sdk-plugin-ssks-password
#or
yarn add @seald-io/sdk-plugin-ssks-password
To verify if the above packages were installed successfully, open your project’s package.json and check the dependencies section.
123456789"dependencies": {
    "@seald-io/sdk": "^0.30.0",
    "@seald-io/sdk-plugin-ssks-password": "^0.30.0",
    "next": "14.2.10",
    "react": "^18",
    "react-dom": "^18",
    "stream-chat": "^8.40.6",
    "stream-chat-react": "^11.23.9"
  },
Initializing The Seald SDK With A Context Object
After installing the Seald SDK, there are a few steps to follow to encrypt and decrypt an app. To do this we will create a Context object (see more info on the topic here) to inject the necessary data into the DOM tree.
To have a central way of handling all encryption-related matters, we inject a SealdContextProvider. This takes care of holding on to the relevant variables and provides the necessary functions for performing the encryption and decryption of messages.
Create a new folder called contexts and inside a new file called SealdContext.tsx. The first thing we do is to import the dependencies for the Seald SDKs:
12import SealdSDK from '@seald-io/sdk
import SealdSDKPluginSSKSPassword from '@seald-io/sdk-plugin-ssks-password
Then, we define a state called SealdState for this (check the code comments for what each variable does):
12345678910111213141516type SealdState = {
  sealdClient: typeof SealdSDK | undefined; // necessary for calling further functions
  encryptionSession: EncryptionSession | undefined; // shared session to continuously encrypt and decrypt messages
  sealdId: string | undefined; // the user id necessary for encryption
  loadingState: 'loading' | 'finished';
  initializeSeald: (userId: string, password: string) => void;
  createEncryptionSession: (sealdId: string, channelId: string) => void;
  encryptMessage: (
    message: string,
    channelId: string,
    chatClient: StreamChat,
    customMessageData: Partial<Message<DefaultStreamChatGenerics>> | undefined,
    options: SendMessageOptions | undefined
  ) => Promise<void>;
  decryptMessage: (message: string, sessionId: string) => Promise<string>;
};
Next, we define both the SealdContext and the SealdContextProvider objects:
12345678910111213141516171819202122232425export const SealdContext = createContext<SealdState>(initialValue);

export const SealdContextProvider = ({
  children,
}: {
  children: React.ReactNode;
}) => {
  const [myState, setMyState] = useState<SealdState>(initialValue);

  // More code to be inserted here

  const store: SealdState = {
    sealdClient: myState.sealdClient,
    encryptionSession: myState.encryptionSession,
    sealdId: myState.sealdId,
    loadingState: myState.loadingState,
    initializeSeald,
    createEncryptionSession,
    encryptMessage,
    decryptMessage,
  };

  return (
    <SealdContext.Provider value={store}>{children}</SealdContext.Provider>
  );
The skeleton is set up, but we still need to add the functions, so let's do this now.
We start off with the initializeSeald function. First, we must load the variables from our .env file. Then, we create two variables for the databaseKey (we will define the function for that in a moment) and the databasePath. We use these to initialize the SealdSDK object and call the initialize function afterward:
123456789101112131415const appId = process.env.NEXT_PUBLIC_SEALD_APP_ID;
const apiURL = process.env.NEXT_PUBLIC_SEALD_API_URL;
const storageURL = process.env.NEXT_PUBLIC_KEY_STORAGE_URL;

const databaseKey = await getDatabaseKey(userId);
const databasePath = `seald-e2e-encrypted-chat-${userId}`;

const seald = SealdSDK({
    appId,
    apiURL,
    databaseKey,
    databasePath,
    plugins: [SealdSDKPluginSSKSPassword(storageURL)],
});
await seald.initialize();
We create the database key and path to save the identity we create locally for the client. We can load it and avoid re-invoking identities whenever a new tab or something similar is opened.
To read more about this, we recommend following this documentation about using a persistent local database that stores the identity in a safe and encrypted way.
The third step is to get the identity we can use for encryption and decryption. For this we have to distinguish two cases. Here's the code first and we'll explain what we do afterwards:
123456789let mySealdId: string | undefined = undefined;

try {
    const accountInfo = await seald.getCurrentAccountInfo();
    mySealdId = accountInfo.sealdId;
} catch (error) {
    // Identity not found, we need to register the user
    mySealdId = await registerUser(seald, userId, password);
}
The first one is that we have already created an identity prior and with the initialization of the SealdSDK object it is automatically retrieved. This is possible because of the databaseKey and databasePath paramenters that we have passed upon initialization. For this we can use the getCurrentAccountInfo function to get the identity (which will succeed and we won't jump into the catch clause we defined in code).
If that is not the case (and an exception is thrown, leading us to the catch statement) we need to register the user first. For that we need a JWT, that needs to be generated server-side (find a code sample here). With that we can first call the initiateIdentity function that we can then save using ssksPassword's saveIdentity function.
The final step is to update the current state with the updated values:
12345678setMyState((myState) => {
    return {
       ...myState,
       sealdClient: seald,
       sealdId: mySealdId,
       loadingState: 'finished',
   };
});
Now, we’ve used two functions here that we have not yet defined, specifically the getDatabaseKey and the registerUser functions. For them, we create a new folder in the project’s root and call it lib.
First, let’s create a getDatabaseKey.ts file. This should technically create a unique token for a user that identifies them in the browser. Since we don’t cover the database aspect of user handling, we will use a simple hash function. Here’s the code to create a unique database key for each user:
1234567891011121314151617'use server';

export async function getDatabaseKey(userId: string): Promise<string> {
  const encoder = new TextEncoder();
  const data = encoder.encode(userId);
  const databaseKey = await crypto.subtle
    .digest('SHA-256', data)
    .then((hashBuffer) => {
      const hashArray = Array.from(new Uint8Array(hashBuffer));
      const hashHex = hashArray
        .map((byte) => byte.toString(16).padStart(2, '0'))
        .join('');
      return `seald_database_key_${hashHex}`;
    });

  return databaseKey;
}
Notice that the ’use server’ directive makes sure that the function gets called on the server-side for security reasons. That makes use of React’s new Server Actions that ship with Next.js (details here).
The other function we haven’t added yet is the registerUser function, so let’s create a file called registerUser.ts inside the lib folder. This should run client-side, so we add the ’use client’ directive at the top of the function to ensure this. It will initiate the identity and save it using the SSKSPassword plugin.
However, for that to be possible, it will need a unique signup JWT. This one, on the other hand, needs to be created server-side, as it needs access to the JWT_SECRET and the JWT_SECRET_ID that we defined earlier in our .env file. To create the signup JWT we need to add three more dependencies to our project, so please run one of the following commands for this:
123npm i -S jose buffer uuid
#or
yarn add jose buffer uuid
Then, create a new file called createSignupJWT.ts inside the lib folder and add the following code (for more info on the functionality, see this link):
123456789101112131415161718192021'use server';

import { SignJWT } from 'jose';
import { v4 as uuidv4 } from 'uuid';
import { Buffer } from 'buffer';

export async function createSignupJWT() {
  const jwtSecret = process.env.JWT_SECRET;
  const jwtSecretId = process.env.JWT_SECRET_ID;

  const token = new SignJWT({
    iss: jwtSecretId,
    jti: uuidv4(),
    iat: Math.floor(Date.now() / 1000),
    scopes: [3],
    join_team: true,
  }).setProtectedHeader({ alg: 'HS256' });

  const signupJWT = await token.sign(Buffer.from(jwtSecret, 'ascii'));
  return signupJWT;
}
With that, the content of registerUser.tsx becomes straightfoward:
1234567891011121314151617'use client';

import type { SealdSDK } from '@seald-io/sdk/browser';
import { createSignupJWT } from './createSignupJWT';

export async function registerUser(
  seald: SealdSDK,
  userId: string,
  password: string
): Promise<string> {
  const signUpJWT = await createSignupJWT();
  const identity = await seald.initiateIdentity({
    signupJWT: signUpJWT,
  });
  await seald.ssksPassword.saveIdentity({ userId, password });
  return identity.sealdId;
}
We have finished the code for initializing the SealdSDK.
Encrypting and Decrypting Chat Messages
After executing the initialization logic, we assigned all the necessary variables, specifically the sealdClient and sealdId , and updated the loading state to be finished. We need to have an Encryption Session ready to encrypt and decrypt messages.
The encryption session should be updated whenever a new channel is active because each channel can have different members. If we previously created this, we can also retrieve a session but at some point, we first need to make these.
So, inside SealdContext.tsx we create a new createEncryptionSession function. It gets the sealdId and the channelId of the currently active channel as parameters. After creating a new encryption session, it updates the state with it (always wrapping it in a useCallback hook to avoid unnecessary re-renders):
123456789101112const createEncryptionSession = useCallback(
    async (sealdId: string, channelId: string) => {
      const session = await myState.sealdClient.createEncryptionSession(
        {
          sealdIds: [sealdId],
        },
        { metadata: channelId }
      );
      return session;
    },
    [myState.sealdClient]
  );
Thanks to all the work we've already done, the encryption and decryption parts are becoming very straightforward.
We can use the previously created encryptionSession to obtain a message and encrypt it with a single function call:
1234567891011121314const encryptMessage = useCallback(
    async (message: string) => {
      if (myState.sealdId && myState.encryptionSession) {
        const encryptedMessage = await myState.encryptionSession.encryptMessage(
          message
        );

        return encryptedMessage;
      }

      return message;
    },
    [myState.sealdId, myState.encryptionSession]
  );
The same goes for the decrypting of a message. Here, we additionally check if there's a mismatch between the current encryption session and the one used for the specific message. If that is the case we update our state's encryption session because it's likely that there are more messages to come in the same channel.
Here's the full code for our decryptMessage function:
12345678910111213141516171819202122232425const decryptMessage = useCallback(
    async (message: string, sessionId: string) => {
      let encryptionSession = myState.encryptionSession;

      if (!encryptionSession || encryptionSession.sessionId !== sessionId) {
        // Either there is no session, or it doesn't match with the session id
        encryptionSession = await myState.sealdClient.retrieveEncryptionSession(
          {
            sessionId,
          }
        );
        setMyState((myState) => {
          return {
            ...myState,
            encryptionSession: encryptionSession,
          };
        });
      }

      const decryptedMessage =
        (await encryptionSession?.decryptMessage(message)) || message;
      return decryptedMessage;
    },
    [myState.encryptionSession, myState.sealdClient]
  );
With this we have all the logic necessary for end-to-end encryption. The only thing left to do is combine this with Stream's Chat SDK.
Sending And Receiving E2E-Encrypted Messages
Before we start with the sending and receiving of encrypted messages, we need to make sure the SealdContext object is initialized correctly. For this, we open up the page.tsx file and wrap our MyChat component in a SealdContextProvider like this:
123<SealdContextProvider>
    <MyChat {...homeState} />
</SealdContextProvider>
Then, inside MyChat.tsx, we need to call the initializeSeald function from the SealdContext upon initialization using a useEffect hook. We add the following code below the call to the useCreateChatClient hook from earlier:
123456789const { initializeSeald, loadingState, encryptMessage } = useSealdContext();
const initializationRef = useRef(false);

useEffect(() => {
    if (!initializationRef.current && loadingState === 'loading') {
        initializationRef.current = true;
        initializeSeald(user.id, 'password');
    }
}, [initializeSeald, user.id, loadingState]);
The initializationRef object ensures that this code is only called once (see useRef documentation).
We need to inject additional code into the previously created chat setup in two places. First, whenever a user sends a message, we need to make sure that we encrypt it before sending it. Second, before a message is displayed, it needs to be decrypted.
Let's start with the encryption and open up MyChat.tsx. The component responsible for this is the MessageInput component. It has a parameter called overrideSubmitHandler which is just what we need.
We can take the message.text parameter, hand it to our previously defined encryptMessage function from the SealdContext and then manually call the sendMessage function on the channel object. The code for this is straightforward:
12345678910111213141516171819202122232425<MessageInput overrideSubmitHandler={async (
    message,
    channelId,
    customMessageData,
    options) => {
        let messageToSend = message.text;

        if (messageToSend) {
            messageToSend = await encryptMessage(message.text);
        }

        try {
    const channel = client.channel('messaging', channelId);
    const sendResult = await channel.sendMessage({
        text: messageToSend,
        customMessageData,
        options,
            });

            console.log('sendResult', sendResult);
        } catch (error) {
    console.error('Error encrypting message: ', error);
        }
    }}
/>
All messages sent are now being encrypted. For the decryption we need to define a custom component. We create a new file inside the src folder and call it ExcryptedMessage.tsx.
We use a dependency injection mechanism to be able to access the message we want to display using the useMessageContext hook. Then we use a useEffect hook to call decryptMessage (from the SealdContext) to be run whenever the message.text variable changes. Normally, this should only run once, but if someone updates the message we make sure it gets re-run as well.
We use a state variable called displayedMessage to show and the CSS class messageBubble from the Stream Chat SDK to have the built-in styling applied.
Here's the code for the entire component:
1234567891011121314151617181920212223export default function EncryptedMessage(): JSX.Element {
  const { message } = useMessageContext();
  const { decryptMessage } = useSealdContext();
  const [displayedMessage, setDisplayedMessage] = useState<string | undefined>(
    message.text
  );

  useEffect(() => {
    if (message.text) {
      const sessionId = JSON.parse(message.text).sessionId;
      decryptMessage(message.text, sessionId).then(
        (decryptedMessage: string) => {
          setDisplayedMessage(decryptedMessage);
        }
      );
    }
  }, [message.text, decryptMessage]);
  return (
    <div className='messageBubble'>
      <p>{displayedMessage}</p>
    </div>
  );
}
The last step is to replace the default Message component of the SDK with our newly created custom one. For this, we go back to App.tsx and replace the default <Channel> object to have a custom Message component like this:
123// previous code
<Channel Message={EncryptedMessage}>
// following code
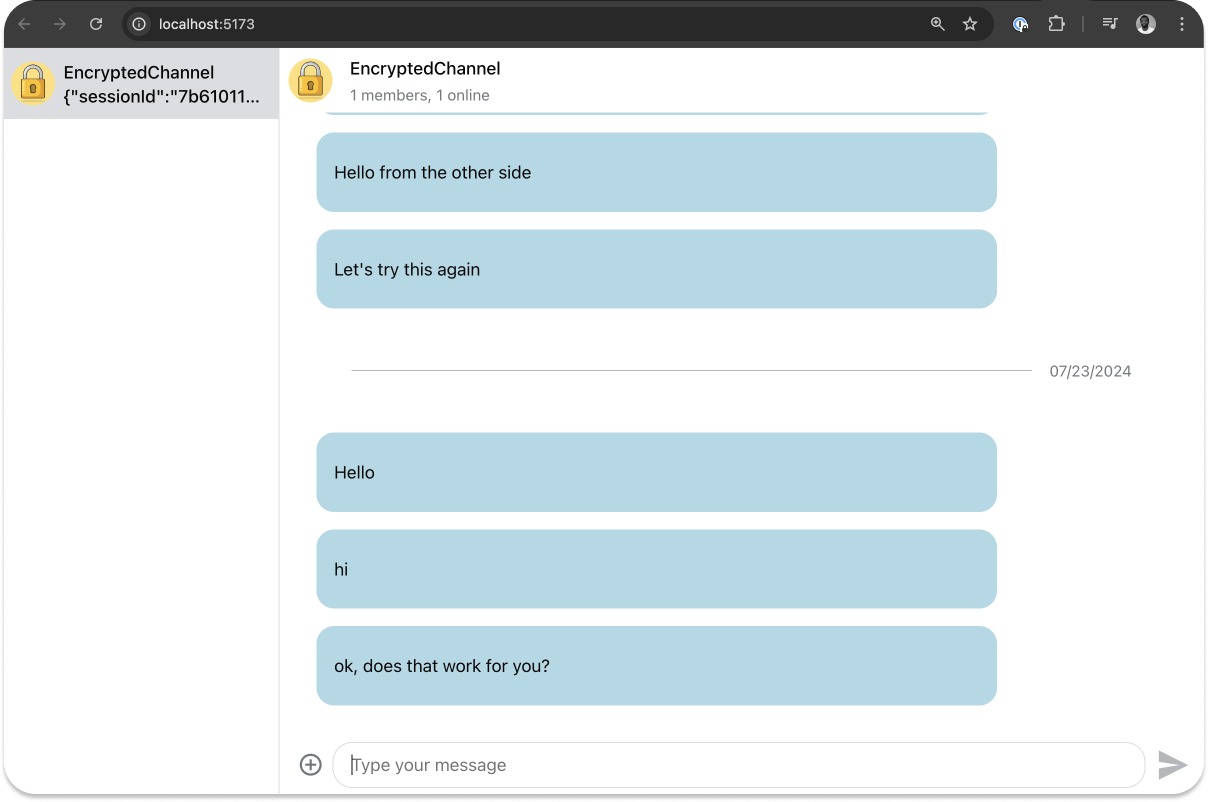
That will display our EncryptedMessage component for all messages, therefore decrypting all messages per default. With this we finished the implementation.
Test the End-to-End Encrypted Messages
In the project's root directory, launch the Terminal in VS Code, enter this command, and click the link to the localhost to see the chat interface in the browser.
npm run dev
Since the chat has been decrypted in the previous section, sending a plain text message or adding an attachment (image, photo, files, and video) will remain human-readable.
Conclusion
Well done! 👍 You now know how to integrate the safety and privacy-preserving technology E2EE into web and mobile applications. We built a fully functioning React chat app with end-to-end encryption similar to WhatsApp Web. This article covered a basic working implementation of end-to-end encrypted messaging. Head to the chat and encryption SDKs to learn about advanced features and capabilities.
Want to learn fundamental E2EE concepts and how it works? Check out Encrypting an App End-to-End.