

Our aim today is straightforward. We learn how to integrate an AI assistant with Stream's Chat APIs and make it blazing fast, like Le Chat by Mistral AI, using the LLM inference platforms.
After the February 2025 updates and improvements to Le Chat by Mistral, many developers and power users have compared its response speed to other AI chat assistants like ChatGPT and Claude. Le Chat's immediate answer feature is due to the AI supercomputers and processors that power it. Continue reading to discover how to add an AI assistant as an in-app feature to any application and optimize the assistant for high-speed and instant output using top AI inference services.
What is a Fast AI Inference Platform?
Fast AI inference platforms provide hardware and backend infrastructures for optimizing and running LLMs to make real-time or near-real-time responses. Getting quick responses from a model in an AI assistant app, for example, is crucial in areas like healthcare, where a doctor may benefit from using AI for image recognition, processing patient data and diagnosis where immediate responses are necessary. Developers can use these AI inference platforms to create custom state-of-the-art models for other use cases such as sports, education, virtual events, and more.
An AI assistant like Le Chat can instantly output its answers to prompts. This ability for the LLM to respond immediately to queries is called a flash answer. Using models from leading providers like Anthropic and OpenAI, you do not get this feature. To use a fast LLM inference for your AI projects, you can check high-speed AI inference platforms like Groq and Cerebras, which host the Le Chat web and mobile apps. With several others, the above LLM inference platforms optimize LLMs to provide near-instant or ultra-low latency responses to user queries.
What is Le Chat?

Le Chat is an alternative to ChatGPT or DeepSeek Chat. You can prompt it for high-quality answers about nearly anything, such as writing suggestions, coding, learning concepts in engineering, science, finance, etc. It works on iOS, Android, and the web and is also available for Pro, Team, and Enterprise use cases. Its key features include:
- Canvas: The Canvas is a power user feature that allows developers to collaborate on projects and code.
- Web search: This feature allows you to find real-time or up-to-date information from the web.
- Image generation: It understands documents and images, which allows it to generate images from text prompts and perform summarization and analysis. For image generation, it uses the Flux image generation platform to allow users to create realistic and high-quality images.
- Code interpretation: To gain insights into data, you can generate visualizations and simulations and perform scientific analysis with this feature.
Although the above features are all present in leading AI assistants like Google AI Studio, Chat GPT, and DeepSeek Chat, Le Chat's main distinguishing feature is the output generation speed. It is faster and outperforms all the above AI assistants with less response generation time.
Benefits of Creating an AI Assistant Like Le Chat
Le Chat's ability to respond to user queries faster than any other AI assistant depends on two main factors.
- Low latency models: The core models of Le Chat are designed to be low latency in their operations.
- Underlying LLM inference architecture: Le Chat is powered by the Cerebras inference engine, which can process large language models faster.
These characteristics make Le Chat run 10 times faster than ChatGPT 4o, Claude 3.5 Sonnet, DeepSeek R1, and Gemini 2.0 Flash. Building an AI assistant on infrastructures similar to Cerebras or Groq is beneficial in areas like video conferencing and livestreaming, AI systems, where calls, audio, and video must be processed and responded to in real-time.
Create an AI Assistant With Your Preferred API
In this section, we will implement an AI assistant as an in-app feature for Stream Chat iOS. This integration will enable users to send and receive rich text messages and chat with an AI chatbot for daily work-related tasks. To create our AI assistant, we would like to use an API and SDK with a ready-made chat UI for a seamless user-AI interaction experience. We can use Stream's APIs and SDKs to achieve this goal. The Chat SDKs are also available on the following platforms. Let's use the iOS option to demonstrate how to quickly build an AI assistant with the Swift SDK. Check the other platforms below and their corresponding code samples, and follow the tutorial to create an AI assistant with your preferred platform.
- Reat Native AI Assistant: Sample code on GitHub.
- React AI Assistant: Entire code on GitHub.
- Flutter AI Assistant: Sample code on GitHub.
- Android AI Assistant: Sample app on GitHub.
- NodeJS AI Assistant: Local version on GitHub.
The following steps will quickly walk you through creating the iOS AI assistant. For a more in-depth guide, refer to Build an AI Assistant for iOS Using Swift.
Step 1: Setup a Node Server
The application we build in this tutorial has three main components,
a local Node server, a SwiftUI application, and the Swift Chat SDK that powers the messaging and AI chat functionalities. In the following sections, we configure each component and assemble them to work seamlessly. Let's begin with the Node back-end server.
Configuring and starting the server will support starting and stopping the in-app AI chat feature. Clone the following repo for setting up a local Node server.
git clone https://github.com/GetStream/ai-assistant-nodejs.git
Next, open the root directory in your favorite IDE and add a .env file to store the following credentials.
12345ANTHROPIC_API_KEY=insert_your_key
STREAM_API_KEY=insert_your_key
STREAM_API_SECRET=insert_your_secret
OPENAI_API_KEY=insert_your_key
OPENWEATHER_API_KEY=insert_your_key
Finally, you should npm install and npm start to start the local server. When successful, you will see a message similar to the one below.

Congratulations, you are now running with a local Node server on port http://localhost:3000.
Start With a New SwiftUI App
In this section, we create a new SwiftUI app in Xcode, Install the Stream Chat Swift SDK, and configure the app with Camera and Photos Library privacies for iOS.
- Create a new SwiftUI app in Xcode using your preferred project name.
- Install the Swift Chat and AI SDKs using Swift Package Manager by copying and pasting these URLs in the search after clicking Add Package Dependencies... in the Xcode toolbar https://github.com/GetStream/stream-chat-swiftui, https://github.com/GetStream/stream-chat-swift-ai.
- Select the project's root directory, go to the Info tab, and add the following privacies. Privacy - Camera Usage Description, Privacy - Photos Library Usage Description.
Note: The camera and photo privacies are for the chat messaging functionality.
Present the Swift Chat SDK’s Channel List Component
Think of the chat channel list as your contact list in WhatsApp or Telegram. In its default state, users can tap it to view a list of messages for incoming and outgoing conversations.
In the main app file of your SwiftUI project, add the code below to replace its content. In your project directory, the main app file is the one that appends App.swift to your SwiftUI project's name. In this example, we have StreamChatAIAssistantApp.swift, where StreamChatAIAssistant is the project name.
12345678910111213141516171819202122232425262728293031323334353637383940414243import SwiftUI
import StreamChat
import StreamChatSwiftUI

@main
struct StreamChatAIAssistantApp: App {

    @State var streamChat: StreamChat
    @StateObject var channelListViewModel: ChatChannelListViewModel

    var chatClient: ChatClient = {
        var config = ChatClientConfig(apiKey: .init("zcgvnykxsfm8"))
        config.isLocalStorageEnabled = true
        config.applicationGroupIdentifier = "group.io.getstream.iOS.ChatDemoAppSwiftUI"

        let client = ChatClient(config: config)
        return client
    }()

    init() {
        let utils = Utils(
            messageListConfig: .init(messageDisplayOptions: .init(spacerWidth: { _ in return 60 }))
        )
        _streamChat = State(initialValue: StreamChat(chatClient: chatClient, utils: utils))
        _channelListViewModel = StateObject(wrappedValue: ViewModelsFactory.makeChannelListViewModel())

        chatClient.connectUser(
            userInfo: UserInfo(
                id: "anakin_skywalker",
                imageURL: URL(string: "https://vignette.wikia.nocookie.net/starwars/images/6/6f/Anakin_Skywalker_RotS.png")
            ),
            token: try! Token(rawValue: "eyJhbGciOiJIUzI1NiIsInR5cCI6IkpXVCJ9.eyJ1c2VyX2lkIjoiYW5ha2luX3NreXdhbGtlciJ9.ZwCV1qPrSAsie7-0n61JQrSEDbp6fcMgVh4V2CB0kM8")
        )
    }

    var body: some Scene {
        WindowGroup {
            ChatChannelListView(
                viewModel: channelListViewModel
            )
        }
    }
}
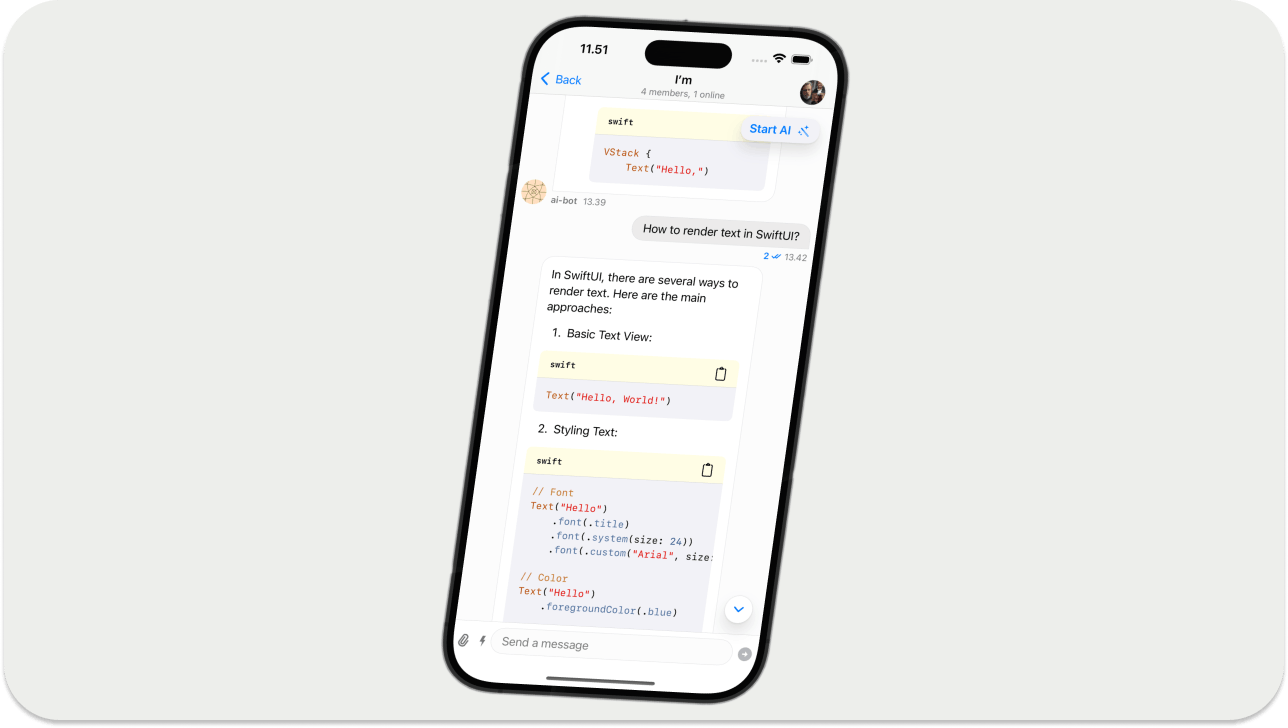
After performing the step above, you should see a screen similar to the one below when you run the app.
Now, tapping any channel list items above will launch a screen where you can start and stop the AI assistant.
Connect the SwiftUI App With the Node Server
In this section, we will create a service that connects the local Node server we configured previously to the SwiftUI app and provide a way to initiate and end conversations with the AI assistant. Create a new swift file StreamAIChatService.swift and substitute its content with the following.
123456789101112131415161718192021222324252627282930313233343536373839404142import Foundation

class StreamAIChatService {
    static let shared = StreamAIChatService()

    private let baseURL = "http://localhost:3000"
    private let jsonEncoder = JSONEncoder()

    private let urlSession = URLSession.shared

    func setupAgent(channelId: String) async throws {
        try await executePostRequest(
            body: AIAgentRequest(channelId: channelId),
            endpoint: "start-ai-agent"
        )
    }

    func stopAgent(channelId: String) async throws {
        try await executePostRequest(
            body: AIAgentRequest(channelId: channelId),
            endpoint: "stop-ai-agent"
        )
    }

    private func executePostRequest<RequestBody: Encodable>(body: RequestBody, endpoint: String) async throws {
        let url = URL(string: "\(baseURL)/\(endpoint)")!
        var request = URLRequest(url: url)
        request.httpMethod = "POST"
        request.setValue("application/json", forHTTPHeaderField: "Content-Type")
        request.httpBody = try jsonEncoder.encode(body)
        _ = try await urlSession.data(for: request)
    }

}

struct AIAgentRequest: Encodable {
    let channelId: String

    enum CodingKeys: String, CodingKey {
        case channelId = "channel_id"
    }
}
Add UIs for the AI Assistant
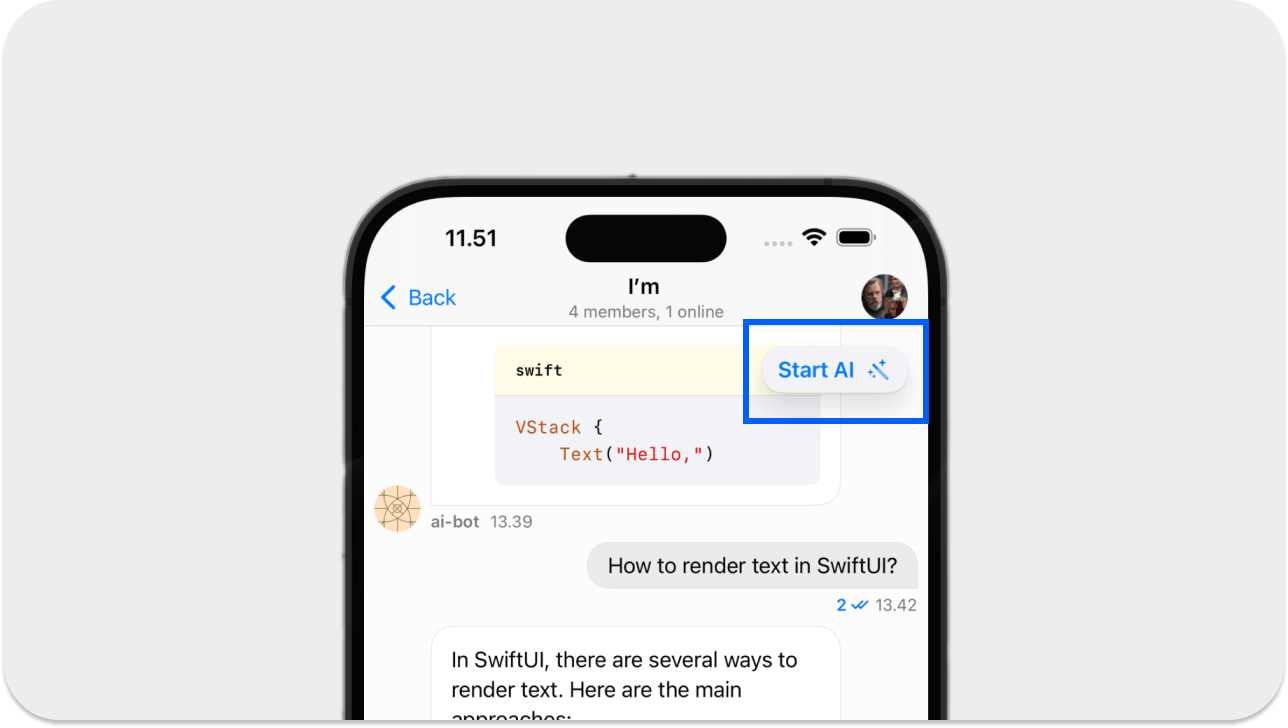
The AI assistant will have three main UIs, an output text field, a typing indicator to demonstrate its thinking, and a button to handle conversations with the AI agent. The chat SDK's built-in incoming message component will display the AI output text field. Create the following two files in your project and copy and paste their corresponding content for the typing indicator and the start/stop AI button shown in the image above.
Configure the SwiftUI App With the SDK Components
In one of the previous sections, we displayed the chat channel list screen in the main SwiftUI project file StreamChatAIAssistantApp.swift. This file is the entry point of the SwiftUI app. To connect the AI assistant's ready-made UI components with the SwiftUI app, you should substitute the content of StreamChatAIAssistantApp.swift with this sample code.
12345678910111213141516171819202122232425262728293031323334353637383940414243444546474849505152535455565758596061626364656667import SwiftUI
import StreamChat
import StreamChatSwiftUI

@main
struct StreamChatAIAssistantApp: App {

    @State var streamChat: StreamChat
    @State var typingIndicatorHandler: TypingIndicatorHandler
    @StateObject var channelListViewModel: ChatChannelListViewModel

    var chatClient: ChatClient = {
        var config = ChatClientConfig(apiKey: .init("zcgvnykxsfm8"))
        config.isLocalStorageEnabled = true
        config.applicationGroupIdentifier = "group.amosgyamfi.StreamChatAIAssistant"

        let client = ChatClient(config: config)
        return client
    }()

    init() {
        let utils = Utils(
            messageTypeResolver: CustomMessageResolver(),
            messageListConfig: .init(
                messageDisplayOptions: .init(spacerWidth: { _ in return 60 }),
                skipEditedMessageLabel: { message in
                    message.extraData["ai_generated"]?.boolValue == true
                }
            )
        )
        _streamChat = State(initialValue: StreamChat(chatClient: chatClient, utils: utils))
        typingIndicatorHandler = TypingIndicatorHandler()
        _channelListViewModel = StateObject(wrappedValue: ViewModelsFactory.makeChannelListViewModel())

        chatClient.connectUser(
            userInfo: UserInfo(
               id: "anakin_skywalker",
               imageURL: URL(string: "https://vignette.wikia.nocookie.net/starwars/images/6/6f/Anakin_Skywalker_RotS.png")
            ),
            token: try! Token(rawValue: "eyJhbGciOiJIUzI1NiIsInR5cCI6IkpXVCJ9.eyJ1c2VyX2lkIjoiYW5ha2luX3NreXdhbGtlciJ9.ZwCV1qPrSAsie7-0n61JQrSEDbp6fcMgVh4V2CB0kM8")
        )
    }

    var body: some Scene {
        WindowGroup {
            ChatChannelListView(
                viewFactory: AIViewFactory(typingIndicatorHandler: typingIndicatorHandler),
                viewModel: channelListViewModel
            )
            .onChange(of: channelListViewModel.selectedChannel) { oldValue, newValue in
                typingIndicatorHandler.channelId = newValue?.channel.cid
                if newValue == nil, let channelId = oldValue?.channel.cid.id {
                    Task {
                        try await StreamAIChatService.shared.stopAgent(channelId: channelId)
                    }
                }
            }
        }
    }
}

class CustomMessageResolver: MessageTypeResolving {

    func hasCustomAttachment(message: ChatMessage) -> Bool {
        message.extraData["ai_generated"] == true
    }
}
Run the iOS AI Assistant
At this point, we have successfully integrated the AI assistant with Stream Chat to help answer user prompts accurately. When you run the app, you should be able to send prompts to the AI agent to answer general questions, solve maths, science, and coding problems, and get real-time information, such as the current weather in a specified location.
Note: The above demo app preview is sped up at 4x speed.
Using a Fast LLM Inference for Our AI Assistant
We have now built a reliable and fully functional AI assistant that can be used in many cases. However, to deploy the AI chatbot we have so far in enterprise-grade applications, we should consider the following essential factors and empower the underlying model (OpenAI, Anthropic, or DeepSeek) to give instant responses.
- The model's output generation speed: Thus, we should aim for a low-latency answer generation to user queries. The example assistant we built in this tutorial generates answers at normal speed and latency. However, we can use LLM inference providers such as Groq and Cerebras to maintain the output of the LLM used for the AI assistant at low latency.
- Fine-tune and use open-source models: On these high-speed inference platforms, we can train open-source models like Llama 3 or DeepSeek R1 for specific chatbot use cases, such as marketplace, on-demand, and gaming.
- Train your foundation model for the AI assistant. Using Cerebras or Groq, for example, we can train an AI agent solely for a telemedicine use case to give accurate and instant answers to Doctors.
The following two examples examine ways to run DeepSeek R1 models with and without inference engines. Although these two sections are unrelated to the AI assistant we just built, they show how useful it is to utilize the inference platforms to enhance the assistant's capabilities should we deploy it in production.
Cerebras Example: Getting Fast LLM Responses
You can use Cerebras to bring instant inference to your AI applications. It is an excellent choice if you want to build complex AI solutions, like a multilingual chatbot for healthcare. In the preview below, we run DeepSeek R1 Distill (Llama 8B) in LM Studio. Although this model is much smaller than the 70B version, it takes about 3 - 4 minutes to generate prompt responses.
As the above example demonstrates, there is nothing wrong with waiting a few minutes to get results from a reasoning model. However, in many circumstances, you may want to equip your AI application with a reasoning model, and as a requirement, you may wish to have instant responses. Like in the example below, we run the DeepSeek-R1-Distill-Llama-7B, a much larger model on Cerebras with an instant output generation.
When this article was written, the Cerebras API was unavailable to developers. However, you can test the example above on its website.
Groq Example: Getting Fast LLM Responses
Like Cerebras, Groq provides developers with fast AI inference. Using the Groq API, you can start building your AI applications today with high-speed response generation. Like the previous LMStudio DeepSeek R1 example, the preview below illustrates running DeepSeek R1 with the companion iOS app. The output generation takes several minutes to obtain the final results because of the intermediate reasoning steps and alternatives required for computing the final answer.
A low-latency but larger version of DeepSeek R1, deepseek-r1-distill-llama-70b running, using the Groq playground, is demonstrated below.
Fast AI Inference Platforms: Use Cases

In the above two examples from the previous section, you noticed that running a large thinking model using Cerebras or Groq skips the reasoning steps to present the final result instantly and avoids waiting for minutes. Here are a few use cases of using a fast inference provider for AI applications.
- Instant reasoning capabilities: These systems empower long reasoning models like DeepSeek R1 with immediate thinking capabilities. They help remove the waiting time for long reasoning steps when generating responses.
- Large-scale and enterprise-setting: These platforms help manage large-demand applications, ensuring scalability and efficiency.
- Real-time accessible search: You can build AI applications to instantly retrieve and present real-time information using the platforms.
- Fine-tune open-source models for specific tasks: As seen in the image above, these fast inference hosting services support many open-source large and small language models you can fine-tune to solve unique problems in medicine, education, finance, etc.
The Future of Instant Response AI Apps
This tutorial walked you through creating an iOS AI assistant and the possibility of extending it further to produce instant responses. You discovered how to build an AI assistant for other ecosystems such as Flutter, React, React Native, Android, and NodeJS. [Download]() the demo SwiftUI app on GitHub, run it and test the AI chat feature for questions about daily life and work-related ones like coding, science, and maths. You can use inference engines like Cerebras and Groq to provide quick responses to an enterprise-grade application. When writing this article, Cerebras and Groq are the leading fast LLM inference providers. Since the AI field is changing rapidly, new players for AI inference will emerge.